Search icon
Arrow left icon
All Products
Best Sellers
New Releases
Books
Videos
Audiobooks
Learning Hub
Newsletters
Free Learning
Arrow right icon
JIRA 7 Essentials - Fourth Edition

You're reading from  JIRA 7 Essentials - Fourth Edition

Product type Book
Published in Nov 2016
Publisher Packt
ISBN-13 9781786462510
Pages 398 pages
Edition 4th Edition
Languages
Author (1):
Patrick Li Patrick Li
Profile icon Patrick Li

Table of Contents (17) Chapters

JIRA 7 Essentials - Fourth Edition
Credits
About the Author
About the Reviewer
www.PacktPub.com
Preface
1. Getting Started with JIRA 2. Using JIRA for Business Projects 3. Using JIRA for Agile Projects 4. Issue Management 5. Field Management 6. Screen Management 7. Workflow and Business Process 8. E-mails and Notifications 9. Securing JIRA 10. Searching, Reporting, and Analysis 11. JIRA Service Desk

Chapter 4. Issue Management

In the previous chapter, you saw that JIRA is a very flexible and versatile tool that can be used in different organizations for different purposes. A software development organization will use JIRA to manage its software development lifecycle and for bug tracking, while a customer services organization may choose to use JIRA to track and log customer complaints and suggestions. For these reasons, issues in JIRA can represent anything that is applicable to real-world scenarios. Generally speaking, an issue in JIRA often represents a unit of work that can be acted upon by one or more people.

In this chapter, we will explore the basic and advanced features offered by JIRA for you to manage issues. By the end of this chapter, you will have learned the following:

  • Issues and what they are in JIRA

  • Creating, editing, and deleting issues

  • Moving issues between projects

  • Expressing your interest in issues through voting and watching

  • Advanced issue operations, including uploading...

Understanding issues


Depending on how you are using JIRA, an issue can represent different things and can even look very different in the user interface. For example, in JIRA Core, an issue will represent a task and will look like this:

While in JIRA Software, if you are using the agile board, an issue can represent a story, or epic, and will resemble a card:

Despite all the differences in what an issue can represent and how it might look, there are a number of key aspects that are common for all issues in JIRA, as follows:

  • An issue must belong to a project.

  • It must have a type, otherwise known as an issue type, which indicates what the issue is representing.

  • It must have a summary. The summary acts like a one-line description of what the issue is about.

  • It must have a status. A status indicates where along the workflow the issue is at a given time. We will discuss workflows in Chapter 7Workflows and Business Processes.

So in summary, an issue in JIRA represents a unit of work that can be...

JIRA issue summary


As we have discussed, an issue in JIRA can be anything in the real world to represent a unit of work or a task to be completed. In this section, we will look at how JIRA presents an issue in the user interface for JIRA Core and JIRA Software. We will cover JIRA Service Desk in Chapter 11JIRA Service Desk, as it has a different interface.

Let's first take a look at an issue in JIRA Core. The following screenshot shows a typical example of an issue and breaks it down into more digestible sections, followed by an explanation of each of the highlighted sections in a table. This view is often called the issue summary or the view issue page:

These sections are described in the following table:

Working with issues


As we saw, issues are the center of JIRA. In the following sections, we will look at what you, as a user, can do with issues. Note that each of the actions will require you to have specific permissions, which we will cover in Chapter 9Securing JIRA.

Creating an issue

When creating a new issue, you will need to fill in a number of fields. Some fields are mandatory, such as the issue's summary and type, while others are optional, such as the issue's description. We will discuss fields in more details in the next chapter.

There are several ways in which you can create a new issue in JIRA. You can choose any of the following options:

  • Click on the Create button at the top of the screen

  • Press  C on your keyboard

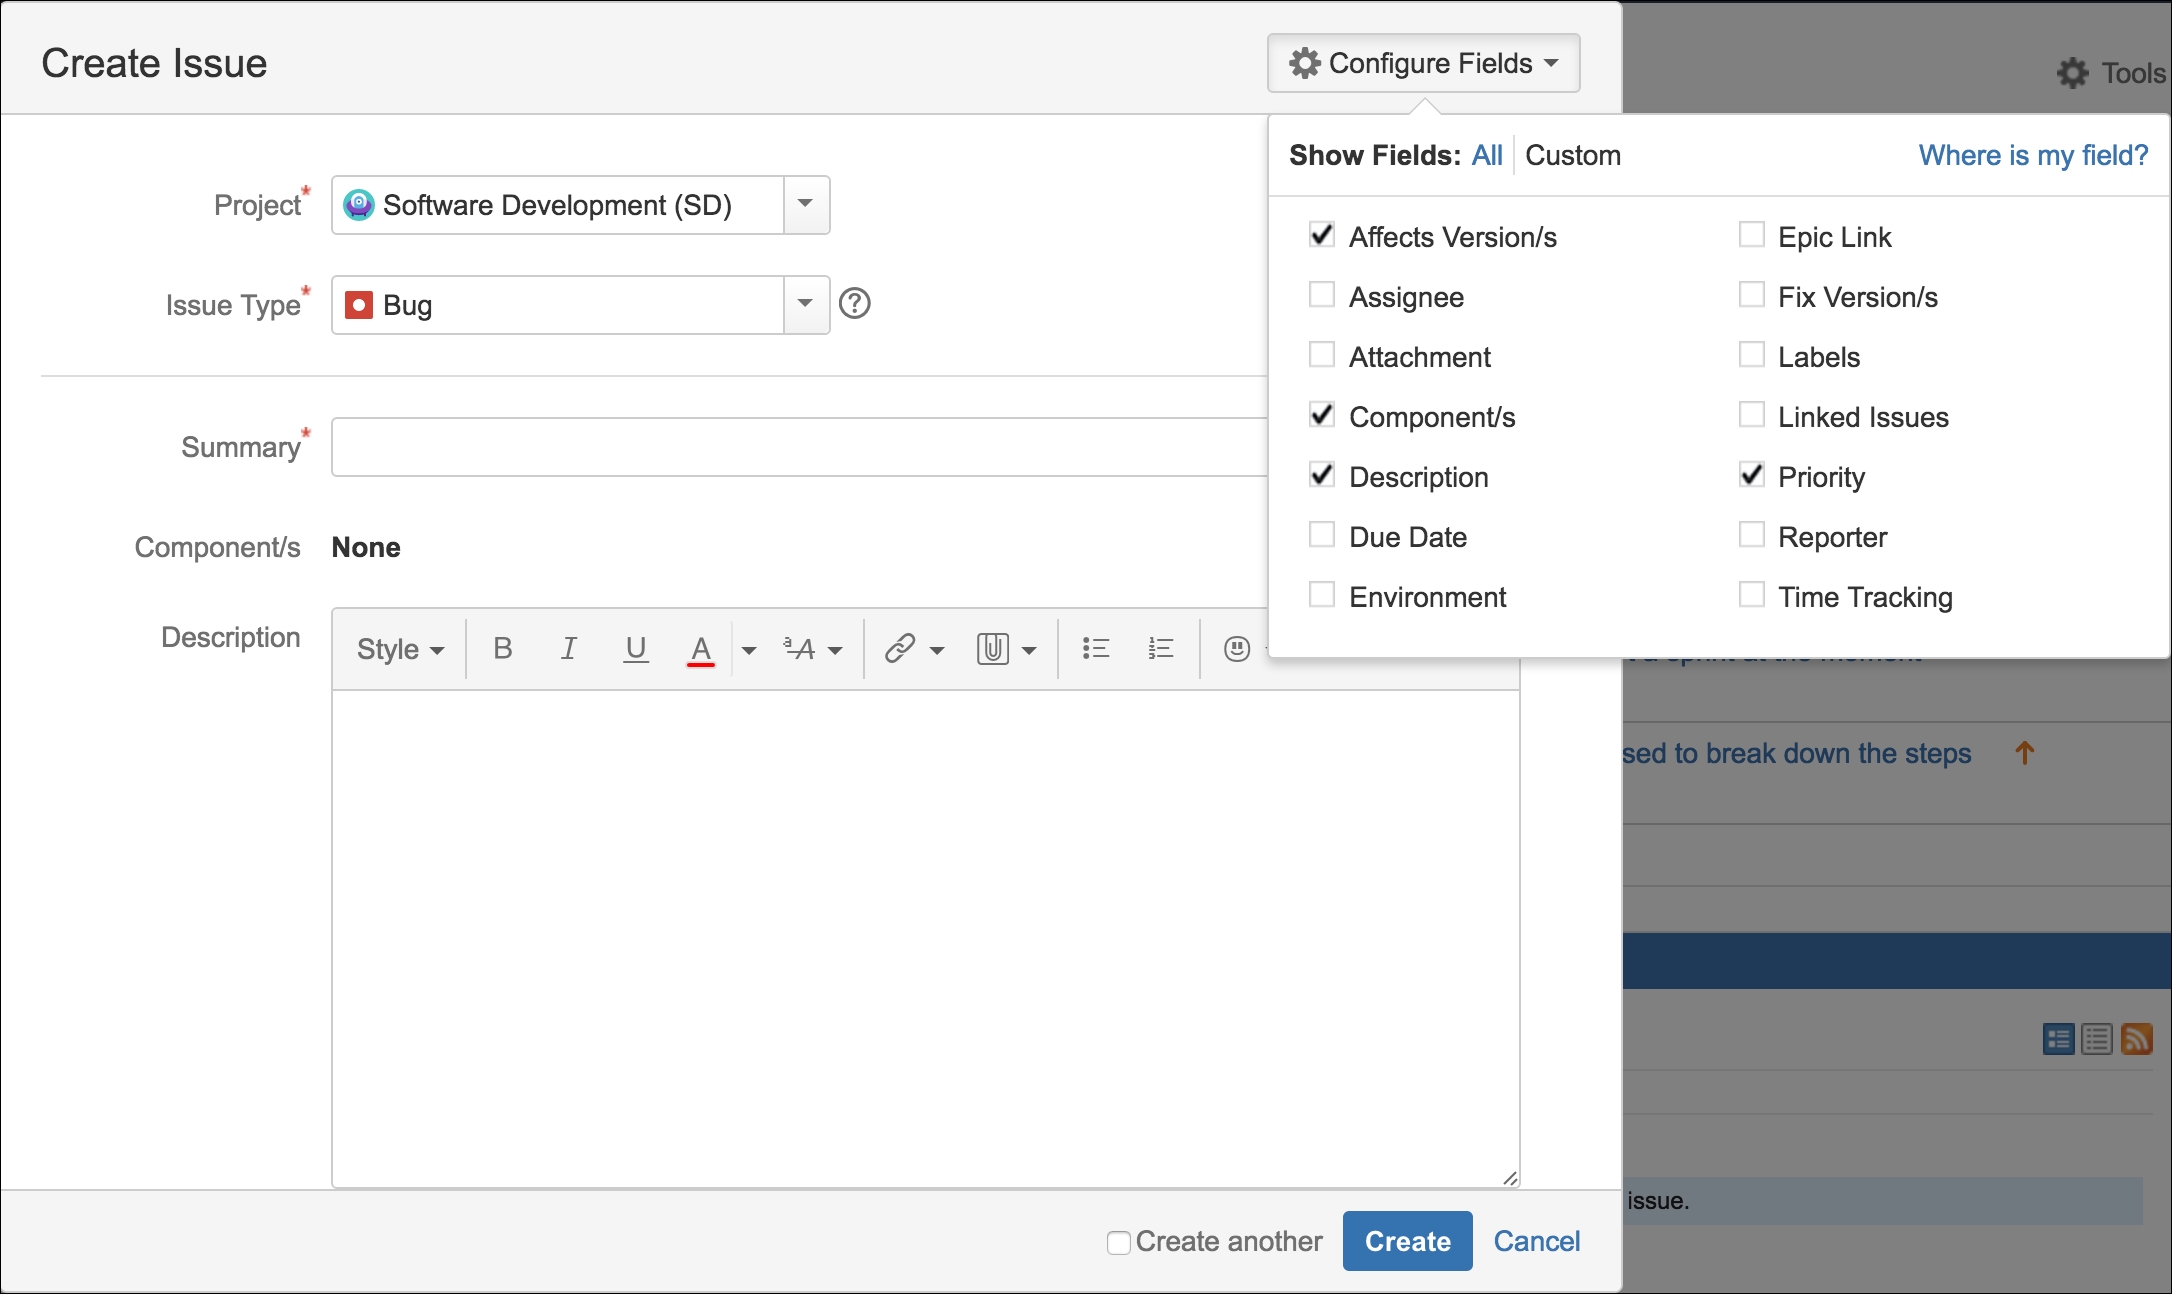
This will bring up the Create Issue dialog box, as shown in the following screenshot:

As you can see, there are quite a few fields, and the required fields will have a red asterisk (*) mark next to their names.

The administrator configures what fields will be part of the...

Issue linking


JIRA allows you to create custom hyperlinks for issues. This allows you to provide more information about the issue. There are two types of links you can create: linking to other issues in JIRA or linking to any arbitrary resources on the Web, such as a web page.

Linking issues with other issues

Issues are often related to other issues in some way. For example, issue A might be blocking issue B, or issue C might be a duplicate of issue D. You can add descriptions to the issue to capture this information, or delete one of the issues in the duplication case, but with this approach, it is hard to keep a track of all these relationships. Luckily, JIRA provides an elegant solution for this, with the standard issue link feature.

The standard issue link lets you link an issue with one or more other issues in the same JIRA instance. So, you can link two issues from different projects together (if you have access to both the projects). Linking issues in this way is very simple; all you...

Issue cloning


When you need to create a new issue and you already have a baseline issue, JIRA allows you to quickly create it with the data based on your existing issues by cloning the original one. Cloning an issue allows you to quickly create a new one with most of its fields populated. For example, you might have two software products with the same bug. After creating a bug report in one project, you can simply clone it for the other project.

A cloned issue will have all the fields copied from the original issue; however, it is a separate entity nonetheless. Further actions performed on either of the two issues will not affect the other.

When an issue is being cloned, a Clone link is automatically created between the two issues, establishing a relationship.

Cloning an issue in JIRA is simple and straightforward. All you have to do is specify a new summary (or accept the default summary with the text CLONE at the front) for the cloned issue:

  1. Browse to the issue you wish to clone.

  2. Select Clone...

Time tracking


Since issues often represent a single unit of work that can be worked on, it is logical for users to log the time they have spent working on it. You can specify an estimated effort required to complete an issue, and JIRA will be able to help you track the progress.

JIRA displays the time tracking information of an issue in the Time Tracking panel on the right-hand side, as shown in the following screenshot:

  • Estimated: This represents the original estimated effort required to complete the issue, for example, the estimated time required to fix a bug by a developer.

  • Remaining: This represents the remaining time for the issue to be completed. It is calculated automatically by JIRA based on the original estimate and total time logged by users. However, the user logging work on the issue, as described in the following section, can also override this value.

  • Logged: This represents the total time spent on the issue so far.

Specifying original estimates

Original estimate represents...

Issues and comments


JIRA lets users create comments on issues. As we have already seen, you will be able to create comments when assigning an issue to a different user. This is a very useful feature that allows multiple users to collaborate to work on the same issue and share information. For example, the support staff (issue assignee) may request more clarification from the business user (issue reporter) by adding a comment to the issue. When combined with JIRA's built-in notification system, automatic e-mail notifications will be sent to the issue's reporter, assignee, and any of the other users watching the issue. Notifications will be covered in Chapter 8E-mails and Notifications.

Adding comments

By default, all logged-in users will be able to add comments to issues they can access. Perform the following steps to add a comment to an issue:

  1. Browse to the issue you wish to add a comment to.

  2. Click on the Comment button or press  M on your keyboard.

  3. Type a comment in to the text box. You can...

Attachments


As we have seen so far, JIRA uses fields such as Summary and Description to capture data. This works for most cases, but when you have complex data such as application log files or screenshots, this becomes insufficient. This is where attachments come in. JIRA allows you to attach files from your local computer or a screenshot you have taken.

Attaching files

The easiest way to attach a file to a JIRA issue is via the drag and drop action:

  1. Browse to the issue you wish to attach a file to.

  2. Drag and drop the files you want to attach in to the browser. You will see an outline indicating where you can drop the file to attach it to the issue, as shown in the following screenshot:

Drag and drop is the easiest way to attach files. But if for some reason drag and drop does not work, you can also manually select the file and attach it:

  1. Browse to the issue you wish to attach a file to.

  2. Select the Attach files option from the More menu.

  3. Select and attach the files you want to attach from the file...

Issue types and subtasks


As seen earlier, issues in JIRA can represent many things ranging from software development tasks to project management milestones. Issue type is what differentiates one kind of issue from another.

Each issue has a type (therefore, the name issue type), which is represented by the issue type field. This lets you know what type of issue it is and also helps you determine many other aspects of it, such as which fields will be displayed for this issue.

The default issue types are great for simple software development projects, but they do not necessarily meet the needs of others. Since it is impossible to create a system that can address everyone's needs, JIRA lets you create your own issue types and assigns them to projects. For example, for a help desk project, you might want to create a custom issue type called ticket. You can create this custom issue type and assign it to the Help Desk project and users will be able to log tickets, instead of bugs, in the system.

Issue...

Subtasks


JIRA allows only one person (assignee) to work on one issue at a time. This design ensures that an issue is a single unit of work that can be tracked against one person. However, in the real world, we often find ourselves in situations where we need to have multiple people working on the same issue. This may be caused by a poor breakdown of tasks or simply because of the nature of the task at hand. Whatever the reason, JIRA provides a mechanism to address this problem through subtasks.

Subtasks are similar to issues in many ways, and as a matter of fact, they are a special kind of issue. They must have a parent issue, and their issue types are flagged as subtask issue types. You can say that all subtasks are issues, but not all issues are subtasks.

For every issue, you can have one or more subtasks that can be assigned and tracked separately from another. Subtasks cannot have other subtasks. JIRA allows only one level of subtasks.

Creating subtasks

Since subtasks belong to an issue...

Issue type schemes


Issue type schemes are templates or collections of issue types that can be applied to projects. As shown in the following screenshot, JIRA comes with Default Issue Type Scheme, which is applied to all projects that do not have specific issue type schemes applied. When you create a new project, a new issue type scheme is created for you based on the project template you have selected. The new scheme will also have issue types prepopulated based on the template. As we can see in the following screenshot, we have two issue type schemes, TP: Project Management Issue Type Scheme for Test Project and SD: Software Development Issue Type Scheme for the Software Development project:

When you create your own issue types, in order to make them available, you need to add them to the issue type scheme used by your project.

Adding issue types to an issue type scheme

Perform the following steps to create a new issue type scheme:

  1. Browse to the administration console.

  2. Select the Issues tab...

Issue priorities


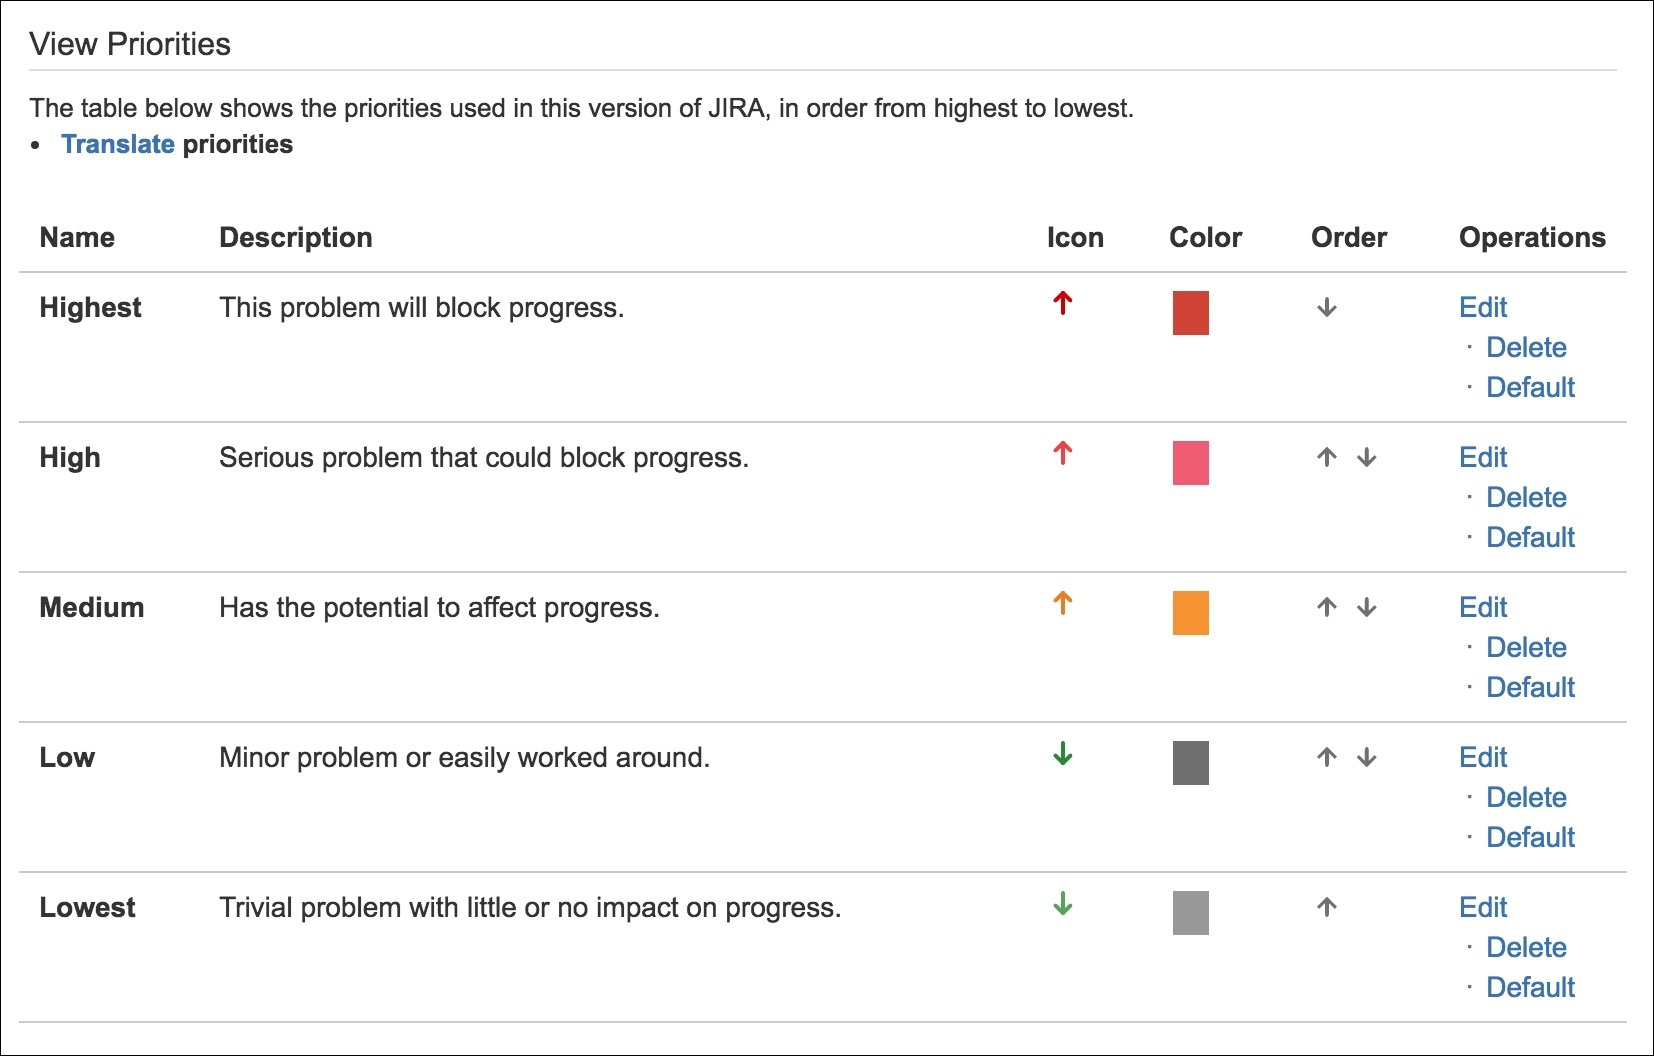
Priorities help users to set the importance of issues. Users can first assign priority values to issues and later use them to sort the list of issues they have to work on, thus helping the team decide which issues to focus on first. JIRA comes with five levels of priorities out of the box, as shown in the following screenshot:

You can customize this list by creating your own priorities. To create new priorities, follow these steps:

  1. Browse to the administration console.

  2. Select the Issues tab and then the Priorities option.

  3. Enter a name and description for the new priority.

  4. Click on the select image link to choose an icon for the priority.

  5. Specify a color for the priority. You can either type in the HTML color hex code directly or use the color picker to help you select the color you want. The color chosen here will be used when icon images cannot be displayed, such as when you export issues to a spreadsheet.

  6. Click on the Add button.

Note

Priorities are global. This means that all...

The HR project


In this exercise, we will continue our setup for the project we have created in the previous chapter. We will add the following configurations to our project:

  • A set of new issue types that are specific to our HR project

  • Add our new issue types to the issue type scheme to make them available

Adding new issue types

Since our project is for the human resources team, we need to create a few custom issue types to augment the default ones that come with JIRA. For this exercise, we will create two new issue types, New Employee and Termination.

The first step to set up an issue type association is to create the two issue types we need, incident and ticket:

  1. Browse to the Issue Types page.

  2. Click on the Add Issue Type button.

  3. Type New Employee in the Name field.

  4. Click on Add button to create the new issue type.

You should now see the new issue type in the table. Now, let's add the Termination issue type:

  1. Click on the Add Issue Type button again.

  2. Type Termination in the Name field.

  3. Click on Add to...

Summary


In this chapter, we looked at what issues are in JIRA and explored the basic operations of creating, editing, and deleting issues. We also looked at the advanced operations offered by JIRA to enhance how you can manipulate and use issues, such as adding attachments, creating sub-tasks, and linking multiple issues.

In the next chapter, we will look at fields and how we can create our own custom fields to capture additional information from users.

lock icon The rest of the chapter is locked
You have been reading a chapter from
JIRA 7 Essentials - Fourth Edition
Published in: Nov 2016 Publisher: Packt ISBN-13: 9781786462510
Register for a free Packt account to unlock a world of extra content!
A free Packt account unlocks extra newsletters, articles, discounted offers, and much more. Start advancing your knowledge today.
Unlock this book and the full library FREE for 7 days
Get unlimited access to 7000+ expert-authored eBooks and videos courses covering every tech area you can think of
Renews at $15.99/month. Cancel anytime}

Section

Description

project/issue key

This shows the project the issue belongs to. The issue key is the unique identifier of the current issue. This section acts as a breadcrumb for easy navigation.

issue summary

This is a brief summary of the issue.

issue export options...