


Building a functional TV
In this recipe, we will create a large flat-screen TV model that can be mounted on any flat surface. After building the TV model as a static prop, we will insert a script into the screen that will allow us to insert our own image IDs. These images will display on the TV and change every few seconds. To do so, we will learn how to modify the script to play to the parameters that we will set.
How to do it…
We will begin by scaling a square part to the size and shape of our TV and attach a wall mount to the back of it. Next, we will create a border around the TV for the screen to sit in. We will create a neon screen, and then adjust the bloom intensity of the material. To finish, we will color the TV and then insert a script, which we will customize with our own values. Let’s begin:
- To begin this recipe, insert a square part, then scale it
11,6,0.5studs. - Add a smaller square part into the center of the back face. This part will attach to the walls so that the TV can hang.
- Next, create a border around the edges of the TV using square parts roughly
0.75studs thick. The border should be flush at the back and overhang the front of the TV by0.25studs:
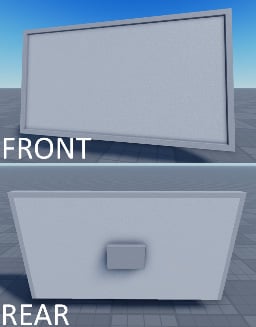
Figure 1.13: Front and back view of TV
- Duplicate the rectangular body part of the TV and move it forward
0.1studs to create the screen of the TV. - Change the material of the part we just placed to Neon.
- Rename the neon screen part
Screen. - Select the neon screen, open the color wheel, and select a color shade that is not overly intense, such as (
159,158,161). You can see the difference in bloom in Figure 1.14:
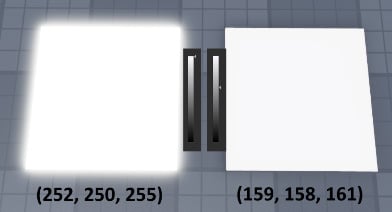
Figure 1.14: Front and back view of TV
- Next, add two small square or cylinder neon parts to the bottom-right corner of the front of the TV. These represent the power buttons.
- Select all the parts and group them into a model.
- Rename your model
Prop_Tv. - Now, color the parts within the TV model to (
35,35,28).You now have a finished static TV prop. If you would like to add functionality to your TV, continue to step 12.
- Insert into the screen part. The script is located inside the
Chapter1folder. - Double-click inside of the screen part to open Script Editor.
- Paste in your own image IDs in the place of
999999, such as9900113573,13572778873, or13544130736. imageID is a string of numbers found in the Texture box if you upload the image onto a decal.To learn how to find an image ID, check the There’s more… section at the end of this recipe.
- Modify the number inside the parentheses of
wait(10.0). The number represents the amount of time it takes to change slides. You can now exit the script. - Lastly, select all of the parts in the TV model and anchor them.
This completes the recipe on how to make both a static and functioning TV:
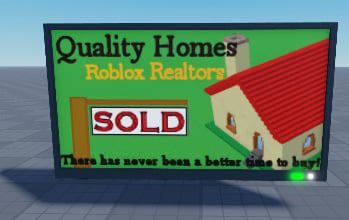
Figure 1.15: Completed functioning TV
There’s more…
To find an image ID, navigate to Roblox Studio Toolbox and find the Free Image search option. Insert an image onto the face of a part, then double-click the decal to view its properties in the Properties menu. Copy the numbers at the end of the Texture link.