Reader small image

You're reading from  The Music Producer's Creative Guide to Ableton Live 11

Product typeBook
Published inMar 2023
PublisherPackt
ISBN-139781801817639
Edition1st Edition
Right arrow
Author (1)
Anna Lakatos
Anna Lakatos
author image
Anna Lakatos

Anna Lakatos is a UK based Ableton Certified Trainer, Producer, Audio Engineer, and Educator. She is also a University Lecturer, Ableton Live Module Leader and Course Developer; teaching on degree programmes such as  BA(Hons) Music Production and Sound Engineering, Music Production and DJ Practice. She has featured in popular music magazines, has facilitated workshops, masterclasses, webinars as well as created content for companies like Ableton, Native Instruments, ADAM Audio, Future Music Magazine and more.
Read more about Anna Lakatos

Right arrow

Utilizing Arrangement and Organization Techniques in our Ableton Live Project

In the previous chapter, we learned how to utilize audio-to-MIDI conversion, convert MIDI to audio, slice audio to MIDI, and discovered how to use the Simpler device. All these features are amazing for sparking your creativity and helping you to get started.

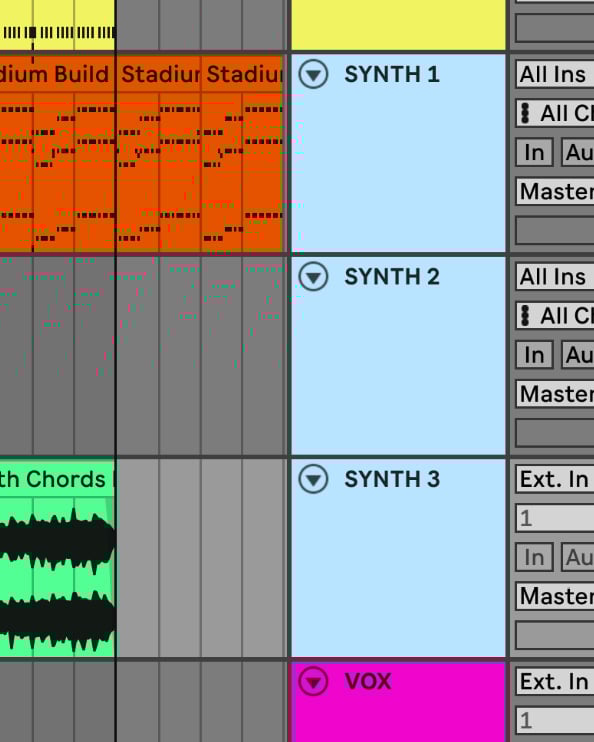
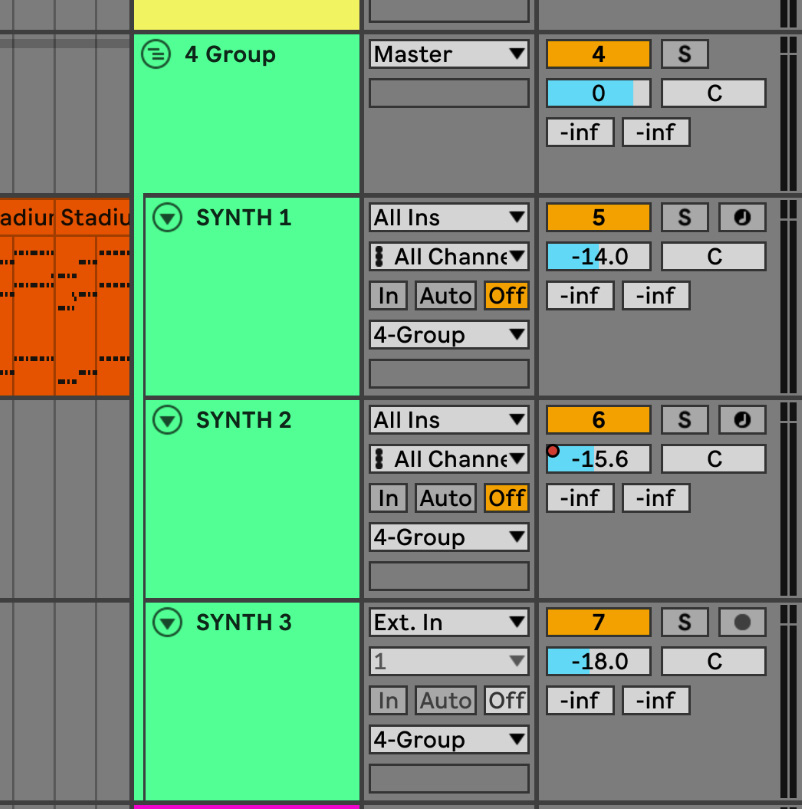
In this chapter, we will look at some crucial workflow techniques for arranging in Live. We will explore how we can move clips and scenes from the Session View into the Arrangement View and how we can utilize Locators and organize our session for better navigation.

As an active producer, you probably already know the building blocks of an arrangement for certain genres and the importance of a good arrangement.

Even if the produced parts and all the musical ideas are awesome, they will still need a properly executed arrangement in order to tell the story and take the listener on a journey with your music.

A good arrangement will have plenty...

Technical requirements

In order to follow along with this chapter, you will need the following:

  • A computer with at least 8 GB of RAM and an Intel Core i5 processor
  • A pair of headphones
  • A copy of Live 11 Suite
  • The Chapter 10 Ableton Live project

Preparing to arrange – session organization techniques

It is very important to be able to navigate the project to organize it.

You can use the Chapter 10 project to follow along with me:

  1. Open the project.

You will find a bunch of tracks with clips organized into scenes, which will form sections of our arrangement (Figure 10.1).

(You can recap how to navigate and organize clips and scenes in Session View in Chapter 1, Taking a Quick Tour of Ableton Live 11.)

Figure 10.1 – The Chapter 10 project

Figure 10.1 – The Chapter 10 project

  1. Let’s make sure that all the tracks are renamed to our taste, unused tracks are deleted, tracks and clips are color-coded, and similar tracks are moved to be next to each other (for example, the three synth tracks).
  2. Start with renaming and recoloring the tracks. To do this, Ctrl + click (right-click on Windows)on the track title bar and choose the appropriate options from the contextual menu (Figure 10.2).
...

From Session View to the Arrangement View

We already learned that we can copy-paste clips from the Session View to the Arrangement View.

But what is actually more exciting is that we can record the arrangement on the fly!

This is why organizing the Session View properly is so important, as it means we can just press record and launch the scenes and record our first sketch for the arrangement.

First, you shouldn’t feel the pressure to compose an entire track in the Session View, record it, and be done. It is a common practice to lay down the main ideas (a couple of tracks), the backbone of a track, quickly in the Session View, then move into the Arrangement View to finish the composition. You can still add additional instruments, edits, and transition sounds, as naturally, having the track idea laid down on the timeline will give you new ideas on how to proceed further with your track until it is finished.

To record your arrangement on the fly, do the following:

...

Editing your arrangement

We already looked at how we can trim, split, fade, move, duplicate, and consolidate clips in the Arrangement View in Chapter 3, Editing Audio and Warping. Most of these also apply to MIDI clips.

In this section, we will explore the Cut/Copy, Paste, and Duplicate Time commands and Insert Silence!

Cut, Copy, Paste, and Duplicate Time commands

Let’s start with the Cut, Copy, Paste, and Duplicate Time commands:

  1. The first thing that needs to be done is to make a selection in the timeline. It can be a bunch of clips, or just one, as we will be working with the chunk of time that the clip(s) occupy (not just the one clip) and affect the overall arrangement!
  2. Once the clip(s) are selected, as in my example (Figure 10.10), we can visit the Edit menu (Figure 10.11).
Figure 10.10 – Clip/Time is selected to perform the Time command

Figure 10.10 – Clip/Time is selected to perform the Time command

Figure 10.11 – The Edit menu

Figure 10.11 – The Edit menu

  1. In...

Locators and Info Text

Locators in Live are not just useful to help you navigate your arrangement better, but they are also equipped with launch buttons that respond to the Global Quantization settings. This can be super useful to test out how your arrangement would sound if you changed the order of some of your sections by having the sections launched by the locator’s launch button on time/in sync with your song tempo, thanks to the Global Quantization settings.

Let’s have a look at how to set them up:

  1. The locators will appear in the Scrub Area.
Figure 10.17 – Locators in the Scrub Area

Figure 10.17 – Locators in the Scrub Area

  1. To set one up, you can Ctrl + click (right-click on Windows) where you’d like to set the locator in the Scrub Area and choose Add Locator (Figure 10.18).
  2. Alternatively, you can use the Set button. This can also work during playback.
Figure 10.18 – Setting up locators

Figure 10.18 – Setting up locators

  1. In order...

Track grouping

Track grouping is important for organizing your tracks for a more fluid arrangement, but it is also super important for mixing purposes as once tracks are grouped they can all be processed together. This is common practice to group tracks with similar dynamic and tonal characteristics.

Let’s see how to group tracks:

  1. Select multiple tracks while holding down the Shift key. In this example, I am looking to group all the synth tracks (Figure 10.21).
Figure 10.21 – Selected tracks for grouping

Figure 10.21 – Selected tracks for grouping

  1. Now you can Ctrl + click (right-click on Windows) on one of the selected tracks and choose Group Tracks from the contextual menu or use Cmd + G (Ctrl + G for Windows).
  2. Now, you will see the tracks are grouped. You can solo and mute all the grouped tracks and also adjust sends, volume, and panning.
Figure 10.22 – Grouped tracks

Figure 10.22 – Grouped tracks

  1. You can, of course, rename and recolor this...

Summary

And with that, we have arrived at the end of this chapter.

We looked at how we can prepare our project for arrangement, and how we can record our clips and scenes on the fly from the Session View into the Arrangement View.

We also discovered some useful Time commands to edit our arrangement and looked at how to use locators and group tracks together, which will not only help us with arranging and session management but also give us some useful possibilities for mixing.

In the next chapter, we will explore how we can use automation and modulation to enhance our arrangement and musical parts.

lock icon
The rest of the chapter is locked
You have been reading a chapter from
The Music Producer's Creative Guide to Ableton Live 11
Published in: Mar 2023Publisher: PacktISBN-13: 9781801817639
Register for a free Packt account to unlock a world of extra content!
A free Packt account unlocks extra newsletters, articles, discounted offers, and much more. Start advancing your knowledge today.
undefined
Unlock this book and the full library FREE for 7 days
Get unlimited access to 7000+ expert-authored eBooks and videos courses covering every tech area you can think of
Renews at $15.99/month. Cancel anytime

Author (1)

author image
Anna Lakatos

Anna Lakatos is a UK based Ableton Certified Trainer, Producer, Audio Engineer, and Educator. She is also a University Lecturer, Ableton Live Module Leader and Course Developer; teaching on degree programmes such as  BA(Hons) Music Production and Sound Engineering, Music Production and DJ Practice. She has featured in popular music magazines, has facilitated workshops, masterclasses, webinars as well as created content for companies like Ableton, Native Instruments, ADAM Audio, Future Music Magazine and more.
Read more about Anna Lakatos