Reader small image

You're reading from  The Music Producer's Creative Guide to Ableton Live 11

Product typeBook
Published inMar 2023
PublisherPackt
ISBN-139781801817639
Edition1st Edition
Right arrow
Author (1)
Anna Lakatos
Anna Lakatos
author image
Anna Lakatos

Anna Lakatos is a UK based Ableton Certified Trainer, Producer, Audio Engineer, and Educator. She is also a University Lecturer, Ableton Live Module Leader and Course Developer; teaching on degree programmes such as  BA(Hons) Music Production and Sound Engineering, Music Production and DJ Practice. She has featured in popular music magazines, has facilitated workshops, masterclasses, webinars as well as created content for companies like Ableton, Native Instruments, ADAM Audio, Future Music Magazine and more.
Read more about Anna Lakatos

Right arrow

Recording Audio in Ableton Live 11

Recording audio is a crucial part of music production. We all know the importance of capturing the magic of musical performances, which could be vocals or any instruments being played by a human that will translate a lot of emotions and energy and add a lot to your track. However, there is more to it than just that.

We can also approach this with a more creative mindset and think about sampling old records, recording Foley sounds and working these into our music, or recording analog synthesizers.

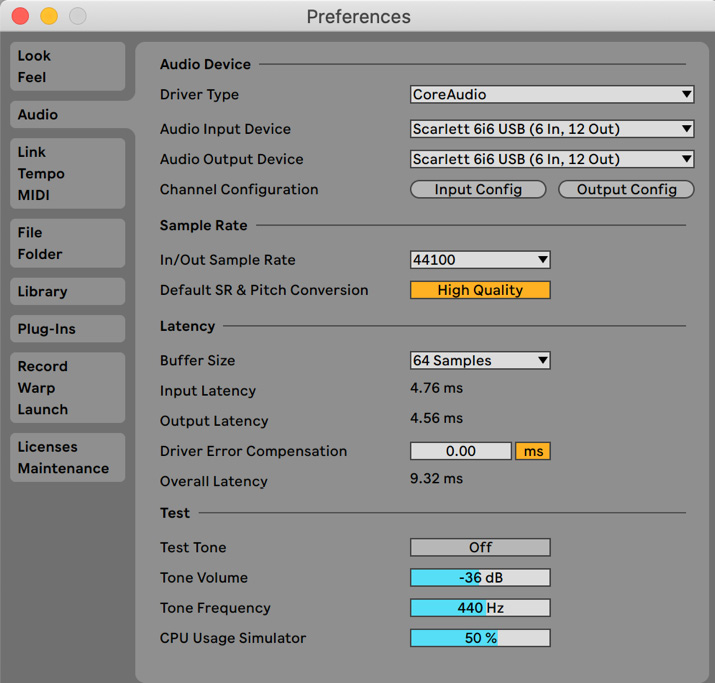
It is crucial that the recorded material is captured appropriately and of great quality. Therefore, this chapter will be important for gaining an understanding of the technical aspects of recording in Live, as well as developing a seamless workflow.

By the end of this chapter, you will be able to set up Live to record audio. You will also develop an understanding of how to record in both Session View and Arrangement View.

Furthermore, the Live...

Technical requirements

In order to follow along with this chapter, you will need the following:

  • A computer with at least 8 GB of RAM and an Intel Core i5 processor
  • A pair of headphones
  • A copy of Live 11 Suite
  • An audio interface
  • A microphone
  • An instrument or your voice
  • Chapter 2 Ableton Live project

Setting up Live for recording

Let’s head to where we need to start:

  1. After opening Live, navigate to Live | Preferences (Options | Preferences on Windows)or use the Cmd + , (Ctrl + , for Windows) shortcut.
  2. Choose the Audio tab:
Figure 2.1 – The Audio tab in Preferences

Figure 2.1 – The Audio tab in Preferences

Now, you should see the audio preferences (see Figure 2.1):

  • For Audio Input Device, you should choose where your microphone is connected to.

This could be your audio interface where you plugged your microphone in with an XLR cable, or if you are recording an instrument, then your quarter-inch jack cable.

If you are using a USB microphone, that will also show up here. Alternatively, if you don’t have a microphone, you can use your computer’s built-in microphone.

  • For Output Device, you should choose where your headphones are connected to – again, this could be your audio interface or your computer’s built-in...

Importing and recording audio in Session View

We have learned in the previous chapter about the non-linear workflow of Session View. First, we will have a look at how we can record audio in this environment to be able to focus more on playing and capturing ideas without worrying about any linear timelines.

Let’s begin:

  1. First, we are going to drop a drum loop into an empty Clip Slot on the first audio track so that we have some rhythm to record to (see Figure 2.6).

Importing audio into Live

You can drag and drop a loop into an empty Clip Slot from the Samples tab under Categories within the browser, where you can find all the samples from the Ableton Live Packs.

Alternatively, if you have added a folder with your own sample collection (see Chapter 1) under Places within the browser, then you can browse within your own samples.

Furthermore, if you type drums into the search bar and then hit Cmd+F (Ctrl + F for Windows), this will show you All results...

Importing and recording audio in Arrangement View

Let’s open a new Live set by navigating to File | New Live Set.

A window will pop up asking you whether you’d like to keep temporary recording files (see Figure 2.12) – you should select Delete:

Figure 2.12 – Pop-up window

Figure 2.12 – Pop-up window

Once that is done, follow these steps:

  1. Now that we have an empty project open, let’s hit the Tab key on the computer keyboard to switch to Arrangement View.
  2. Drag and drop a drum loop from the browser again to the first empty audio track.
  3. Enable the metronome and one-bar count-in again.
  4. Navigate to another empty audio track, set the appropriate input at the I/O section and the monitoring to Auto, and arm the track (see Figure 2.13):
Figure 2.13 – I/O, monitoring, and track arming set up

Figure 2.13 – I/O, monitoring, and track arming set up

  1. Now, we are going to press the Arrangement Record button, and you will hear the count-in before the...

Using Take Lanes in Live 11

Something exciting came along with the Live 11 update – a long-awaited function to be able to perform comping.

Comping will enable us to record multiple takes of audio within the same track and then pick the best parts of each take to create the perfect comp!

If you never carried out comping before, just think about it this way: you loop the section of the song where the singer is supposed to be singing the verse. You can let the singer sing that verse a couple of times on a loop record without any interruption and capture every single take they have performed in multiple Take Lanes.

Then, you can go into the Take Lanes and pick the best part of each. For example, maybe the beginning of the first take was pitchy, the second part was great, and, in the second take, the first part was great, but in the second part, the singer missed the last word.

Now, you are able to combine the great parts of both takes in a super fast, seamless way.

...

Summary

Recording audio is a crucial part of music production to capture performances and any unique audio to use creatively in your production.

Recording in Session View will allow you to just jam and capture your performance quickly in a loop-based environment. This is also going to be useful if you are planning to record audio as part of a live performance on stage.

Recording in Arrangement View will allow you to purposefully record audio material in a more arrangement-focused way and take advantage of Take Lanes and comping.

In the next chapter, we will be focusing on how you can edit your recorded material in both Session View and Arrangement View.

lock icon
The rest of the chapter is locked
You have been reading a chapter from
The Music Producer's Creative Guide to Ableton Live 11
Published in: Mar 2023Publisher: PacktISBN-13: 9781801817639
Register for a free Packt account to unlock a world of extra content!
A free Packt account unlocks extra newsletters, articles, discounted offers, and much more. Start advancing your knowledge today.
undefined
Unlock this book and the full library FREE for 7 days
Get unlimited access to 7000+ expert-authored eBooks and videos courses covering every tech area you can think of
Renews at $15.99/month. Cancel anytime

Author (1)

author image
Anna Lakatos

Anna Lakatos is a UK based Ableton Certified Trainer, Producer, Audio Engineer, and Educator. She is also a University Lecturer, Ableton Live Module Leader and Course Developer; teaching on degree programmes such as  BA(Hons) Music Production and Sound Engineering, Music Production and DJ Practice. She has featured in popular music magazines, has facilitated workshops, masterclasses, webinars as well as created content for companies like Ableton, Native Instruments, ADAM Audio, Future Music Magazine and more.
Read more about Anna Lakatos