Now we can get started on our first app. In programming, it is tradition for the first app of a new student to use whatever language/OS they are using to say hello to the world. We will quickly build an app that does just that, and, in Chapter 2, Kotlin, XML, and the UI Designer, we will go beyond that and add some buttons that respond to the user when they are clicked.
Note
The complete code as it stands at the end of this chapter is in the download bundle in the Chapter01 folder for your reference. You can't simply copy and paste this code, however. You still need to go through the project creation phase explained in this chapter (and at the beginning of all projects) as Android Studio does lots of work behind the scenes. Once you become familiar with these steps and understand which code is typed by you, the programmer, and which code/files are generated by Android Studio, you will then be able to save time and typing by copying and pasting from the files I supply in the download bundle.
Follow these steps to start the project:
Run Android Studio in the same way you run any other app. On Windows 10, for example, the launch icon appears in the start menu.
You will be greeted with the Android Studio welcome screen, as shown in the following screenshot. Locate the Start a new Android Studio project option and left-click it:

After this, Android Studio will bring up the Choose your project window, as follows:

We will use the Basic Activity option, as selected in the previous screenshot. Android Studio will autogenerate some code and a selection of resources to get our project started. We will discuss the code and the resources in detail in the next chapter. Select Basic Activity and click Next.
This next screen is the Configure your project screen, where we will perform the following steps and a few more things as well:
Name the new project
Provide a company domain as a package name to distinguish our project from any others, in case we should ever decide to publish it on the Play Store
Choose where on our computer the project files should go
Select our preferred programming language
The name of our project is going to be
Hello World,and the location for the files will be yourAndroidProjectsfolder that we created in the Setting up Android Studio section.The package name can be almost anything you like. If you have a website, you could use the
com.yourdomain.helloworldformat. If not, feel free to usecom.gamecodeschool.helloworld,or something that you just make up. It is only important when you come to publish it.To be clear, in case you can't see the details in the following screenshot clearly, here are the values I used. Remember that yours might vary depending upon your choice of company domain and project save location:
Option
Value entered
Name:
Hello WorldPackage Name:
com.gamecodeschool.helloworldLanguage:
Kotlin
Save location:
D:\AndroidProjects\HelloWorldMinimum API Level:
Leave at whatever the default is
This project will support instant apps:
Leave at whatever the default is
Use AndroidX artifacts:
Select this option
Note
Note that the application name has a space between "Hello" and "World," but the project location does not, and will not work if it does.
Regarding the Minimum API level setting, we already know that the Android SDK is the collection of packages of code that we will be using to develop our apps. Like any good SDK, the Android SDK is regularly updated, and each time it gets a significant update, the version number is increased. Simply put, the higher the version number, the newer the features you get to use; the lower the version number, the more devices our app will work on. For now, the default API 15, Android 4.0.3 (IceCreamSandwich) version will give us lots of great features and near 100% compatibility with the Android devices currently in use. If, at the time of reading, Android Studio is suggesting a newer API, then go with that.
If you are reading this some years in the future, then the Minimum API option will probably default to something different, but the code in this book will still work.
The following screenshot shows the Configure your project screen once you have entered all the information:

Note
You can write Android apps in a few different languages, including C++ and Java. There are various advantages and disadvantages to each compared to using Kotlin. Learning Kotlin will be a great introduction to other languages, and Kotlin is also the newest (and arguably best) official language of Android.
Click the Finish button and Android Studio will prepare our new project for us. This might take a few seconds or a few minutes, depending upon how powerful your PC is.
At this stage, you might be ready to proceed but, depending on the install process, you might need to click a couple of extra buttons.
Look in the bottom window of Android Studio and see if you have the following message:
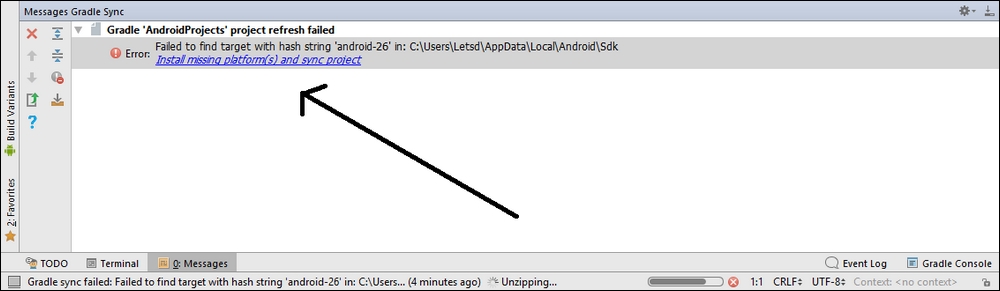
If you do, click Install missing platform(s) and sync project, accept the license agreement, and then click Next, followed by Finish.