Reader small image

You're reading from  Learning Lego Mindstorms EV3

Product typeBook
Published inJan 2015
Publisher
ISBN-139781783985029
Edition1st Edition
Right arrow
Author (1)
Gary Garber
Gary Garber
author image
Gary Garber

Gary Garber teaches physics, math, and engineering at Boston University Academy. Gary is the president of the New England Section of the American Association of Physics Teachers and has led dozens of professional development workshops in education at both the local and national levels. Gary runs the Boston University FIRST Robotics program. He has run and hosted numerous robotics workshops in VEX, Tetrix, and LEGO platforms. He has run dozens of LEGO robotics tournaments and spoken on robotics education at both local and national conferences. His robotics team has worked with Engineers Without Borders, NASA, and the National Science Teachers Association on a variety of engineering and education projects. He is currently an educational consultant, working to develop new software tools for the classroom, at the Tufts Center for Engineering Education and Outreach, which is a pioneer in LEGO Robotics Education. He is the author of Instant LEGO MINDSTORMS EV3, Packt Publishing. He currently resides in Massachusetts, US. When he is not playing with LEGO, robots, or toy trains, he enjoys spending time with his wife, Catalina, and their two children, Alejandro and Leonardo.
Read more about Gary Garber

Right arrow

Chapter 6. Output from EV3

In this chapter, we will explore how to send output from the EV3 brick. Output from the EV3 can be visual via the display screen, the built-in brick lights, or external lights. We will use the speaker to generate sounds. In this chapter, we will cover:

  • How to display stock images

  • How to use the Image Editor

  • How to display your images

  • How to display data

  • Using the brick lights

  • Powering non-EV3 LEGO lights

  • Using the Sound Editor

  • Playing sound files

  • Making music

Display


In the previous chapter, we were introduced to the idea of displaying control values on the EV3 screen. This feedback is useful so you do not have to be connected to your computer to make changes to the way the program is executed.

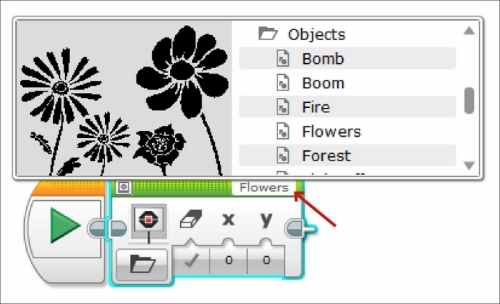
After you have dragged a Display block onto your Programming Canvas, if you click on the upper right-hand corner on the File Name, you can load an image. As you can see in the following screenshot, the EV3 software has numerous stock images that you can use in the LEGO image files:

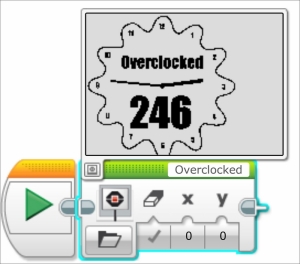
By clicking on the Display Preview button on the upper left-hand corner of the Display block, the display preview is opened. If the Display block is inside a loop or switch, the preview may get cut off. You can resize the loop or switch to make room for the display preview. The image in the display preview is pixelated. Although the EV3 software could generate a high-resolution image, the display preview is reflecting the actual lower resolution of the display on the EV3 brick...

Image Editor


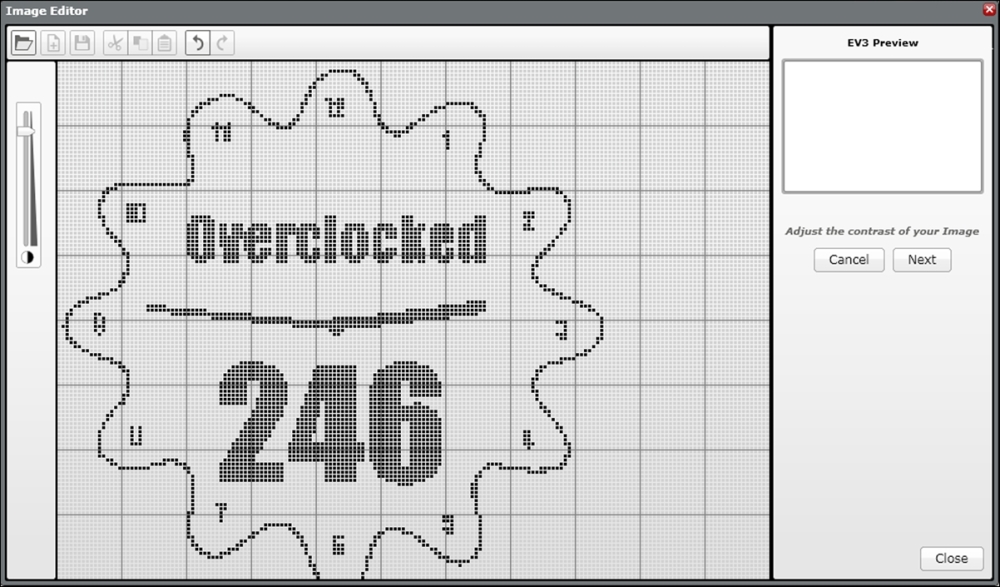
The Image Editor is a great way to create visual messages to send to your user. The EV3 walks you through the basics of creating an image using the Image Editor. You can also import .jpg, .png, and .bmp images and edit them. If you are importing a color image, keep in mind that the image will be converted to a low-resolution black-and-white image. You can see in the following screenshot that the resolution of the Image Editor is pixelated, reflecting the lower resolution of the EV3 brick:

After you have created and saved your image, you can view what it will look like in your program before you display it on the EV3 brick. Similar to what we did earlier, by clicking on File Name in the upper right-hand corner of the Display block, you can load your image. If you are using the image you created with the Image Editor, it can be found in the Project Images folder.

You cannot transfer the images you have created between projects within the EV3 software. Thus, if you have created a...

Display data


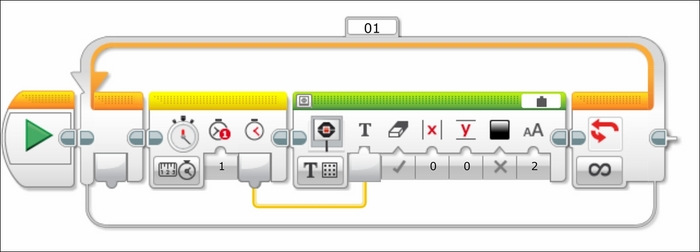
A very simple example of useful code would be to display a time counter on the screen. To do this, you wire the output from a Timer sensor block to the wired input of the Display block. You will want to erase the screen whenever the new time value is displayed.

At the same time, you can display the value of a sensor on the same screen. In the following screenshot, the value for the Color Sensor will be displayed on the screen. You can choose the x and y coordinates of the text, and I have the sensor value displayed just below the time. Additionally, the screen is erased only during the first Display block. When you click on the Mode Selector for the Display block, there are actually two text modes, Grid and Pixels. In the following screenshot, I have used Text Grid and the program writes the sensor values to row 3 on the Display screen. Each row in the grid is actually 10 pixels high.

As you saw in Chapter 5, Interacting with EV3, we can also display the value of a variable. In...

Brick lights


Brick lights are another useful way to provide visual feedback from your robot. Coordinating the color of the brick with other parts of your program can be interesting. In the following code, the color of the brick is dependent on the value of the Color Sensor. If the Color Sensor detects black, the brick will be orange. If the Color Sensor detects white, the brick will glow green. Otherwise, by default, if the sensor detects anything other than black or white, the brick will glow red, as shown in the following screenshot:

This allows for a cool-looking EV3 brick, and allows your robot to visually display information that can be seen from a distance. You may want to have lights that are not built into your EV3 brick. In order to use off-brick lights, you will need to use some of the legacy NXT MINDSTORMS parts.

Legacy NXT/RCX lights


Even before the NXT kit, the earlier RCX MINDSTORMS kit contained lights and a very simple motor that did not have a shaft encoder. To use these motors and lights with the NXT brick, you needed a converter cable. Because of the new Auto-ID system and digital motor control in the EV3, you are technically limited to using the brick lights. There are several solutions involving soldering and rewiring the cables with an extra resistor to allow older RCX motors, power function motors, and lights. The extra resistor would send a code to the Auto-ID system. To avoid soldering, you can use the black MINDSTORMS NXT converter cable to take the output from the EV3 and sends it to a two wire electrical signal. In the following image, you can see a LEGO light bulb from the NXT kit powered by the EV3:

Even with the NXT converter cable, you will find that legacy motors and lights will not work with the EV3 brick because the EV3 is still searching for the Auto-ID signal. To avoid soldering...

Sound


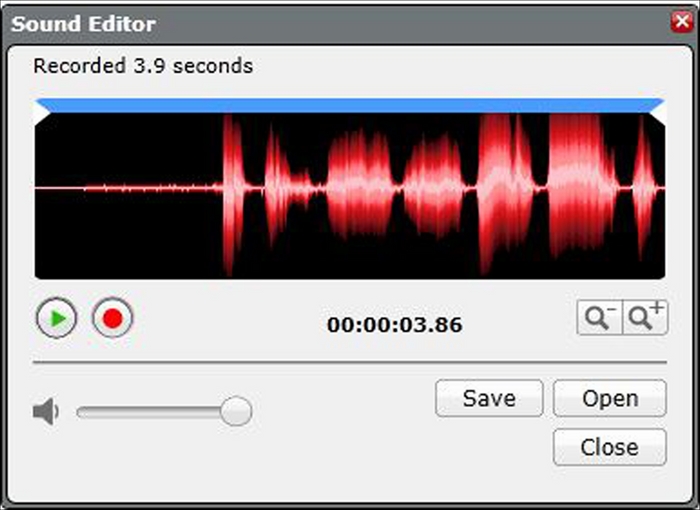
Using the microphone in your computer, it is very easy to use the Sound Editor to record sounds into a file to be used.

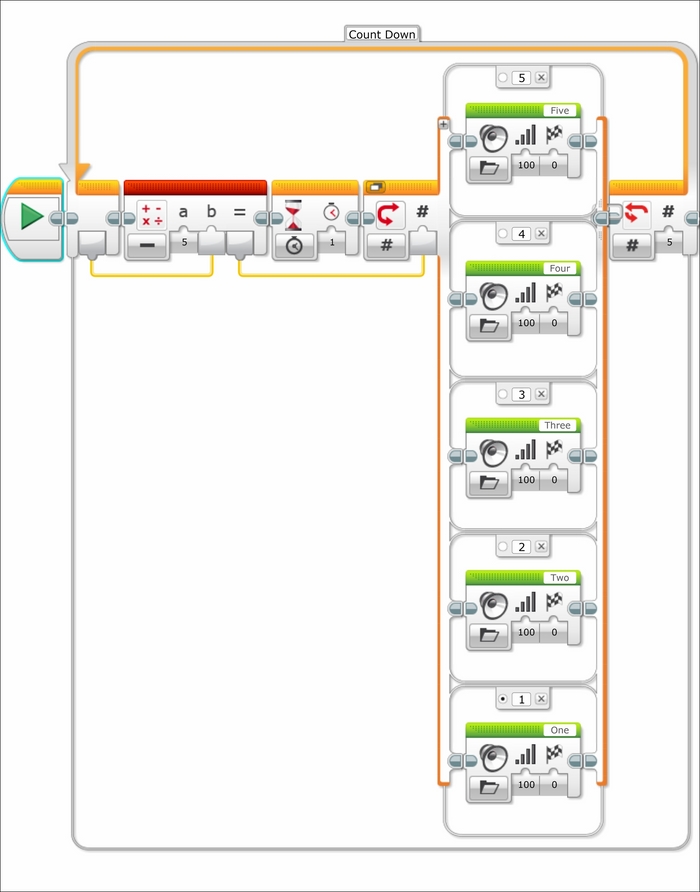
The stock sound files contain all of the system sounds and a variety of robotic noises. There are also recordings for all of the numeric digits. You could easily write a program for a countdown. In the following program, the speaker plays a Count Down using a combination of Switches (or case structures) and Loops. The loop runs five times, and the index of the loop chooses the path of the Switch. Since the index counter on the loop actually counts up, I used a Math block to allow the output to count down. Although I could have written this code using a linear sequence of blocks, I wanted to introduce another example of using a case structure to choose a sequence of commands.

Music


With the Sound blocks, there are three modes. You can play the sound completely before moving onto the next block, play the sound once while the program runs the subsequent blocks, or play the sound repetitively while the program runs the subsequent blocks. If you choose the parallel modes, you will find that the sounds will only play as long as the program is running.

If you choose to use the musical tones of the Sound block, you have a choice between a musical note, or the actual physical frequency. By using the Tone mode, you can play a continuously changing frequency, whereas the Note mode is limited to the discrete values of the musical scale. In the following screenshot, the Loop first plays a continuous increase in frequency value where the input wire to the Sound block is a numeric value:

The range of frequencies the EV3 speaker can play starts at 250 Hz and peaks out at 10,000 Hz. In the preceding program, the other interesting block is the Advanced Math Mode of the Math block...

Summary


In this chapter, we explored various forms of output from the robot, including sound, lights, and, the display. You have learned about two of the tools in the EV3 software: the Image Editor and the Sound Editor.

In the next chapter, you will learn about advanced programming techniques, including data operations, My Blocks, variables, constants, arrays, loops, conditional statements, and case structures.

lock icon
The rest of the chapter is locked
You have been reading a chapter from
Learning Lego Mindstorms EV3
Published in: Jan 2015Publisher: ISBN-13: 9781783985029
Register for a free Packt account to unlock a world of extra content!
A free Packt account unlocks extra newsletters, articles, discounted offers, and much more. Start advancing your knowledge today.
undefined
Unlock this book and the full library FREE for 7 days
Get unlimited access to 7000+ expert-authored eBooks and videos courses covering every tech area you can think of
Renews at $15.99/month. Cancel anytime

Author (1)

author image
Gary Garber

Gary Garber teaches physics, math, and engineering at Boston University Academy. Gary is the president of the New England Section of the American Association of Physics Teachers and has led dozens of professional development workshops in education at both the local and national levels. Gary runs the Boston University FIRST Robotics program. He has run and hosted numerous robotics workshops in VEX, Tetrix, and LEGO platforms. He has run dozens of LEGO robotics tournaments and spoken on robotics education at both local and national conferences. His robotics team has worked with Engineers Without Borders, NASA, and the National Science Teachers Association on a variety of engineering and education projects. He is currently an educational consultant, working to develop new software tools for the classroom, at the Tufts Center for Engineering Education and Outreach, which is a pioneer in LEGO Robotics Education. He is the author of Instant LEGO MINDSTORMS EV3, Packt Publishing. He currently resides in Massachusetts, US. When he is not playing with LEGO, robots, or toy trains, he enjoys spending time with his wife, Catalina, and their two children, Alejandro and Leonardo.
Read more about Gary Garber