Search icon
Arrow left icon
All Products
Best Sellers
New Releases
Books
Videos
Audiobooks
Learning Hub
Newsletters
Free Learning
Arrow right icon
Learning Lego Mindstorms EV3

You're reading from  Learning Lego Mindstorms EV3

Product type Book
Published in Jan 2015
Publisher
ISBN-13 9781783985029
Pages 284 pages
Edition 1st Edition
Languages
Author (1):
Gary Garber Gary Garber
Profile icon Gary Garber

Table of Contents (19) Chapters

Learning LEGO MINDSTORMS EV3
Credits
About the Author
About the Reviewers
www.PacktPub.com
Preface
Engineering Notebook Mechanical Design Drive Train and Chassis Sensors and Control Interacting with EV3 Output from EV3 Advanced Programming Advanced Programming and Control Experiment Software and Data Logging Other Programming Languages Communication between Robots Advanced Robot – Gyro Boy Index

Chapter 2. Mechanical Design

In this chapter, we will build and program several models to demonstrate the basic principles of mechanical design. We will:

  • Explore the idea of mechanical advantage

  • Learn how you can increase either speed or torque using different combinations of gears

  • Build gearboxes with motors

  • Use the spur gears, beveled gears, and worm gears

  • Write a program to spin the motors a set number of rotations

  • Use the display on the EV3 brick

All of the models in this chapter can be built with both the EV3 Home Edition and EV3 Educational Edition kits.

Mechanical advantage


When designing a robot, sometimes we may want to build a fast robot that needs to get to its objective quickly. At other times, we may want a powerful robot. For instance, maybe the robot needs to push a heavy object, push another robot, or climb a steep hill. When it comes to a robotic arm, we might be trying to lift a heavy object slowly or lift a small object quickly.

However, we cannot have both speed and power. There is a trade-off here—if you increase one, you decrease the other. This trade-off is called the law of conservation of energy.

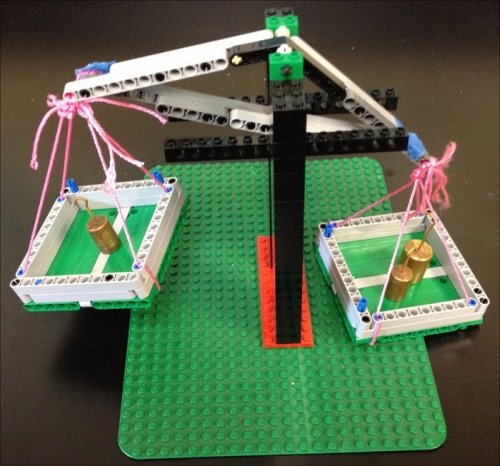
LEGO bricks allow us to use several types of simple machines. The simplest would be the lever arm. You can easily create a lever with LEGO beams and pins. To balance a seesaw or a lever, the amount of torque or rotational force must be the same on either side of the seesaw. In the preceding image, we see a LEGO balance with unequal forces but equal lever arms. The longer the lever arm, the less force we need to rotate the lever...

Motors


The EV3 kit comes with two large motors and one medium motor. Beyond the packaging, there are some other important differences between the large motor and the medium motor. The following list compares the features of the large and medium motor:

  • Large motor maximum speed 170 rpm

  • Medium motor maximum speed 250 rpm

  • Large motor torque when rotating 0.21 N∙m (Newton-meters is a unit used to measure torque)

  • Medium motor torque when rotating 0.08 N∙m

  • Large motor torque at standstill 0.42 N∙m

  • Medium motor torque at standstill 0.12 N∙m

  • Large motor mass is 76 grams

  • Medium motor mass is 36 grams

The large motor will be excellent to power the drive train of our robot, and if you need the extra speed, you can always gear the motors up. If you need more torque, you can gear down. The medium motor is about half the mass of the large motor. The medium motor actually spins about 50 percent faster than the large motor. The torque of the medium motor is only a fraction of the large motor. This makes the medium...

Large motors and gears


We will be building a simple gear train with two gears powered by the large motor. The gears we are using are double bevel gears. Normally, when you think of a gear, you are thinking of a straight or a spur gear. The LEGO double bevel gear is essentially a spur gear in the middle, with beveled edges on both sides. Not only does this allow you to combine two double bevel gears aligned parallel to each other as we are in this section, but you can also combine them at right angles, as we will see later in this chapter. I chose this particular set of gears because they are included in both the Home Edition and Educational Edition kits. However, you could build a gear train like this using any set of dissimilar gears. The small gear has 12 teeth, and the large gear has 36 teeth. The motor will power the larger gear. We will find that every time the large gear spins once, the small gear will spin three times. So we are gaining speed, but at the cost of losing torque. This...

Writing a program


After we attach the cables, we will be ready to write a program to make the motor spin. Connect the motor to port D on your EV3 brick. Turn on your EV3 brick by pressing the dark gray button in the center of the brick.

After you start up the EV3 software, navigate to File | New Project | Program. This will start up a new program. You could easily start one of the many LEGO tutorials at this point. We will start with a blank sheet. The startup menu you see in the following screenshot is the main difference between the Home Edition version of the software and the Educational Edition. Additionally, the Home Edition does not allow you to do experiments.

You will see several icons at the bottom of the screen on the green Action tab of the Programming Palette. Drag a Large Motor block (encircled in red in the following screenshot) onto the Programming Canvas and place it next to the Start block.

Although not required, you can add a Stop block at the end of the program. You can find...

Bevel gears at right angles


In the next example, we are going to build a gearbox using a 12-tooth bevel gear along with the large 36 tooth straight gear with double bevels. These gears actually rotate at right angles to each other. Since the motor drives the smaller gear, the output of our gearbox is actually slower than the motor. However, we will gain torque in this system, so we have a mechanical advantage of 3. We will be using the medium motor in this model.

In the following five steps, we will build a gearbox with two gears at right angles:

  1. First attach two friction pins to the medium motor.

  2. Next, attach the open frame to the motor. The open frame is essentially our gearbox.

  3. Next, place the 8-mod axle (with stop) and the beveled gear into the medium motor. Make sure the axle fits into the motor.

  4. Now, insert the large gear and an axle into your gearbox. The teeth of both the gears should interlock.

  5. Finally, add a flag so you can see the rotations of the large gear.

Next, write this simple...

Worm gear


For our next model, we will build a gearbox that contains a worm gear. Every time the worm gear makes one complete rotation, the spur or straight gear meshed to it will progress by one tooth. We are using a 24-tooth spur gear in this model. Notice how this spur gear does not have any bevels. You will find that our spur gear will rotate very slowly, but we have a mechanical advantage of 24! Speed is not always the goal of a gearbox. Besides greater torque, one feature I like about using a worm gear is the greater amount of control. If you are building an arm where great precision is required, the worm gear will allow you to align your output appendage with a high degree of accuracy. The EV3 shaft encoders can guide the motors themselves to within one degree of accuracy. So with this combination of gears, we have an accuracy of 1/24 of a degree.

In the following seven steps, we will build the gearbox with a worm gear:

  1. First insert two long friction pins into your medium motor. The...

Using wires and parallel threads


In the following screenshot, you can see that we can have parallel commands in our program. Our primary command will be to rotate the medium motor. You can decide how many turns to rotate your medium motor for. Although in our original program the blocks are connected by touching each other, you can also connect the blocks with wires as you would a real instrument. If you click on the Sequence Plug Exit of a block, a wired space between blocks will open up. You can drag this wire to the next command block, such as the Loop block we will add in a moment.

This also allows you to make your code two dimensional. One important aspect of visual programming is being able to view your entire code on the screen at one time. You can also split the wires to run parallel threads in your program. In this case, the wires run to both the Medium Motor block and the Loop block. When the program executes, both of these branches will run at the same time.

For your other parallel...

Summary


In this chapter, you learned how to use several types of gears included in the LEGO EV3 kit. We observed how to combine gears to increase speed or torque in a gearbox. We wrote simple programs with parallel threads, loops, motor feedback, and display output.

In the next chapter, we will attach two large motors to the EV3 brick to build a moveable robot.

lock icon The rest of the chapter is locked
You have been reading a chapter from
Learning Lego Mindstorms EV3
Published in: Jan 2015 Publisher: ISBN-13: 9781783985029
Register for a free Packt account to unlock a world of extra content!
A free Packt account unlocks extra newsletters, articles, discounted offers, and much more. Start advancing your knowledge today.
Unlock this book and the full library FREE for 7 days
Get unlimited access to 7000+ expert-authored eBooks and videos courses covering every tech area you can think of
Renews at $15.99/month. Cancel anytime}