Reader small image

You're reading from  Learning Lego Mindstorms EV3

Product typeBook
Published inJan 2015
Publisher
ISBN-139781783985029
Edition1st Edition
Right arrow
Author (1)
Gary Garber
Gary Garber
author image
Gary Garber

Gary Garber teaches physics, math, and engineering at Boston University Academy. Gary is the president of the New England Section of the American Association of Physics Teachers and has led dozens of professional development workshops in education at both the local and national levels. Gary runs the Boston University FIRST Robotics program. He has run and hosted numerous robotics workshops in VEX, Tetrix, and LEGO platforms. He has run dozens of LEGO robotics tournaments and spoken on robotics education at both local and national conferences. His robotics team has worked with Engineers Without Borders, NASA, and the National Science Teachers Association on a variety of engineering and education projects. He is currently an educational consultant, working to develop new software tools for the classroom, at the Tufts Center for Engineering Education and Outreach, which is a pioneer in LEGO Robotics Education. He is the author of Instant LEGO MINDSTORMS EV3, Packt Publishing. He currently resides in Massachusetts, US. When he is not playing with LEGO, robots, or toy trains, he enjoys spending time with his wife, Catalina, and their two children, Alejandro and Leonardo.
Read more about Gary Garber

Right arrow

Chapter 7. Advanced Programming

In this chapter, we will explore some more advanced algorithms with a focus on what we need for navigation. This will be particularly useful for programming your robot to navigate an obstacle course or play a complex game, such as FIRST Lego League. In this chapter, we will cover how to:

  • Use Loops and Switches to drive in a square

  • Use Loops and Switches to avoid an obstacle

  • Navigate using Motor Rotation sensor feedback

  • Navigate using Gyro Sensor feedback

  • Simplify our program using My Blocks

  • Simplify our program using Arrays

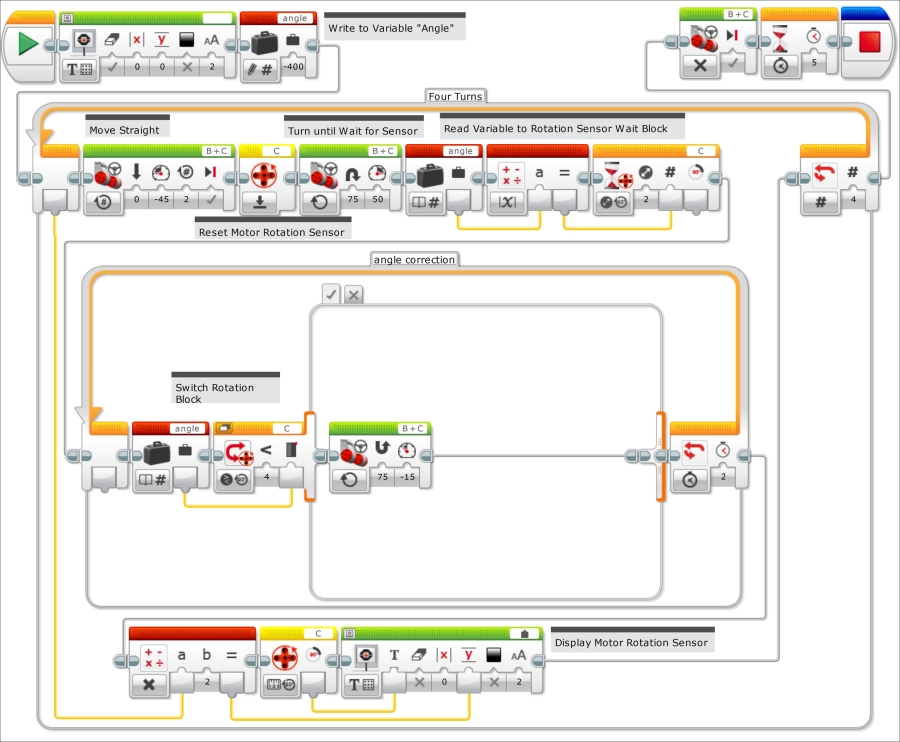
Using any of our four base robots, we will make the robot go forward, make a 90 degree turn, go forward, and repeat this sequence several times. In this chapter, I have included programs using both the Gyro Sensor and a process of navigation called dead reckoning. Dead reckoning, which is short for deduced reckoning, consists of calculating how far the wheels of your robot should turn by using the built-in shaft encoders (Motor Rotation sensors...

Loop and the Motor Rotation sensors


Let's start by using dead reckoning to drive in a square. As you can see in the following screenshot, we will first use a Loop block from the Flow Control palette and select the Count mode for the Loop block. We can have the robot repeat this turning sequence several times. Inside this loop, the Move Steering block will tell the robot to move forward for one rotation of the wheels. We will then have a Move Steering block that will turn the robot. Remember that a 500-degree turn of the motor shaft is not equivalent to a 500-degree turn of the entire robot.

This is a 500-degree turn of the motor shaft and the wheels, which I chose based on the design of the skid-bot. Depending on which robot design you chose to use, you will need to vary the value that the rotation sensor uses to trigger the stop of the turning motion to approximate a 90-degree turn. If you use any of the other robots from Chapter 3, Drive Train and Chassis (such as the caster-bot or the...

Loop and the Gyro Sensor


Now we will repeat this exercise using the Gyro Sensor that comes with the Educational Version of the EV3 kit. If you have the Home version, you might consider buying the LEGO Gyro Sensor or the Gyro or Compass sensor from HiTechnic or other third-party vendors. You can buy the LEGO EV3 Gyro Sensor directly from LEGO, part number 45505, for about $30. In the following screenshot, you can see that the loop is the same except we will use a move to turn while steering until the Wait block is triggered by a change in state of the Gyro Sensor by 90 degrees:

Before you run the program, you need to make sure the robot is absolutely still. It is critical to calibrate the Gyro Sensor. You can do this either by unplugging it and plugging it back in while the robot is stationary, or by changing the mode of the Gyro Sensor. You can change the mode using Port View or by writing this into your program. We can now run this program. If you notice that your Gyro values keep changing...

Switch or two-level controller


We will now use a case structure to add a correction to the turns. In the EV3 language, a case structure or if…then…else statement is called a Switch block. The Switch can be controlled by sensors and other logic statements. Although you typically will have only two cases, you could add several other branches to the case structure. Each branch of the Switch is called a case statement and can contain several programming blocks. We will use the Gyro and rotation sensors to define the case to try and "zigzag" onto the exact 90-degree angle to produce a square. In the following screenshot, you can see the entire code. As this program is extensive, it is worth noting how the wires are used to organize the code into rows, so you can see the entire program on one screen at the same time:

Initially, we asked the Gyro Sensor to only wait until it turned 90 degrees on each leg of our square. Now we will adjust our code to ask the robot to stop turning when it reaches...

Three-level controller


Now, let's examine a version of this program using the rotation sensor. This program is similar to the previous program except that the angle is set to 400 (the probable rotation of the wheels) and the blocks are set to the rotation sensors instead of the Gyro Sensors. The Gyro program used a two-level controller. A path in the case structure was chosen based on the robot's position relative to a setpoint value. Notice that, in this program, I have a switch within a switch. This allows for a three-level controller. When the robot is actually at the set-point value, no motion takes place.

In the preceding screenshot, you can see the path the switch takes for the true case of when the Motor Rotation sensor is greater than the value of the angle variable. In the following screenshot, you can see the false case, when the value is not greater than the value of the angle variable. You can see in the screenshot that to make three levels we need the switch within a switch....

Subroutines or My Blocks


In this section, we will program the robot to move forward until it encounters an unknown obstacle with the Touch Sensor and then attempt to steer around the obstacle. An obstacle such as a table or chair leg would be ideal. We will program the robot to take input from the brick buttons. The program we will initially write is inefficient and repetitive. It is actually a good example of how you shouldn't write a program. We will first simplify the code using the EV3 version of a subroutine or function that is called My Block. You can think of a My Block as a small program within a large program. It is called a My Block because it is a block that you create.

At the beginning, the robot will move forward until the Wait block is triggered by a change in state of the Touch Sensor. We will then program the robot to move back for one rotation of the wheels and display the following message onto the brick screen: Press left or right. The next Wait block will wait for the...

Arrays


We just saw how to simplify the program to avoid an obstacle using a My Block (subroutine). Now, we will instead optimize the program using an array, whereas in the LEGO EV3 software, a variable can have one value, an array can have several elements, each with its own value. To learn how an array in EV3 works, you will first need to write a program to display a series of numbers on the EV3 brick screen.

First, clear the display screen. Then define a variable called Steering. By clicking on the mode selector of the Variable block, we can choose to write to an array instead of writing to a numeric variable. The LEGO EV3 software contains numeric and logic (or Boolean) arrays. It does not currently have arrays for strings (or lists).

We will write the series of numbers [100, -100, -100, 100] into the array. You can enter elements by clicking on the input value of the array variable block. This will be useful later when we use this same array variable block in the obstacle code.

We will...

Summary


In this chapter, we explored various programming techniques such as My Blocks, Switches, and Loops. We used combinations of switches and loops to cause our robot to drive in a square and avoid an obstacle. We used two-level and three-level controllers to help us navigate and make precise turns. You learned how to navigate using both dead reckoning and the Gyro Sensor. You learned how to simplify your programs using My Blocks and Arrays.

In the next chapter, we will develop a proportional controller that determines the position using either the Ultrasonic or the Infrared Sensor. We will also develop a proportional line following robot using the Color Sensor.

lock icon
The rest of the chapter is locked
You have been reading a chapter from
Learning Lego Mindstorms EV3
Published in: Jan 2015Publisher: ISBN-13: 9781783985029
Register for a free Packt account to unlock a world of extra content!
A free Packt account unlocks extra newsletters, articles, discounted offers, and much more. Start advancing your knowledge today.
undefined
Unlock this book and the full library FREE for 7 days
Get unlimited access to 7000+ expert-authored eBooks and videos courses covering every tech area you can think of
Renews at $15.99/month. Cancel anytime

Author (1)

author image
Gary Garber

Gary Garber teaches physics, math, and engineering at Boston University Academy. Gary is the president of the New England Section of the American Association of Physics Teachers and has led dozens of professional development workshops in education at both the local and national levels. Gary runs the Boston University FIRST Robotics program. He has run and hosted numerous robotics workshops in VEX, Tetrix, and LEGO platforms. He has run dozens of LEGO robotics tournaments and spoken on robotics education at both local and national conferences. His robotics team has worked with Engineers Without Borders, NASA, and the National Science Teachers Association on a variety of engineering and education projects. He is currently an educational consultant, working to develop new software tools for the classroom, at the Tufts Center for Engineering Education and Outreach, which is a pioneer in LEGO Robotics Education. He is the author of Instant LEGO MINDSTORMS EV3, Packt Publishing. He currently resides in Massachusetts, US. When he is not playing with LEGO, robots, or toy trains, he enjoys spending time with his wife, Catalina, and their two children, Alejandro and Leonardo.
Read more about Gary Garber