Reader small image

You're reading from  Godot 4 Game Development Projects - Second Edition

Product typeBook
Published inAug 2023
Reading LevelN/a
PublisherPackt
ISBN-139781804610404
Edition2nd Edition
Languages
Tools
Right arrow
Author (1)
Chris Bradfield
Chris Bradfield
author image
Chris Bradfield

Chris Bradfield has worked in the Internet technology space for over 25 years. He has worked in the online gaming space for a number of MMO and social gaming publishers in South Korea and the United States. In his game industry career, he has served as a game designer, developer, product manager, and team leader. In 2012, he discovered a love for teaching and founded KidsCanCode to provide programming instruction and curriculum to young students. He is a member of the Godot Engine documentation team and works to provide learning resources for game development students around the world.
Read more about Chris Bradfield

Right arrow

Jungle Jump – Running and Jumping in a 2D Platformer

In this chapter, you’ll build a platformer game in the tradition of classics such as Super Mario Bros. Platform games are a very popular genre, and understanding how they work can help you make a variety of different game styles. If you’ve never attempted making one before, the player movement in platformers can be surprisingly complex to implement, and you’ll see how Godot’s CharacterBody2D node has features to help you in that process.

In this project, you will learn about the following:

  • Using the CharacterBody2D node
  • Using the Camera2D node
  • Combining animations and user input to produce complex character behavior
  • Designing levels using TileMap
  • Creating an infinitely scrolling background using ParallaxLayer
  • Transitioning between scenes
  • Organizing your project and planning for expansion

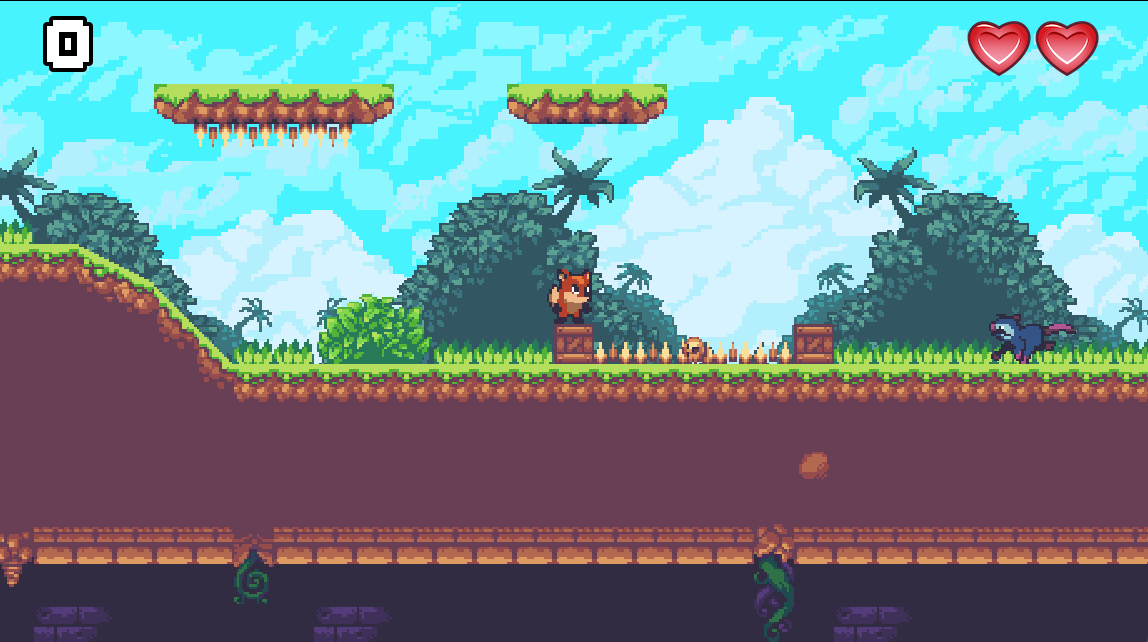
Here is a screenshot of the completed game:

Figure 4.1: Completed game screenshot
...

Technical requirements

As with the previous projects, you’ll start by downloading the art assets for the game, which can be found here: https://github.com/PacktPublishing/Godot-Engine-Game-Development-Projects-Second-Edition/tree/main/Downloads

You can also find the complete code for this chapter on GitHub at: https://github.com/PacktPublishing/Godot-4-Game-Development-Projects-Second-Edition/tree/main/Chapter04%20-%20Jungle%20Jump

Setting up the project

To create a new project, start by opening Project Settings so that you can configure the defaults that you’ll need.

The art assets for this game use a pixel art style, which means they look best when the images are not smoothed, which is Godot’s default setting for texture filtering:

Figure 4.2: Texture filtering

Figure 4.2: Texture filtering

While it’s possible to set this on each Sprite2D, it’s more convenient to specify the default setting. Click the Advanced toggle in the top right and find the Rendering/Textures section on the left. In the settings list, scroll to the bottom and find the Canvas Textures/Default Texture Filter setting. Change it from Linear to Nearest.

Then, under Display/Window, change Stretch/Mode to canvas items and Aspect to expand. These settings will allow the user to resize the game window while preserving the image’s quality. Once the project is complete, you’ll be able to see the effects...

Introducing kinematic bodies

A platformer requires gravity, collisions, jumping, and other physics behavior, so you might think that RigidBody2D would be the perfect choice to implement the character’s movement. In practice, you’ll find that the more realistic physics of the rigid body are not desirable for a platform character. To the player, realism is less important than responsive control and an action feel. So, as the developer, you want to have precise control over the character’s movements and collision response. For this reason, a kinematic style of physics is usually the better choice for a platform character.

The CharacterBody2D node is designed for implementing physics bodies that are to be controlled directly via code. These nodes detect collisions with other bodies when they move but are not affected by global physics properties such as gravity or friction. This doesn’t mean that they can’t be affected by gravity and other forces ...

Creating the player scene

The Godot node that implements kinematic movement and collision is called CharacterBody 2D.

Open a new scene and add a CharacterBody2D node named Player as the root and save the scene. Don’t forget to click the Group Selected Node(s) button. When saving the Player scene, you should also create a new folder to contain it. This will help keep your project folder organized as you add more scenes and scripts.

Look at the properties of CharacterBody2D in the Inspector. Notice the default values of Motion Mode and Up Direction. “Grounded” mode means the body will consider one collision direction as the “floor,” the opposite wall as the “ceiling,” and any others as “walls” – which one is determined by Up Direction.

As you’ve done in previous projects, you’ll include all the nodes the player character needs to function in the Player scene. For this game, that means handling...

Collectible items

Before you start making the level, you need to create some items that the player can collect, since those will be part of the level as well. The assets/sprites folder contains sprite sheets for two types of collectibles: cherries and gems.

Rather than make a separate scene for each type of item, you can use a single scene and swap out the texture property in the script. Both objects have the same behavior: animating in place and disappearing when collected by the player. You can also add a tween effect for the collection (see Chapter 2).

Scene setup

Start the new scene with Area2D and name it Item. Save the scene in a new items folder.

An area is a good choice for these objects because you want to detect when the player contacts them, but you don’t need a collision response from them. In the Inspector, set Collision/Layer to collectibles (layer 4) and Collision/Mask to player (layer 2). This will ensure that only the Player node will be able to...

Designing the level

For most of you, this section will take up the largest chunk of your time. Once you start designing a level, you’ll find it’s a lot of fun to lay out all the pieces and create challenging jumps, secret paths, and dangerous encounters.

First, you’ll create a generic Level scene containing all the nodes and code that is common to all levels. You can then create any number of Level scenes that inherit from this master level.

Using TileMaps

Create a new scene and add a Node2D node named LevelBase. Save the scene in a new folder called levels. This is where you’ll save all the levels you create, and they will all inherit functionality from this level_base.tscn scene. They’ll all have the same node hierarchy – only the layout will be different.

A tilemap is a common tool for designing game environments using a grid of tiles. They allow you to draw a level layout by painting the tiles onto the grid rather than placing...

Adding enemies

There are many different behaviors you could add for an enemy. For this game, the enemy will walk along a platform in a straight line and change direction when hitting an obstacle.

Scene setup

As before, you’ll need to create a new scene to represent the enemy:

  1. Start with a CharacterBody2D node named Enemy and give it three children: Sprite2D, CollisionShape2D, and AnimationPlayer.
  2. Save the scene in a folder called enemies. If you decide to add more enemy types to the game, you can save them all here.
  3. Set the body’s collision Layer to enemies and its Mask to environment, player, and enemies. As with the player, this determines which types of objects the enemy will collide with.
  4. It’s also useful to group enemies together, so click the Node tab and add the body to a group called enemies.
  5. Add res://assets/sprites/opossum.png to Texture and set Animation/Hframes to 6.
  6. Add a rectangular collision shape that covers most...

Game UI

As in the previous projects you’ve worked on, you’ll need a HUD to display information during gameplay. Collecting items will increase the player’s score, so that number should be displayed, as well as the player’s remaining life value, which will be shown as a series of hearts.

Scene setup

Create a new scene with a MarginContainer root node named HUD and save it in a new ui folder. Set Layout to Top Wide and, in the Theme Overrides/Constants section of the Inspector, set the right and left margins to 50 and the top/bottom margins to 20.

Add an HBoxContainer node to keep things aligned and give it two children, Label and HBoxContainer, named Score and LifeCounter, respectively.

On the Score label, set the Text property to 100 and in the Inspector, under Layout/Container Sizing, check the Expand box. In Label Settings, add a new settings object to configure the font. Drag res://assets/Kenney Thick.ttf into the Font property and set Size...

Title screen

The title screen is the first thing the player will see, and the game will return to this screen when the player dies and the game ends.

Scene setup

Start with a Control node and set Layout to Full Rect. Add a TextureRect node using the back.png image. Set Layout to Full Rect and Stretch Mode to Keep Aspect Covered.

Add another TextureRect, this time using middle.png and setting Stretch Mode to Tile. Drag the width of the rectangle until it’s wider than the screen and arrange it so that it covers the bottom half.

Add two Label nodes named Title and Message and set their Text properties to Jungle Jump and Press Space to Play, respectively. Add the font to each one as you’ve done before, setting the title to size 72 and the message to size 48. Set the title’s layout to Centered and the message’s layout to Center Bottom.

When you’re finished, the scene should look like this:

Figure 4.24: Title screen

Figure 4.24: Title screen...

Setting up the main scene

You’ve made some level scenes, but eventually, you’re going to want to make more than one. How does the game know which one to load? Your Main scene is going to take care of that.

Delete any extra nodes you added to main.tscn when you were testing the player’s movement. This scene will now be responsible for loading the current level. Before it can do that, however, you need a way to keep track of the current level. You can’t keep track of that variable in the level scene because that will be replaced with a newly loaded level when it ends. To keep track of data that needs to be carried from scene to scene, you can use an autoload.

About autoloads

In Godot, you can configure a script or scene as an autoload. This means that the engine will automatically load it at all times. Even if you change the current scene in SceneTree, the autoloaded node will remain. You can also refer to that autoloaded scene by name from any other...

Transitioning between levels

Your levels now need a way to transition from one to the next. In the res://assets/environment/props.png sprite sheet, there is an image of a door that you can use for your level’s exit. Finding and walking into the door will take the player to the next level.

Door scene

Make a new scene with an Area2D node named Door and save it in the items folder. Add a Sprite2D node and use the props.png image as Texture. Under Region, click Enabled, and then click the Edit Region button to select the door image from the sprite sheet. Then, in Offset/Offset, set y to -8. This will ensure that when the door is placed at the tile location, it will be positioned correctly.

Add a CollisionShape2D node and give it a rectangular shape that covers the door. Put the door on the items layer and set its mask so that it only scans the player layer.

This scene doesn’t need a script because you’re just going to use its body_entered signal in the...

Finishing touches

Now that you’ve completed the main structure of the game, and hopefully designed a few levels for the player to enjoy, you can consider making some additions to improve the gameplay. In this section, you’ll find a few more suggested features – add them as-is or adjust them to your liking.

Sound effects

As with the previous projects, you can add audio effects and music to improve the experience. In res://assets/audio/, you’ll find audio files you can use for different game events, such as player jump, enemy hit, and item pickup. There are also two music files: Intro Theme for the title screen and Grasslands Theme for the level scene.

Adding these to the game will be left to you, but here are a few tips:

  • You may find it helpful to adjust the volume of individual sounds. This can be set with the Volume dB property. Setting a negative value will reduce the sound’s volume.
  • You can attach the music to the master level...

Summary

In this chapter, you learned how to use the CharacterBody2D node to create arcade-style physics for player movement. This is a powerful node that can be used for a wide variety of game objects – not just platform characters.

You learned about the TileMap node for level design – a powerful tool with even more features than you used in this project. An entire chapter could be written on all of the different things you can do with it. For more information, see the Using TileMaps page on the Godot documentation website: https://docs.godotengine.org/en/latest/tutorials/2d/using_tilemaps.html.

Camera2D and ParallaxBackground are also key tools for any game where you want to move around in a world that’s bigger than the size of the screen. The camera node in particular will be a node that you’ll use in most 2D projects.

You also made extensive use of what you learned in earlier projects to tie everything together. Hopefully, at this point, you...

lock icon
The rest of the chapter is locked
You have been reading a chapter from
Godot 4 Game Development Projects - Second Edition
Published in: Aug 2023Publisher: PacktISBN-13: 9781804610404
Register for a free Packt account to unlock a world of extra content!
A free Packt account unlocks extra newsletters, articles, discounted offers, and much more. Start advancing your knowledge today.
undefined
Unlock this book and the full library FREE for 7 days
Get unlimited access to 7000+ expert-authored eBooks and videos courses covering every tech area you can think of
Renews at $15.99/month. Cancel anytime

Author (1)

author image
Chris Bradfield

Chris Bradfield has worked in the Internet technology space for over 25 years. He has worked in the online gaming space for a number of MMO and social gaming publishers in South Korea and the United States. In his game industry career, he has served as a game designer, developer, product manager, and team leader. In 2012, he discovered a love for teaching and founded KidsCanCode to provide programming instruction and curriculum to young students. He is a member of the Godot Engine documentation team and works to provide learning resources for game development students around the world.
Read more about Chris Bradfield