Reader small image

You're reading from  Building Smart Homes with Raspberry Pi Zero

Product typeBook
Published inOct 2016
PublisherPackt
ISBN-139781786466952
Edition1st Edition
Right arrow
Author (1)
Marco Schwartz
Marco Schwartz
author image
Marco Schwartz

Marco Schwartz is an electrical engineer, entrepreneur, and blogger. He has a master's degree in electrical engineering and computer science from Supélec, France, and a master's degree in micro engineering from the Ecole Polytechnique Fédérale de Lausanne (EPFL), Switzerland. He has more than five years' experience working in the domain of electrical engineering. Marco's interests center around electronics, home automation, the Arduino and Raspberry Pi platforms, open source hardware projects, and 3D printing. He has several websites about the Arduino, including the Open Home Automation website, which is dedicated to building home automation systems using open source hardware. Marco has written another book on home automation and the Arduino, called Home Automation With Arduino: Automate Your Home Using Open-source Hardware. He has also written a book on how to build Internet of Things projects with the Arduino, called Internet of Things with the Arduino Yun, by Packt Publishing.
Read more about Marco Schwartz

Right arrow

Building a wireless security camera


We are now going to build the module that will act as a wireless security camera. You can have one or many of those modules inside your home; it will allow you to observe what is going on in your home from a central location.

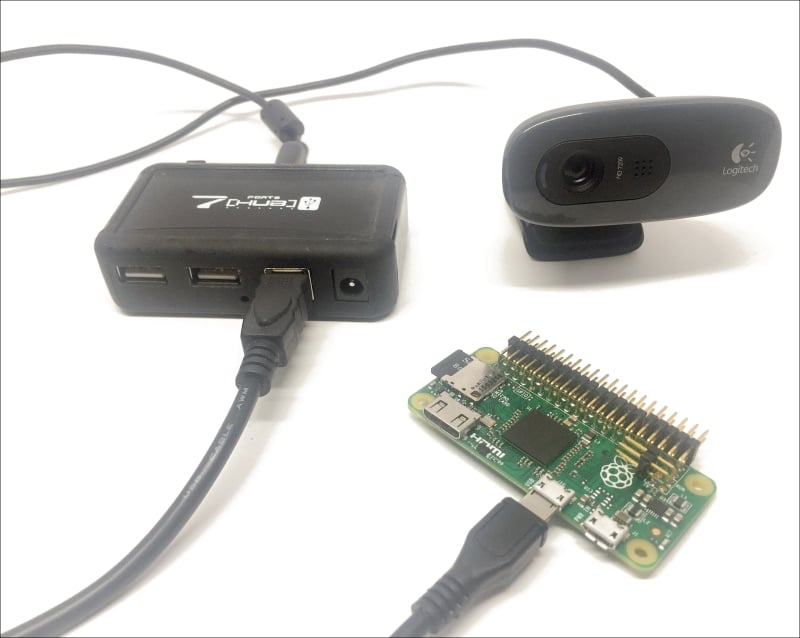
The hardware configuration for this part will be really simple, as we are using an USB camera. However, you will need to use an USB hub here, as we will need to connect the USB camera and the usual WiFi dongle on the Raspberry Pi.

This is the final result:
Let's now test the camera first, by taking a simple picture from the command line. You will need to install the fswebcam utility. To do so, simply type the following command inside a terminal:

sudo apt-get install fswebcam

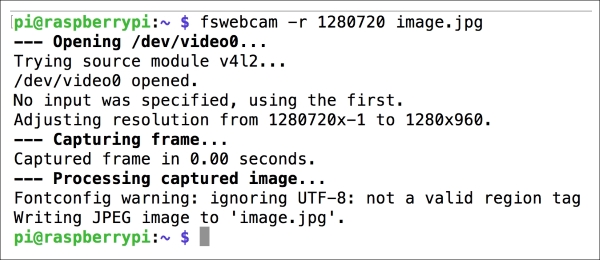
Then, still from a terminal, you can take a picture with the following command:

fswebcam -r 1280×720 image.jpg

This will make a lot of messages appear inside the terminal, confirming that the picture has been taken:
You can now use an image utility to open the picture...

lock icon
The rest of the page is locked
Previous PageNext Page
You have been reading a chapter from
Building Smart Homes with Raspberry Pi Zero
Published in: Oct 2016Publisher: PacktISBN-13: 9781786466952

Author (1)

author image
Marco Schwartz

Marco Schwartz is an electrical engineer, entrepreneur, and blogger. He has a master's degree in electrical engineering and computer science from Supélec, France, and a master's degree in micro engineering from the Ecole Polytechnique Fédérale de Lausanne (EPFL), Switzerland. He has more than five years' experience working in the domain of electrical engineering. Marco's interests center around electronics, home automation, the Arduino and Raspberry Pi platforms, open source hardware projects, and 3D printing. He has several websites about the Arduino, including the Open Home Automation website, which is dedicated to building home automation systems using open source hardware. Marco has written another book on home automation and the Arduino, called Home Automation With Arduino: Automate Your Home Using Open-source Hardware. He has also written a book on how to build Internet of Things projects with the Arduino, called Internet of Things with the Arduino Yun, by Packt Publishing.
Read more about Marco Schwartz