Reader small image

You're reading from  Building Smart Homes with Raspberry Pi Zero

Product typeBook
Published inOct 2016
PublisherPackt
ISBN-139781786466952
Edition1st Edition
Right arrow
Author (1)
Marco Schwartz
Marco Schwartz
author image
Marco Schwartz

Marco Schwartz is an electrical engineer, entrepreneur, and blogger. He has a master's degree in electrical engineering and computer science from Supélec, France, and a master's degree in micro engineering from the Ecole Polytechnique Fédérale de Lausanne (EPFL), Switzerland. He has more than five years' experience working in the domain of electrical engineering. Marco's interests center around electronics, home automation, the Arduino and Raspberry Pi platforms, open source hardware projects, and 3D printing. He has several websites about the Arduino, including the Open Home Automation website, which is dedicated to building home automation systems using open source hardware. Marco has written another book on home automation and the Arduino, called Home Automation With Arduino: Automate Your Home Using Open-source Hardware. He has also written a book on how to build Internet of Things projects with the Arduino, called Internet of Things with the Arduino Yun, by Packt Publishing.
Read more about Marco Schwartz

Right arrow

Chapter 9. Control Appliances from Anywhere

In this chapter, we are going to continue exploring the IoT field, and learn how we can use it for a smart home. In the previous chapter, we learned how to make our home send data to the cloud, using the Raspberry Pi Zero board. Here, we'll actually do the opposite; we are going to learn how to control appliances in your home from anywhere in the world.

We are going to start with a simple example, controlling a simple LED from anywhere in the world. Then, we'll see how to control lamps using the same principles. After that, we are going to use IFTTT again (as we did in Chapter 6, Sending Notifications using Raspberry Pi Zero) to build two exciting applications: a lamp that switches on when motion is detected and a cloud thermostat. Let's start!

Hardware and software requirements


As always, we are going to start with a list of required hardware and software components for the project.

For the devices to control, we'll use a simple LED with a 330 Ohm resistor and then the PowerSwitch Tail Kit that we already used in several chapters of this book.

For the sensors, which we will need at the end of the chapter, we'll use a simple DHT11 sensor, along with a 4.7k Ohm resistor. We'll also use a PIR motion sensor.

Finally, you will need the usual breadboard and jumper wires.

The following is the list of components that you will need for this whole chapter, not including the Raspberry Pi Zero:

Control a LED from anywhere in the world


For the first project of this chapter, we are simply going to learn how to control a simple LED from a cloud dashboard.

For this project, you will need a LED and a 330 Ohm resistor. For the connection of the components to the Pi, you can refer to Chapter 4, Control Appliances from the Raspberry Pi Zero of this book, in which you will learn how to connect those components. You need to connect the LED to GPIO14 of the Pi.

This is the final result:

Let's now see how to configure the board, so we can control it from the cloud. To do so, we'll use the aREST framework that we have already used several times in this book. The following is the complete code for this part:

// Required modules
var express = require('express');
var app = express();
var piREST = require('pi-arest')(app);

// Thing name
piREST.set_id('98t52d');
piREST.set_name('pi_zero_cloud');
piREST.set_mode('bcm');

// Connect to cloud.aREST.io
piREST.connect();

// Start server
var server = app...

Creating several lamps from the cloud


In the second project of this chapter, we are going to apply what we learned earlier and control several lamps from the cloud using a single dashboard.

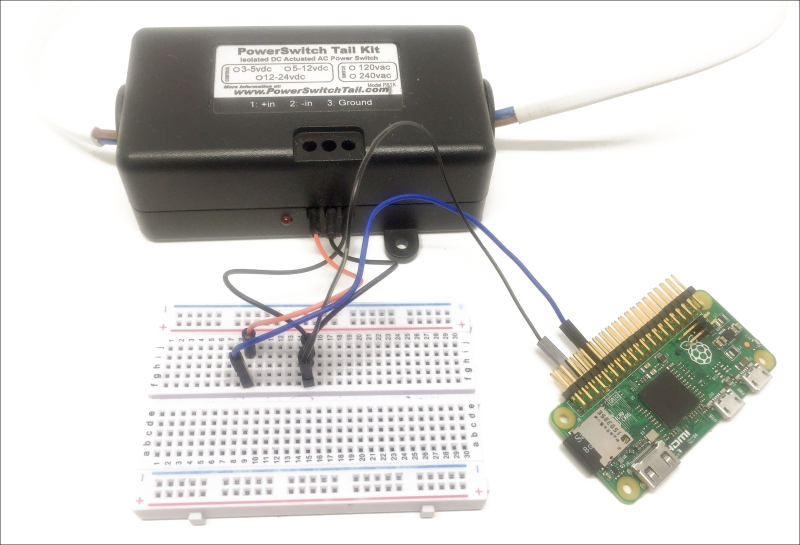
To actually assemble the project, I recommend checking Chapter 4, Control Appliances from the Raspberry Pi Zero where we saw how to connect the PowerSwitch Tail Kit to the Raspberry Pi Zero. You need to connect the PowerSwitch to GPIO14 of the Raspberry Pi board.

This is how one module looks like:

Now, configure each board with the exact same code as in the previous section and give a different ID to each board. I also recommend changing the name of the boards inside the code; for example, to know where you placed them in your home (bedroom, living room, and so on).

Then, go back to the website where we created a cloud dashboard and create a new dashboard:

In there, create a new On/Off element for each lamp you want to control, on pin 14:

This is how your dashboard should look like at the end:

You can now try...

Make a motion-activated lamp using IFTTT


In this section, we are now going to use what we learned in this chapter and combine it with what we already learned in the previous chapters about the web service IFTTT. We are going to use this knowledge to build a lamp that is automatically activated when motion is detected by a motion sensor.

For this section, you will need two Raspberry Pi modules: one with a motion sensor and one connected to a lamp via the PowerSwitch tail. To learn how to assemble these modules, please refer to the previous chapters of the book.

This is the assembled Raspberry Pi Zero with a PIR motion sensor on GPIO18:

We are first going to create the IFTTT recipes so you and the two boards can communicate. First, make sure that the Maker channel is activated on your IFTTT account:

Then, create a new recipe, with the Maker channel as the trigger:

For the event, enter motion_detected:

Choose the Maker channel as the action channel:

For the action itself, choose Make a web request...

Build an automated cloud thermostat


In the last section of this chapter, we are going to apply what we learned in the previous section, but this time to build a cloud thermostat that will work using IFTTT.

Apart from the Raspberry Pi Zero that will control an electrical heater via the PowerSwitch Tail, you will need another Raspberry Pi Zero with a DHT11 sensor that we have already used several times in this book. In order to assemble this module, I recommend checking for example the second chapter of this book.

Once you have your two modules assembled, go again to IFTTT and create a new recipe, using the Maker channel for the trigger and for the action channels.

For the trigger, enter the following event:

Of course, if the temperature is too low, it means that we want to activate the heater. We therefore need to send this command to the board that controls the heater:

Once this recipe is created, create another for the temperature_high event:

When the temperature is too high, we automatically...

Summary


In this chapter, we continued to explore the field of the Internet of Things and we used it to control our smart home remotely. We first saw how to control devices remotely, like simple LEDs and lamps. Then, we learned how to combine what we learned with IFTTT to create more complex projects, for example making a cloud thermostat.

You can of course improve what you learned in this chapter. For example, you can combine what you learned in this chapter and the previous chapter to create cloud dashboards from where you can both monitor your devices and control other devices remotely.

In the next chapter, we are going to use everything that we learned in this book to create a complete home automation system based on the Raspberry Pi Zero.

lock icon
The rest of the chapter is locked
You have been reading a chapter from
Building Smart Homes with Raspberry Pi Zero
Published in: Oct 2016Publisher: PacktISBN-13: 9781786466952
Register for a free Packt account to unlock a world of extra content!
A free Packt account unlocks extra newsletters, articles, discounted offers, and much more. Start advancing your knowledge today.
undefined
Unlock this book and the full library FREE for 7 days
Get unlimited access to 7000+ expert-authored eBooks and videos courses covering every tech area you can think of
Renews at $15.99/month. Cancel anytime

Author (1)

author image
Marco Schwartz

Marco Schwartz is an electrical engineer, entrepreneur, and blogger. He has a master's degree in electrical engineering and computer science from Supélec, France, and a master's degree in micro engineering from the Ecole Polytechnique Fédérale de Lausanne (EPFL), Switzerland. He has more than five years' experience working in the domain of electrical engineering. Marco's interests center around electronics, home automation, the Arduino and Raspberry Pi platforms, open source hardware projects, and 3D printing. He has several websites about the Arduino, including the Open Home Automation website, which is dedicated to building home automation systems using open source hardware. Marco has written another book on home automation and the Arduino, called Home Automation With Arduino: Automate Your Home Using Open-source Hardware. He has also written a book on how to build Internet of Things projects with the Arduino, called Internet of Things with the Arduino Yun, by Packt Publishing.
Read more about Marco Schwartz