Reader small image

You're reading from  Building Smart Homes with Raspberry Pi Zero

Product typeBook
Published inOct 2016
PublisherPackt
ISBN-139781786466952
Edition1st Edition
Right arrow
Author (1)
Marco Schwartz
Marco Schwartz
author image
Marco Schwartz

Marco Schwartz is an electrical engineer, entrepreneur, and blogger. He has a master's degree in electrical engineering and computer science from Supélec, France, and a master's degree in micro engineering from the Ecole Polytechnique Fédérale de Lausanne (EPFL), Switzerland. He has more than five years' experience working in the domain of electrical engineering. Marco's interests center around electronics, home automation, the Arduino and Raspberry Pi platforms, open source hardware projects, and 3D printing. He has several websites about the Arduino, including the Open Home Automation website, which is dedicated to building home automation systems using open source hardware. Marco has written another book on home automation and the Arduino, called Home Automation With Arduino: Automate Your Home Using Open-source Hardware. He has also written a book on how to build Internet of Things projects with the Arduino, called Internet of Things with the Arduino Yun, by Packt Publishing.
Read more about Marco Schwartz

Right arrow

Chapter 6. Sending Notifications using Raspberry Pi Zero

In this chapter, we are going to start diving into a very interesting field that will change the way we interact with our environment: the Internet of Things (IoT). The IoT basically proposes to connect every device around us to the Internet, so we can interact with them from anywhere in the world.

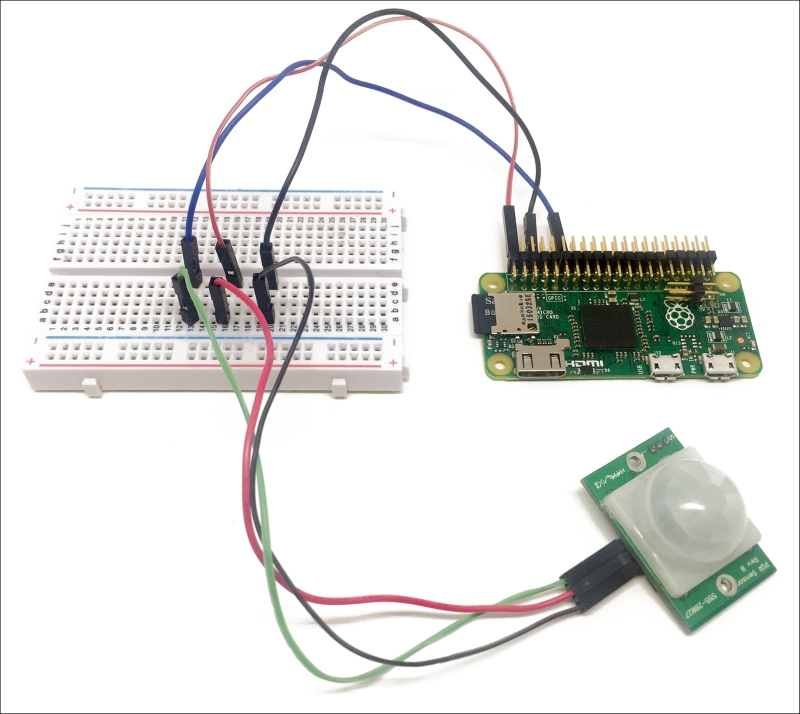
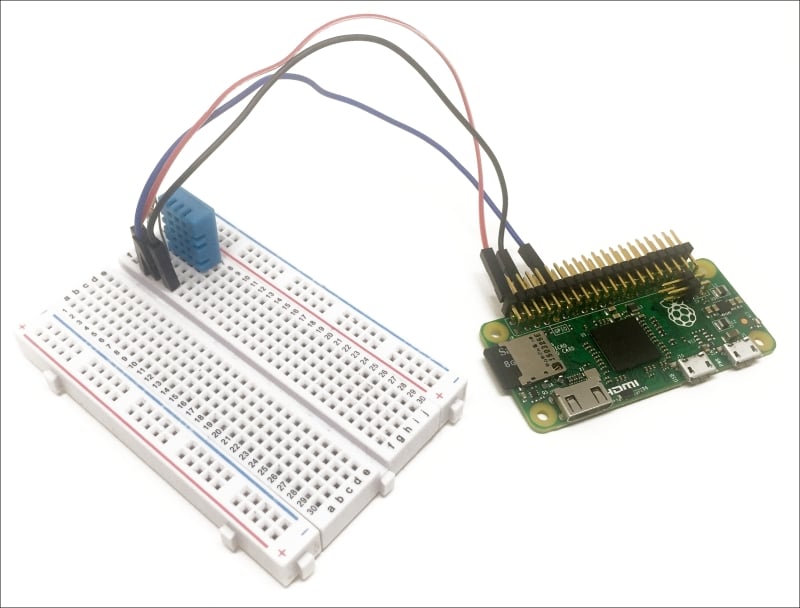
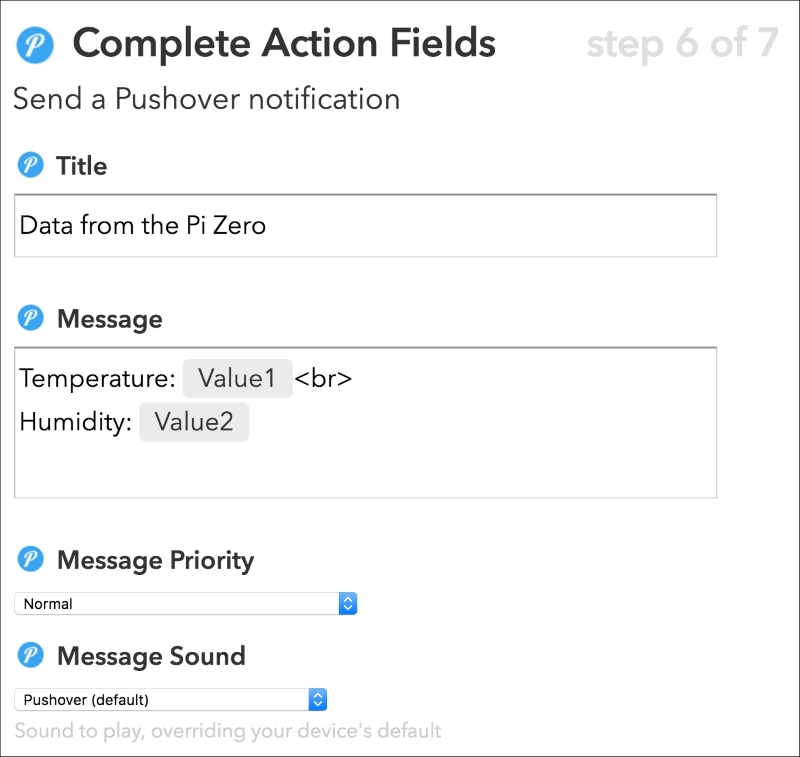
Within this context, a very important application is to receive notifications from your devices when they detect something in your home, for example a motion in your home or the current temperature. This is exactly what we are going to do in this chapter, we are going to learn how to make your Raspberry Pi Zero board send you notifications via text message, email, and push notifications. Let's start!

Hardware and software requirements


As always, we are going to start with the list of required hardware and software components for the project.

Except Raspberry Pi Zero, you will need some additional components for each of the sections in this chapter.

For the first project of this chapter, we are going to use a simple PIR motion sensor to detect motion from your Pi.

Then, for the last two projects of the chapter, we'll use the DHT11 sensor that we have already used in previous chapters.

Finally, you will need the usual breadboard and jumper wires.

This is the list of components that you will need for this whole chapter, not including the Raspberry Pi Zero:

On the software side, you will need to create an account on IFTTT, which we will use in all the projects of this...

Making a motion sensor that sends text messages


For the first project of this chapter, we are going to attach a motion sensor to the Raspberry Pi board and make the Raspberry Pi Zero send us a text message whenever motion is detected. For that, we are going to use IFTTT to make the link between our Raspberry Pi and our phone. Indeed, whenever IFTTT will receive a trigger from the Raspberry Pi, it will automatically send us a text message.

Lets first connect the PIR motion sensor to the Raspberry Pi. For that, simply connect the VCC pin of the sensor to a 3.3V pin of the Raspberry Pi, GND to GND, and the OUT pin of the sensor to GPIO18 of the Raspberry Pi.

This is the final result:

Let's now add our first channel to IFTTT, which will allow us later to interact with the Raspberry Pi and with web services. You can easily add new channels by clicking on the corresponding tab on the IFTTT website. First, add the Maker channel to your account:

This will basically give you a key that you will need...

Sending temperature alerts through email


In the second project of the chapter, we are going to learn how to send automated email alerts based on data measured by the Raspberry Pi.

Let's first assemble the project. Place the DHT11 sensor on the breadboard and then place the 4.7k Ohm resistor between pin 1 and 2 of the sensor. Then, connect pin 1 of the sensor to the 3.3V pin of the Raspberry Pi, pin 2 to GPIO18, and pin 4 to GND. This is the final result:

Let us now see how to configure the project. Go over to IFTTT and create add the Email Channel to your account:

After that, create a new recipe by choosing the Maker channel as the trigger:

For the event, enter temperature_alert and then choose Email as the action channel:

You will then be able to customize the text and subject of the email sent to Pi. As we want to send the emails whenever the temperature in your home gets too low, you can use a similar message:

You can now finalize the creation of the recipe and close IFTTT. Let's now see how...

Receiving measurement SATA through push notifications


In the last project of this chapter, we'll learn how to use the project we built in the previous section to actually not send you alerts, but just keep you updated about the current temperature and humidity measured by Pi.

Here however, we are going to use something new to alert you: push notifications. These notifications will immediately show up on your phone if you have the right app installed.

As the app, we'll use Pushover that is available for iOS and Android. You can install it from your App Store and find more information at the following URL:

https://ifttt.com/

Then, add the Pushover channel inside IFTTT:

Now, create a new recipe and choose the Maker channel again as the trigger:

I used data as the trigger:

Then, select Pushover as the action channel and enter the following message:

Here, we'll use the variables Value1 and Value2 to display the temperature and humidity inside the message. We'll see in a moment how to actually send that...

Summary


In this chapter, we learned all the basics about sending automated notifications from your Raspberry Pi. We learned, for example, how to send notifications via email, text messages, and push notifications. This is really important to build a smart home, as you want to be able to get alerts in real-time from what's going on inside your home and also receive regular reports about the current status of your home.

You can of course improve the projects of this chapter in many ways. It would be easy for example to have several Pi Zero boards in your home, each sending you alerts on your phone for example. You could give a name to each of the boards and include that name inside the alerts so you know which Pi sent the message.

In the next chapter, we are going to use everything we learned so far in the book to build a simple security system using the Raspberry Pi Zero board.

lock icon
The rest of the chapter is locked
You have been reading a chapter from
Building Smart Homes with Raspberry Pi Zero
Published in: Oct 2016Publisher: PacktISBN-13: 9781786466952
Register for a free Packt account to unlock a world of extra content!
A free Packt account unlocks extra newsletters, articles, discounted offers, and much more. Start advancing your knowledge today.
undefined
Unlock this book and the full library FREE for 7 days
Get unlimited access to 7000+ expert-authored eBooks and videos courses covering every tech area you can think of
Renews at $15.99/month. Cancel anytime

Author (1)

author image
Marco Schwartz

Marco Schwartz is an electrical engineer, entrepreneur, and blogger. He has a master's degree in electrical engineering and computer science from Supélec, France, and a master's degree in micro engineering from the Ecole Polytechnique Fédérale de Lausanne (EPFL), Switzerland. He has more than five years' experience working in the domain of electrical engineering. Marco's interests center around electronics, home automation, the Arduino and Raspberry Pi platforms, open source hardware projects, and 3D printing. He has several websites about the Arduino, including the Open Home Automation website, which is dedicated to building home automation systems using open source hardware. Marco has written another book on home automation and the Arduino, called Home Automation With Arduino: Automate Your Home Using Open-source Hardware. He has also written a book on how to build Internet of Things projects with the Arduino, called Internet of Things with the Arduino Yun, by Packt Publishing.
Read more about Marco Schwartz