Reader small image

You're reading from  Building Smart Homes with Raspberry Pi Zero

Product typeBook
Published inOct 2016
PublisherPackt
ISBN-139781786466952
Edition1st Edition
Right arrow
Author (1)
Marco Schwartz
Marco Schwartz
author image
Marco Schwartz

Marco Schwartz is an electrical engineer, entrepreneur, and blogger. He has a master's degree in electrical engineering and computer science from Supélec, France, and a master's degree in micro engineering from the Ecole Polytechnique Fédérale de Lausanne (EPFL), Switzerland. He has more than five years' experience working in the domain of electrical engineering. Marco's interests center around electronics, home automation, the Arduino and Raspberry Pi platforms, open source hardware projects, and 3D printing. He has several websites about the Arduino, including the Open Home Automation website, which is dedicated to building home automation systems using open source hardware. Marco has written another book on home automation and the Arduino, called Home Automation With Arduino: Automate Your Home Using Open-source Hardware. He has also written a book on how to build Internet of Things projects with the Arduino, called Internet of Things with the Arduino Yun, by Packt Publishing.
Read more about Marco Schwartz

Right arrow

Chapter 7. Use the Raspberry Pi Zero to Build a Security System

In this chapter, we are going to learn how to build a modular security system using the Raspberry Pi Zero board. The Raspberry Pi board is really cheap and has a very small form factor, you can use many such boards inside your home to build a complete security system for your home.

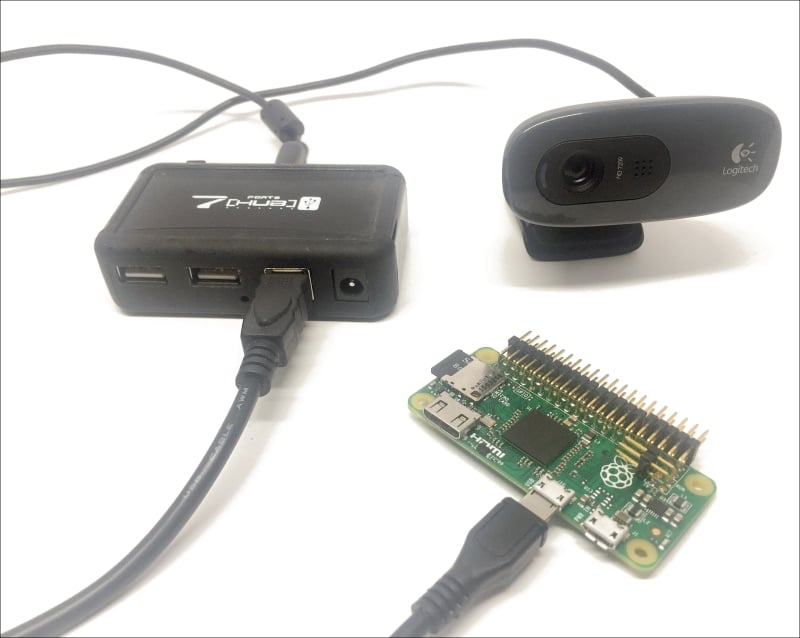
We are going to integrate three types of components into our system: motion sensors, alarms, and security camera. These modules will communicate with a central server application that will either run on your computer or on another Raspberry Pi. First, we are going to see how to configure each board individually and then configure the central server and a basic interface.

Hardware and software requirements


As always, we are going to start with the list of required hardware and software components for the project.

In this chapter, we are going to use at least three Raspberry Pi Zero boards: for a motion sensor, an alarm module, and a camera module. Of course, you can perfectly use more of each module in your security system.

For the motion sensor module, I will use a simple PIR motion sensor.

Then, for the alarm module, I will be using a small buzzer, as well as an LED and a 330 Ohm resistor.

For the camera module, I will use a Logitech C270 webcam. Here, any camera compatible with the UVC protocol would work, which is the case for most of the cameras sold these days.

Finally, you will need the usual breadboard and jumper wires.

This is the list of components that you will need for this chapter, not including the Raspberry Pi Zero:

Building a motion sensor with the Pi Zero


The first module that we are going to assemble in this chapter is the motion sensor module. These modules will be deployed in key parts of your home, to detect any intruder in your home.

The hardware configuration for this part will actually be very simple. First, connect the VCC pin of the motion sensor to a 3.3V pin of the Raspberry Pi. Then, connect the GND pin of the sensor to one GND pin of the Pi. Finally, connect the OUT pin of the motion sensor to the GPIO17 pin of the Raspberry Pi. You can refer to the previous chapters to find out about pin mapping of the Raspberry Pi Zero board.

This is the final result:

Let's now see how to configure this module so we can access it remotely through WiFi. This application will be based on the aREST framework again, which we already saw in the previous chapters of the book.

Here is the complete code for this part:

// Modules
var express = require('express');

// Express app
var app = express();

// aREST
var...

Making a simple alarm module


In the second part of this chapter, we are going to learn how to build an alarm module for our security system. You will usually have one of those modules in your home that will flash light and emit sound in case motion is detected. Of course, you can perfectly connect it to a real siren instead of a buzzer to have a loud sound in case any motion is detected.

To assemble this module, first place the LED in series with the 330 Ohm resistor on the breadboard, with the longest pin of the LED in contact with the resistor. Also place the buzzer on the breadboard.

Then, connect the other side of the resistor to GPIO14 of the Pi and the other part of the LED to one GND pin of the Pi.

For the buzzer, connect the pin marked as + on the buzzer to GPIO15 and the other pin of the buzzer to one GND pin of the Pi.

This is the final result:

To configure this module, we will again use the aREST library, so the code will be very similar to the one we used in the previous section:

...

Building a wireless security camera


We are now going to build the module that will act as a wireless security camera. You can have one or many of those modules inside your home; it will allow you to observe what is going on in your home from a central location.

The hardware configuration for this part will be really simple, as we are using an USB camera. However, you will need to use an USB hub here, as we will need to connect the USB camera and the usual WiFi dongle on the Raspberry Pi.

This is the final result:

Let's now test the camera first, by taking a simple picture from the command line. You will need to install the fswebcam utility. To do so, simply type the following command inside a terminal:

sudo apt-get install fswebcam

Then, still from a terminal, you can take a picture with the following command:

fswebcam -r 1280×720 image.jpg

This will make a lot of messages appear inside the terminal, confirming that the picture has been taken:

You can now use an image utility to open the picture...

Creating a security system


In the last section of this chapter, we are going to learn how to integrate all the modules we built in this chapter into a central interface, from which you'll be able to monitor them.

For this project, I ran this last part on my personal computer, but you can, of course, use another Pi Zero board (or any Raspberry Pi board) to run this software.

Let's now see the code for this last section. It will be again composed a main Node.js file for the server, and one HTML and JavaScript files for the interface itself.

Let's first see the Node.js part. It starts by importing all the required modules:

// Modules
var express = require('express');
var app = express();
var request = require('request');

// Use public directory
app.use(express.static('public'));

Then, you will need to modify the code to put the IP addresses of the Raspberry modules you will be using in the project (except the camera modules, we'll set their IPs directly inside the interface):

var motionSensorPi...

Summary


In this chapter, we learned how to build a modular security system based on Raspberry Pi Zero. There are of course many ways to improve this project. For example, you can simply add more modules to the project, like having more motion sensors that triggers the same alarm. You can also use some simple software like Ngrok to access the live video stream remotely, even if you are outside of the WiFi network of your home.

In the next chapter, we are going to dive into the Internet of Things again, and learn how to monitor and control your home from anywhere in the world!

lock icon
The rest of the chapter is locked
You have been reading a chapter from
Building Smart Homes with Raspberry Pi Zero
Published in: Oct 2016Publisher: PacktISBN-13: 9781786466952
Register for a free Packt account to unlock a world of extra content!
A free Packt account unlocks extra newsletters, articles, discounted offers, and much more. Start advancing your knowledge today.
undefined
Unlock this book and the full library FREE for 7 days
Get unlimited access to 7000+ expert-authored eBooks and videos courses covering every tech area you can think of
Renews at $15.99/month. Cancel anytime

Author (1)

author image
Marco Schwartz

Marco Schwartz is an electrical engineer, entrepreneur, and blogger. He has a master's degree in electrical engineering and computer science from Supélec, France, and a master's degree in micro engineering from the Ecole Polytechnique Fédérale de Lausanne (EPFL), Switzerland. He has more than five years' experience working in the domain of electrical engineering. Marco's interests center around electronics, home automation, the Arduino and Raspberry Pi platforms, open source hardware projects, and 3D printing. He has several websites about the Arduino, including the Open Home Automation website, which is dedicated to building home automation systems using open source hardware. Marco has written another book on home automation and the Arduino, called Home Automation With Arduino: Automate Your Home Using Open-source Hardware. He has also written a book on how to build Internet of Things projects with the Arduino, called Internet of Things with the Arduino Yun, by Packt Publishing.
Read more about Marco Schwartz