


You are now going to modify the sketch slightly so that it can transmit the state of the sensor to a central interface running on your computer. However, you not only want to transmit the state of the motion sensor, but also an ID identifying the sensor that is detecting the motion. Programming the detector starts by importing the right libraries:
// Libraries
#include <aREST.h>
#include <SPI.h>
The aREST library implements a REST API for Arduino. REST stands for REpresentational State Transfer, and is widely used in web applications such as Software as a Service (SaaS) applications. In our case, we will use this library to standardize the communication with the central interface that will run on the computer. In this project, the REST commands will be sent over the XBee connection that acts as a serial port from the Arduino point of view.
After importing the libraries, you need to declare the sensor pin and the ID of the module as follows:
// Motion sensor pin and ID
int sensor_pin = 8;
String xbee_id = "2";
After this, you can create the instance of the aREST library that will handle the requests coming from the graphical interface:
// Create aREST instance
aREST rest = aREST();
In the setup() function of the sketch, the first step is to start the serial communication. Be careful here, as the speed of the serial object has to be the same as the speed of your XBee modules, which is 9600 bauds by default:
// Start Serial
   Serial.begin(9600);
You can also set the ID of the module:
   // Give name and ID to device
   rest.set_id(xbee_id);
Note that if you are configuring more than one sensor, you need to change the ID of each sensor you are configuring. Now, thanks to the aREST library, the loop() part of the sketch is pretty simple. We simply have to handle the incoming requests from the computer that will come via the XBee serial interface:
void loop() {

  // Handle REST calls
  rest.handle(Serial);

}
Now, the sketch is ready to be used.
Note
All the code is available on the GitHub repository of the project:
https://github.com/openhomeautomation/arduino-home-automation/tree/master/chapter1
You can upload the sketch to your Arduino board by making sure that the switch is still set on DLINE. Once this is done, you can test the code locally via the serial monitor of the Arduino IDE. Open the serial monitor, make sure that the serial speed is set to 9600, and type the following:
/digital/8/r
This is the REST command to read a digital value from pin number 8 and return the value, which is exactly what we want to achieve. You should see the following data being returned, depending on the current state of the sensor:
{"return_value": 0, "id": "2", "name": "", "connected": true}What we are interested in is the return_value field, which contains the result of the digitalRead() function. Try to wave your hand in front of the sensor to see if the return value changes accordingly. Note that the returned data is in the JSON format, which will be really important later when we are going to process this information and display it.
Now that you are sure that the code is working, you can switch over to XBee communication. For that, simply put the switch next to the XBee module to UART. Now, the serial port of the Arduino board is directly wired to the XBee module.
Note
By default, all the XBee modules sold are configured on the same Personal Area Network (PAN) ID, which is 3332. This means that all the modules will receive data from other modules on the same PAN ID. For experimentation, you can leave it at its default value. However, you might want to change this later, in case your neighbor is, for example, using XBee devices as well.
To continue further, insert the XBee module you want to modify in the USB XBee explorer and open the XCTU XBee tool. Click on the top-left button to add a new device and select the USB explorer serial port. You should get the following screen:
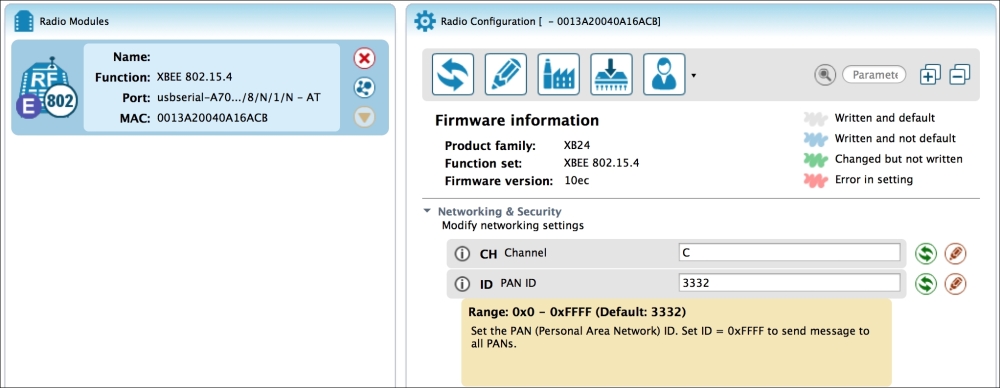
You will then be able to change the PAN ID of your device. To configure all the modules in your network, just repeat the procedure for each XBee module.