Reader small image

You're reading from  Blender 3D Printing by Example.

Product typeBook
Published inDec 2017
Reading LevelIntermediate
PublisherPackt
ISBN-139781788390545
Edition1st Edition
Languages
Tools
Concepts
Right arrow
Author (1)
Vicky Somma
Vicky Somma
author image
Vicky Somma

Vicky Somma started 3D printing her Blender designs in 2014, empowered by the 3D Printing Service Bureau, Shapeways, a full year before owning her own 3D printer. In November 2014, she was named one of the winners of the White House 3D Printed Ornament Design Contest. Her ornament, designed in Blender and inspired by the Library of Congress, hung in the East Wing of the White House and is now part of a Smithsonian Collection. For the 2015 and 2016 Holiday Seasons, she had Blender-designed 3D printed ornaments hanging in the Virginia Executive Mansion. In addition to Blender, Vicky also designs OpenSCAD. She prints on a MakerGear M2 and a Wanhao Duplicator i3 to make a line of designs that she sells at craft shows and Etsy. She teaches TinkerCad and 3D printing classes for local librarians. She maintains a 3D printing blog and makes regular appearances on the Friday 3D Printing Community Hangouts (#F3DPCH). Vicky's 3D printed Blender designs have been featured on NBC's TODAY, CBSNews, the Washington Post, Michelle Obama's Instagram, and websites such as 3DPrint, 3DPrintingIndustry, and 3Ders. Her designs have been highlighted by Thingiverse, Simplify3D, and Shapeways.
Read more about Vicky Somma

Right arrow

Customizing with Text

One of 3D printing's great assets is its ability to customize. One way to do that is to add engraved or embossed text to a piece. In this chapter, you'll use the text object in Blender to add customized text to give the wearer an emotional connection to the bracelet. The skills you'll use include:

  • Adding and editing new text objects
  • Finding and using fonts already installed on your computer
  • Converting text objects to 3D meshes

Adding a new text object

In Chapter 5, Building a Base with Standard Meshes and a Mirror, you used a cylinder and a cube as building block for your bracelet plate. Blender also has a specialized text object you can incorporate into your designs. You can add these the same way you would any other object:

  1. In Object Mode, left-click to move your 3D Cursor where you would like to add the new text
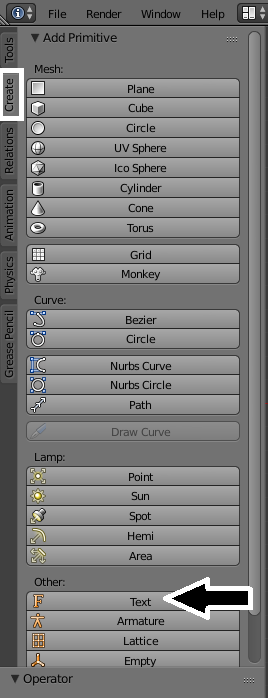
  1. In the Tool Shelf on the left-hand side of your screen, click the Create tab and under Other, click Text:
Adding a new text object

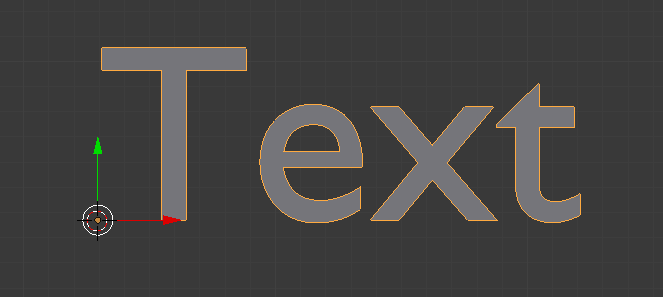
This adds a new text object to your 3D View. By default, it simply reads, Text.

A newly created text object

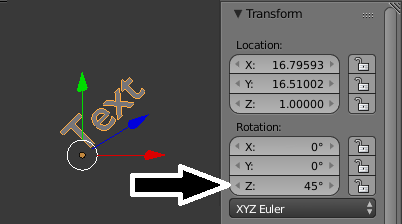
Like other Blender objects, you can use the Properties Shelf to transform the entire object, such as by changing its Location or Rotation:

Normal transform functions, such as rotate, work on text objects
...

Changing font settings

When you create a new text object, it uses the Blender default font, Bfont, for your text object. I find it to be a solid font, though the capital J does strike me as out of proportion with the other letters:

The Blender Default Font

The default font could very well meet your purposes. If it doesn't, Blender gives you the ability to fine-tune settings for your text objects, including the font type. You can use any font already installed on your computer, even a symbol font such as Wingdings:

Same text, three different fonts

Finding the font filename

When you do try to change a font in Blender, you are picking it by the filename of the True Type Font (.ttf) file that is installed on your computer...

Converting the text to a 3D mesh

Similar to the Bezier Curve in Chapter 3, Converting a Bezier Curve to a Properly Sized 3D Mesh, we want to convert our 2D text object into a mesh and make it 3D. Like most things in Blender, there are multiple ways to approach this.

Using the text object properties

You may have noticed in the Geometry section, there is a spot under Modifications where you can set up an Extrude height. This gives your text an exact thickness:

Setting the text thickness with font properties

You would still have to use the Object | Convert to | Mesh from Curve/Meta/Serf/Text menu option like we did in Chapter 3, Converting a Bezier Curve to a Properly Sized 3D Mesh, to convert your work to a 3D mesh. This approach...

Finalizing the bracelet

When we use the Boolean Union Modifier, our main concern is getting rid of internal vertices and overlapping geometry that would potentially confuse the slicer and the 3D printer. In the case of our coordinates, if we align them perfectly flush with the rest of the base, there will be no such overlap. We would be able to safely export our work without having to do the formal Boolean Union.

Since the Object Origin of our coordinates is at the bottom of the letters, we will want to set that to match the Z position of the top surface of our bracelet plate to line them up. If the letters were higher than that, our text would not be connected to the base. If they are lower than that, the letters would extend inside the base and create the confusing overlap:

You want the bottom of the text to line up with the top of the base plate.

The steps to look up that...

Summary

In this chapter, you finished your second jewelry piece. You learned how to add a text object in Blender and how to change the text, the size, the font type, as well as advanced settings such as line spacing. You learned two techniques to convert your text to a 3D mesh and how to align it flush with your bracelet plate. Finally, you reinforced earlier lessons by multi-selecting two objects and exporting them to STL format for 3D printing.

In the Chapter 8, Using Empties to Model the Base of the House, you'll begin another type of 3D printing project. You will start an architectural model by working on a house figurine.

lock icon
The rest of the chapter is locked
You have been reading a chapter from
Blender 3D Printing by Example.
Published in: Dec 2017Publisher: PacktISBN-13: 9781788390545
Register for a free Packt account to unlock a world of extra content!
A free Packt account unlocks extra newsletters, articles, discounted offers, and much more. Start advancing your knowledge today.
undefined
Unlock this book and the full library FREE for 7 days
Get unlimited access to 7000+ expert-authored eBooks and videos courses covering every tech area you can think of
Renews at $15.99/month. Cancel anytime

Author (1)

author image
Vicky Somma

Vicky Somma started 3D printing her Blender designs in 2014, empowered by the 3D Printing Service Bureau, Shapeways, a full year before owning her own 3D printer. In November 2014, she was named one of the winners of the White House 3D Printed Ornament Design Contest. Her ornament, designed in Blender and inspired by the Library of Congress, hung in the East Wing of the White House and is now part of a Smithsonian Collection. For the 2015 and 2016 Holiday Seasons, she had Blender-designed 3D printed ornaments hanging in the Virginia Executive Mansion. In addition to Blender, Vicky also designs OpenSCAD. She prints on a MakerGear M2 and a Wanhao Duplicator i3 to make a line of designs that she sells at craft shows and Etsy. She teaches TinkerCad and 3D printing classes for local librarians. She maintains a 3D printing blog and makes regular appearances on the Friday 3D Printing Community Hangouts (#F3DPCH). Vicky's 3D printed Blender designs have been featured on NBC's TODAY, CBSNews, the Washington Post, Michelle Obama's Instagram, and websites such as 3DPrint, 3DPrintingIndustry, and 3Ders. Her designs have been highlighted by Thingiverse, Simplify3D, and Shapeways.
Read more about Vicky Somma