Search icon
Arrow left icon
All Products
Best Sellers
New Releases
Books
Videos
Audiobooks
Learning Hub
Newsletters
Free Learning
Arrow right icon
Blender 3D Printing by Example.

You're reading from  Blender 3D Printing by Example.

Product type Book
Published in Dec 2017
Publisher Packt
ISBN-13 9781788390545
Pages 430 pages
Edition 1st Edition
Languages
Concepts
Author (1):
Vicky Somma Vicky Somma
Profile icon Vicky Somma

Table of Contents (16) Chapters

Preface 1. Thinking about Design Requirements 2. Using a Background Image and Bezier Curves 3. Converting a Bezier Curve to a Properly Sized 3D Mesh 4. Flattening a Torus and Boolean Union 5. Building a Base with Standard Meshes and a Mirror 6. Cutting Half Circle Holes and Modifier Management 7. Customizing with Text 8. Using Empties to Model the Base of the House 9. Mesh Modeling and Positioning the Details 10. Making Textures with the Array Modifier and Scalable Vector Graphics 11. Applying Textures with Boolean Intersection 12. Making Organic Shapes with the Subdivision Surface Modifier 13. Trial and Error – Topology Edits 14. Coloring Models with Materials and UV Maps 15. Troubleshooting and Repairing Models

Mesh Modeling and Positioning the Details

In this chapter, we are going to add details to our house figurine by modeling the windows. The skills involved will include the following:

  • Performing multiple cuts at once with Loop Cut and Slide
  • Using the Subdivision tool to divide up existing faces and edges
  • Dissolving unnecessary edges
  • Using the Inset tool to create borders
  • Renaming objects in the Outliner for better organization
  • Positioning objects with the Snap during transform icon

Modeling windows

As I embark on adding details to the house, I do have some options for how to attack the modeling. Let's take the example of a window. I could continue to use the Loop Cut and Slide and Extrude tools to slice up new edges on the existing cube and make the windows part of the already existing mesh.

All my work would be contained in a single object, the cube:

The existing cube could be cut up and the details, such as windows, could be modeled as part of the same mesh

Looking ahead, however, I can see that this particular window is a common element of the house. I can see it repeated not only on the front of the house but the other sides as well:

The same window is repeated throughout the house.

If I modeled the windows as a direct part of the existing cube, I would have to repeat my modeling steps for each window. That would not only add to my modeling time...

Renaming and copying windows

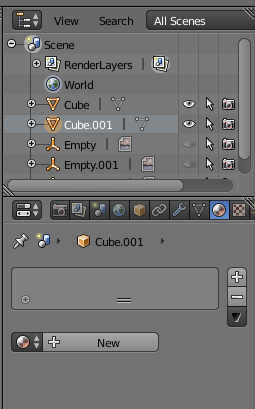
Once satisfied with the window, we can make copies to apply to the rest of the house. As we continue to add details to the project, the Outliner window is going to get quite a few objects in it. Blender assigns default names to each object based on what it is. For example, my project currently has two cubes named Cube and Cube.001:


The Outliner window with the default names of each object

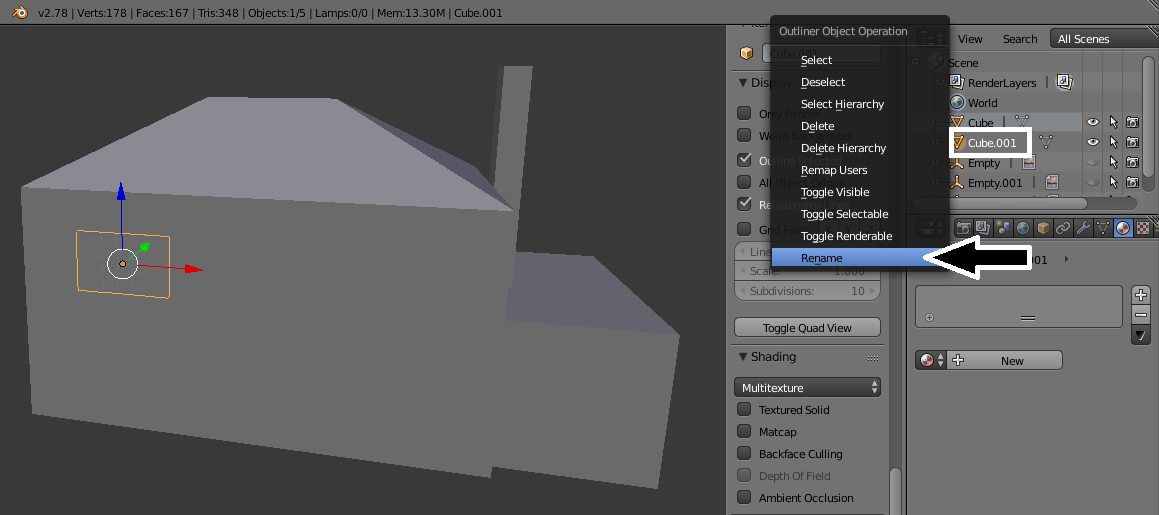
It is helpful, particularly in large endeavors, to assign more meaningful names. It'll make it easier to select objects through the Outliner window and hide ones we don't want to see. The steps to rename an object are as follows:

  1. In the Outliner window at the top right of the screen, right-click on the name you wish to update. A pop-up menu displays. Select Rename. Alternatively, you can double-click on the object's name:


Asking Blender to rename...

Perfecting the positioning with Snap

As with the text on the coordinate bracelet, we do not want to cause confusion with overlapping geometry. We want our windows to line up exactly and lay flush to the house itself. In Chapter 7, Customizing with Text, we typed in the exact location coordinate to line the text up. You can still do that with the windows. The only catch is you'll first want to change the Object Origin to a specific vertex as we did in Chapter 5, Building a Base with Standard Meshes and a Mirror. Specifically, you want to move the Object Origin from the center of the window to a point you want to lie directly on the house. Once that is done, you match up the applicable coordinates. In the following example, I make sure the X coordinate of the window matches the X coordinate of a point on the left side of the house:

Windows can be lined up by changing the Object...

Summary

In this chapter, you got hands-on practice with mesh modeling techniques. You learned how to make multiple cuts with Loop Cut and Slide. You learned how to dissolve unnecessary edges. You used the Subdivide and Inset tools to emphasize your details. You got more practice extruding, duplicating, and rotating. You learned how to organize your work by renaming objects in the Outliner window. Finally, you learned about the Snap during transform icon and how it can expedite lining your objects up.

In the Chapter 10, Making Textures with the Array Modifier and Scalable Vector Graphics, you are going to learn two techniques to model textures. You'll learn about the Array Modifier for brickwork and how to import Scalable Vector Graphic (SVG) files to make stonework.

lock icon The rest of the chapter is locked
You have been reading a chapter from
Blender 3D Printing by Example.
Published in: Dec 2017 Publisher: Packt ISBN-13: 9781788390545
Register for a free Packt account to unlock a world of extra content!
A free Packt account unlocks extra newsletters, articles, discounted offers, and much more. Start advancing your knowledge today.
Unlock this book and the full library FREE for 7 days
Get unlimited access to 7000+ expert-authored eBooks and videos courses covering every tech area you can think of
Renews at $15.99/month. Cancel anytime}