Reader small image

You're reading from  Blender 3D Printing by Example.

Product typeBook
Published inDec 2017
Reading LevelIntermediate
PublisherPackt
ISBN-139781788390545
Edition1st Edition
Languages
Tools
Concepts
Right arrow
Author (1)
Vicky Somma
Vicky Somma
author image
Vicky Somma

Vicky Somma started 3D printing her Blender designs in 2014, empowered by the 3D Printing Service Bureau, Shapeways, a full year before owning her own 3D printer. In November 2014, she was named one of the winners of the White House 3D Printed Ornament Design Contest. Her ornament, designed in Blender and inspired by the Library of Congress, hung in the East Wing of the White House and is now part of a Smithsonian Collection. For the 2015 and 2016 Holiday Seasons, she had Blender-designed 3D printed ornaments hanging in the Virginia Executive Mansion. In addition to Blender, Vicky also designs OpenSCAD. She prints on a MakerGear M2 and a Wanhao Duplicator i3 to make a line of designs that she sells at craft shows and Etsy. She teaches TinkerCad and 3D printing classes for local librarians. She maintains a 3D printing blog and makes regular appearances on the Friday 3D Printing Community Hangouts (#F3DPCH). Vicky's 3D printed Blender designs have been featured on NBC's TODAY, CBSNews, the Washington Post, Michelle Obama's Instagram, and websites such as 3DPrint, 3DPrintingIndustry, and 3Ders. Her designs have been highlighted by Thingiverse, Simplify3D, and Shapeways.
Read more about Vicky Somma

Right arrow

Converting a Bezier Curve to a Properly Sized 3D Mesh

In this chapter, we will convert the 2D curve of our profile into a 3D mesh that is properly sized for our pendant. The skills that will be covered are as follows:

  • Converting a Bezier curve into a mesh
  • Using different selection modes to select vertices, edges, and faces
  • Creating new faces
  • Using the Extrude tool to make a 2D face into a 3D object
  • Understanding Blender units and sizing your object to specific dimensions

Converting a Bezier curve into a mesh

Now that we have finalized the shape of our curve, we want to translate that layout to a format that will be easy to combine with other 3D objects. We want to make our curve into what's called a mesh. As a curve, each segment is defined by two control points and two handles, which makes it easy to define and edit.

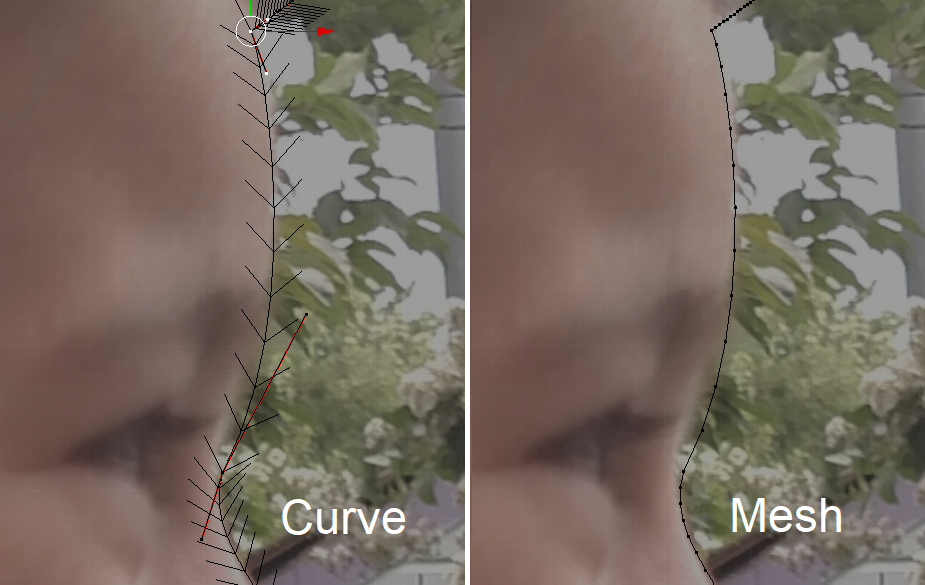
That same shape as a mesh is comprised of numerous points (vertices) and line segments (edges):

As a curve, the forehead is defined by two control points and two handles. As a mesh, that is translated to specific vertices.

Viewing the curve in Edit Mode gives you a preview of where the final vertices will be. The arrows that show the direction of the curve also illustrate where the points will be.

You can select how many vertices will ultimately define each curve segment. On the bottom right of your screen is an area known...

Selecting vertices and making a new face

Now that our profile is a mesh, you will be working in terms of vertices, edges, and faces. Vertices are the points that make up the edges. Edges, in turn, are the borders that make up faces. In 3D printing, the slicing software is ultimately concerned with the faces of your object. An object with just vertices and edges would not print.

When you are in Edit Mode, you have the ability to view and edit all three elements of a mesh. There are now icons at the bottom of the screen that will let you switch your Selection Mode. If you select the leftmost icon, which is a yellow point on a cube, you will be in Vertex Select mode, where right-clicking will select specific vertices in your model. Selecting the middle icon, a yellow line on a cube, will put you in Edge Select mode and allow you to pick the edges or the outline of our profile. There...

Extruding to make 3D objects

You have your first face, but your model is not yet a full 3D object. You are going to need to give your object some height to give your printer something to do. Before we do that, let's learn a little more about our face and how it will behave.

Understanding and viewing face normals

Although it is completely flat and 2D, your first face already has an inside and an outside, a front and a back. A quilt square is also flat, but there is a definite outside, the part with the pattern that will be seen, and a definite inside. Your face doesn't have the fancy colors of a quilt square, but you can still tell which part is the "front" and which part is the "back." The 3D...

Scaling and sizing the mesh

Before we go any further, this is a good point to reflect on the thoughts from Chapter 1, Thinking About Design Requirements, and to size our piece appropriately for the function and the printing process you have in mind. Looking at pendants I already own, I'm thinking a suitable size for this pendant would be 1 1/2" tall. This is an item that may look fantastic in cast metals from a 3D Printing Service Bureau. If I did decide to go that route, I would make the piece thinner to save on cost.

My starting dimensions would likely be as follows:

Dimension Service Bureau
(Shapeways Plated Metals)
At home
(FFF/FDM)
Length 1 1/2" (38.1mm) 1 1/2" (38.1mm)
Width Proportional to length Proportional to length
Height (thickness) 0.8mm 2mm
...

Summary

In this chapter, you converted a Bezier curve into a mesh. You learned how to select vertices and edges and how to create a brand new face. Next, you learned about the Extrude tool and how to make that 2D face into a 3D object. Finally, you learned how to update the dimensions and scale of your object to make sure it is properly sized for your needs.

In Chapter 4, Flattening a Torus and Boolean Union, you will finalize your pendant by adding a hook at the top.

lock icon
The rest of the chapter is locked
You have been reading a chapter from
Blender 3D Printing by Example.
Published in: Dec 2017Publisher: PacktISBN-13: 9781788390545
Register for a free Packt account to unlock a world of extra content!
A free Packt account unlocks extra newsletters, articles, discounted offers, and much more. Start advancing your knowledge today.
undefined
Unlock this book and the full library FREE for 7 days
Get unlimited access to 7000+ expert-authored eBooks and videos courses covering every tech area you can think of
Renews at $15.99/month. Cancel anytime

Author (1)

author image
Vicky Somma

Vicky Somma started 3D printing her Blender designs in 2014, empowered by the 3D Printing Service Bureau, Shapeways, a full year before owning her own 3D printer. In November 2014, she was named one of the winners of the White House 3D Printed Ornament Design Contest. Her ornament, designed in Blender and inspired by the Library of Congress, hung in the East Wing of the White House and is now part of a Smithsonian Collection. For the 2015 and 2016 Holiday Seasons, she had Blender-designed 3D printed ornaments hanging in the Virginia Executive Mansion. In addition to Blender, Vicky also designs OpenSCAD. She prints on a MakerGear M2 and a Wanhao Duplicator i3 to make a line of designs that she sells at craft shows and Etsy. She teaches TinkerCad and 3D printing classes for local librarians. She maintains a 3D printing blog and makes regular appearances on the Friday 3D Printing Community Hangouts (#F3DPCH). Vicky's 3D printed Blender designs have been featured on NBC's TODAY, CBSNews, the Washington Post, Michelle Obama's Instagram, and websites such as 3DPrint, 3DPrintingIndustry, and 3Ders. Her designs have been highlighted by Thingiverse, Simplify3D, and Shapeways.
Read more about Vicky Somma