Search icon
Arrow left icon
All Products
Best Sellers
New Releases
Books
Videos
Audiobooks
Learning Hub
Newsletters
Free Learning
Arrow right icon
Blender 3D Printing by Example.

You're reading from  Blender 3D Printing by Example.

Product type Book
Published in Dec 2017
Publisher Packt
ISBN-13 9781788390545
Pages 430 pages
Edition 1st Edition
Languages
Concepts
Author (1):
Vicky Somma Vicky Somma
Profile icon Vicky Somma

Table of Contents (16) Chapters

Preface 1. Thinking about Design Requirements 2. Using a Background Image and Bezier Curves 3. Converting a Bezier Curve to a Properly Sized 3D Mesh 4. Flattening a Torus and Boolean Union 5. Building a Base with Standard Meshes and a Mirror 6. Cutting Half Circle Holes and Modifier Management 7. Customizing with Text 8. Using Empties to Model the Base of the House 9. Mesh Modeling and Positioning the Details 10. Making Textures with the Array Modifier and Scalable Vector Graphics 11. Applying Textures with Boolean Intersection 12. Making Organic Shapes with the Subdivision Surface Modifier 13. Trial and Error – Topology Edits 14. Coloring Models with Materials and UV Maps 15. Troubleshooting and Repairing Models

Cutting Half Circle Holes and Modifier Management

In this chapter, we are going to poke two holes in our plate to allow it to be added to a bracelet. The techniques and skills covered will include the following:

  • Duplicating objects to save time
  • Positioning based on the minimum wall thickness
  • Using the Ctrl and Shift keys to multiselect items
  • Mesh modeling to remove vertices and create new faces
  • Using the Boolean Difference Modifier to cut holes
  • Managing the order of the Modifier Stack

Duplicating and sizing a cylinder

Now that we are satisfied with the shape and size of our base plate for the bracelet, we should add holes so that it can be incorporated into a jewelry piece. The Boolean Modifier that we used in Chapters 4, Flattening a Torus and Boolean Union, and Chapter 5, Building a Base with Standard Meshes and a Mirror, can also subtract objects from each other:


The Boolean Modifier can also subtract objects from each other

We can use that to poke holes in either side of our plate. That hole object could potentially be any shape. We could subtract a cylinder, a cube, or even the profile pendant we made in previous chapters:

Examples of the plate with different types of objects subtracted from it

For this project, I want to stay consistent with the curvature of the piece and use a semicircle for my hole. Thinking about the design requirements and the...

Placing the hole and preserving wall thicknesses

The new small cylinder is centered within its larger predecessor. For aesthetics, and to make sure we have more space for our custom text, we'll want to move that new cylinder along the X axis and place it closer to the edge of our piece. For the most part, you can go with what looks good to the eye. The only stipulation is you will want to make sure you meet the minimum wall thickness of your printing process.

For Service Bureau Printing, I would consider leaving at least 1mm. For at-home printing, I would be more comfortable with 2mm:

You will want to keep minimum wall thickness in mind when positioning the new cylinder

Positioning with subtraction

We can determine the...

Mesh modeling to make a half cylinder

Satisfied with the placement of our hole, we are going to use mesh modeling techniques to change our full cylinder into a half cylinder. In Chapter 4, Flattening a Torus and Boolean Union, you used the Border Select tool to pick a number of vertices at once. In this chapter, you'll practice another way to multiselect: using the Ctrl key and Shift key in conjunction with right-click.

Using Shift to multiselect

Anytime you are using the right mouse button to select, you can use the Shift key to add additional items to the selection. This includes entire objects in Object Mode as well as vertices, edges, or faces when you are in Edit Mode. Let's look at vertices in a cylinder as...

Making a hole with Boolean difference

Now that we are satisfied with the size, placement, and shape of our half cylinder, it is time to tell Blender to subtract it from our base cube. The steps are as follows:

  1. Switch back to Object Mode and right-click on our base cube to select it.
  2. In the Properties window, click on the wrench icon to access the Modifiers.
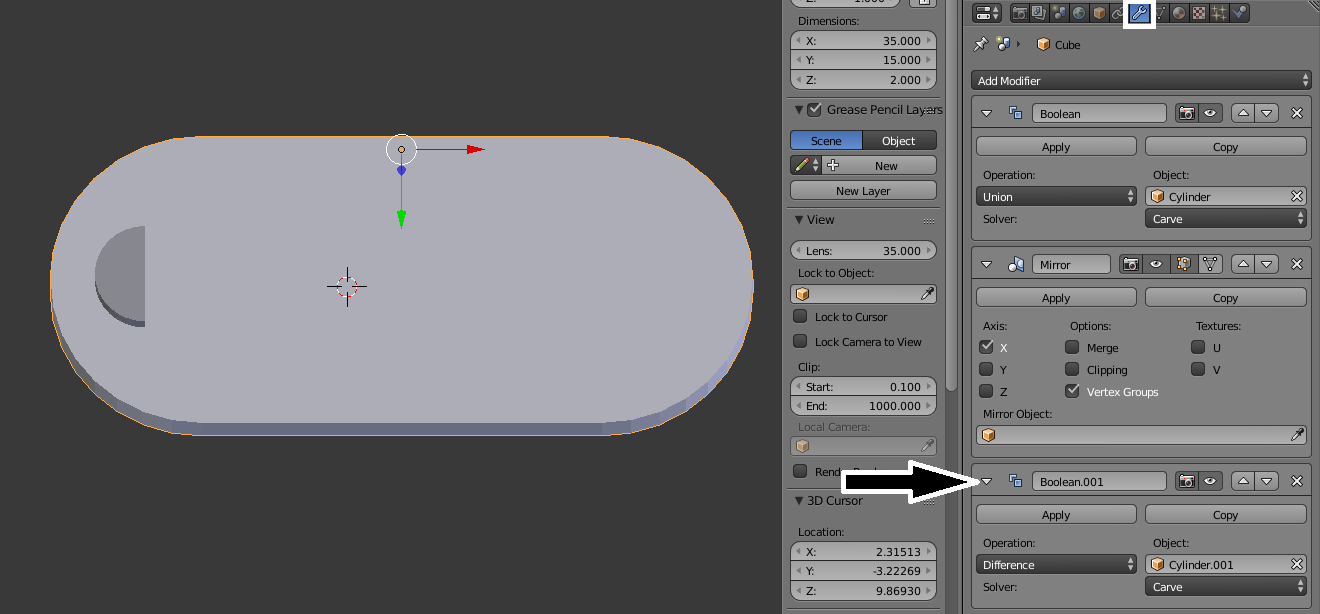
  3. Click on the Add Modifier drop-down menu and pick Boolean. A new modifier is added to the bottom of the modifier list. In this case, underneath our Boolean Union and our Mirror Modifier:
Adding another Boolean Modifier
  1. For Operation, pick Difference. For Object, select what you want to subtract. In this case, I want to subtract our half cylinder, which is named Cylinder.001. Finally, for Solver, select Carve:
Setting up the properties for the Boolean Difference

Do not click Apply at this time. We've added our Boolean...

Changing your object with modifier order

Once our half cylinder is hidden, we can see the hole in the left-hand side of our bracelet plate. The right-hand side, however, is still completely solid:

The base with just a single hole.

This is due to the order of the modifiers, the Modifier Stack. Blender applies the modifiers from top to bottom, as they are listed in the Properties window. In the case of our bracelet base, Blender currently does the following:

  1. Combines the cylinder and the cube to make a rounded half base
  2. Mirrors the rounded half base to make a full base
  3. Subtracts the half cylinder to make a hole
Modifiers are applied in order from top to bottom

The Mirror Modifier cannot copy a hole which is yet to exist. Changing the order of the Modifier Stack can produce very different objects. Suppose we put the Mirror Modifier last. The Union is applied, giving our base...

Summary

In this chapter, you learned to duplicate an existing cylinder to make a template for a hole. You resized and repositioned the hole, keeping the minimum wall thickness in mind. You learned new techniques for selecting multiple items at once. You deleted unnecessary vertices and practiced mesh modeling to make new faces for your half cylinder hole. You learned how to use the Boolean Difference Modifier to subtract one object from another. Finally, you learned how the ordering of your modifiers can impact on your final object. Altogether, you finished the base of your bracelet plate.

In Chapter 7, Customizing with Text, you will learn how to add text to customize and finalize your bracelet.

lock icon The rest of the chapter is locked
You have been reading a chapter from
Blender 3D Printing by Example.
Published in: Dec 2017 Publisher: Packt ISBN-13: 9781788390545
Register for a free Packt account to unlock a world of extra content!
A free Packt account unlocks extra newsletters, articles, discounted offers, and much more. Start advancing your knowledge today.
Unlock this book and the full library FREE for 7 days
Get unlimited access to 7000+ expert-authored eBooks and videos courses covering every tech area you can think of
Renews at $15.99/month. Cancel anytime}