Chapter 9. Entering Virtual Reality
In this chapter and the next, we'll create a first-person virtual reality (VR) game. The game will be targeted specifically at the powerful Oculus Rift hardware, and it's worth declaring this from the outset, as many other VR platforms exist as well. Although development methodologies do differ from device to device, the main principles of VR development within Unity are sufficiently similar that these chapters will still be helpful to any VR development on any of the hardware available today. Specifically, this chapter explores the following topics:
Note
The starting project and assets can be found in the book's companion files in the Chapter09/Start folder. You can start here and follow along with this chapter if you don't have your own project already.
Project Overview – Getting Started
The project created in this chapter will be a first-person shooter game, which mixes together nearly all the development techniques seen so far, as well as new techniques specific to VR. In this game, the player will be a stationary character that can look around and shoot in any direction, but cannot move around. The player will be standing in a sci-fi interior, and enemy bots will spawn into the level at random intervals. The bots will initially wander around searching for the player and, upon finding them, will run towards them, eventually attacking them. The player will be armed with plasma cannons on each hand, and will have the ability to attack oncoming enemies to avoid being injured. The basic objective is to see how long you can survive!
To create this project, we'll begin by creating the core functionality for a standard first-person mode, and then migrate that to VR. To get started, create a new project and import all assets from the Assets_To_Import...
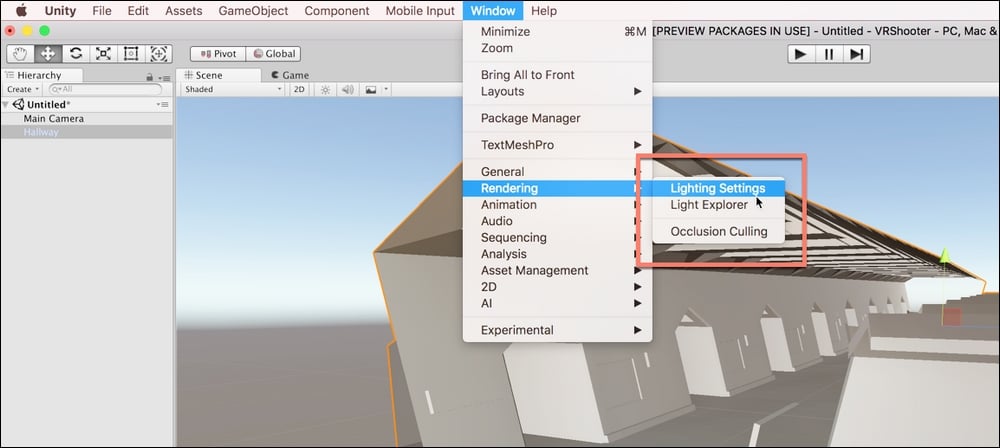
Lighting and mood is critically important for any scene, and here we'll create an atmospheric, dystopian sci-fi interior. This kind of environment typically relies on high levels of contrast between lighting; contrasting dark colors with vibrant non-natural lighting colors, such as green, blue and red. Let's start by disabling all lighting in the scene. Ensure all lights are moved from the hierarchy panel, and then access the lighting window by selecting Window | Rendering | Lighting Settings from the application menu. See Figure 9.4:
From the Lighting window, remove the day-time skybox from the Skybox Material field by choosing None via the texture swatch. From the Environment Lighting group, set the Ambient Source to Color, and the Ambient Color to black. This removes all ambient lighting from the scene, that is, lighting that pervades everywhere and pre-illuminates objects before scene lighting takes effect. See Figure 9...
Unity 2018 and above ships with a newer version of the post-processing stack for adding volume-based post-process effects to your project. Let's use these post-processing camera effects to enhance the appeal of the scene. As mentioned in earlier chapters, post-process effects are filters and adjustments applied to the pixels of the scene camera to stylize or improve the aesthetics of the rendered frame.
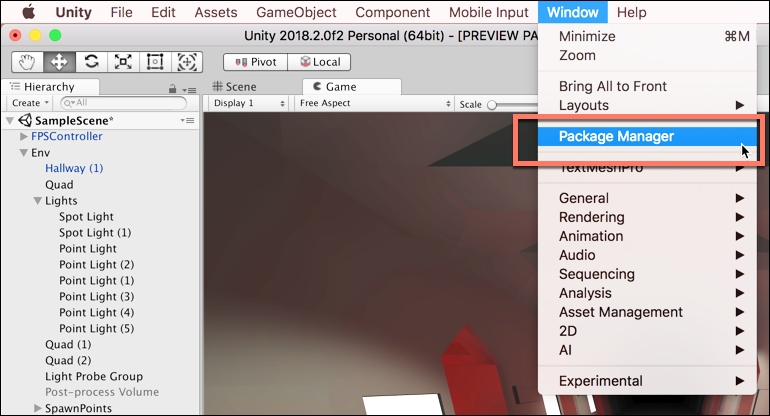
To add the newest version of the Post-Processing Stack, choose Window | Package Manager from the application menu. See Figure 9.19:
From the Packages List, click the All button to filter the list and view all available or installed packages. Select the Post-Processing package by clicking on it from the list. Once selected, click the install button to add the package to your project. If the project is already added, you may have the option of updating to the latest version by clicking the Update button. See Figure 9.20:
In this chapter so far, we've been preparing the foundations for a scene, ready to add core functionality and gameplay. To recap, our game will be a first-person VR shooter, in which waves of enemy droids will spawn into the level, move towards the player, and then attack on approach. The player must dispatch all enemies and see how long they can survive the level. We still have gameplay to implement, and whenever creating VR content, I like to make the project compatible with both VR and a standard first-person controller, both to help debugging and to aid testing without a headset.
But, before moving forwards with development, let's prepare for VR development generally. This section uses the Oculus Rift device, although the development workflow is similar for Oculus Go too. To get started, you'll need to connect and install your Oculus Rift device. Instructions for doing this can be found online at https://support.oculus.com/guides/rift/latest/concepts/rgsg-2-hwhardware...
Great work. So far we've imported all project assets, configured those assets, set up the environment, and calibrated the lighting. In addition, we've got started on the path to VR development. This is splendid, but there's more to do. In the next chapter, we'll complete our first-person shooter game.
Q1. XR stands for...
A. Extended Realities
B. Extensible Realism
C. X Rated
D. Expansive Reality
Q2. Light Probes are useful for…
A. Adding Indirect Illumination to Moving Objects
B. Light-mapping non-UV'd objects
C. Unwrapping UV sets
D. Adding soft shadows on static objects
Q3. Emissive lighting can…
Q4. The Post Processing Stack 2 includes…