In the previous chapters, we have only touched upon the use of cameras. In this chapter, we will see what cameras in 3D are and what they can do. Obviously, there is nothing like a real, physical camera in Papervision3D and it doesn't even have a visual representation on the 2D screen. The camera merely represents a virtual point from which we view the scene and the objects present in it.
The chapter will cover the following:
First, let's briefly examine how the camera and its classes are implemented in the Papervision3D library.
Cameras inherit from DisplayObject3D
Not only primitives inherit their properties and methods from DisplayObject3D, but also the CameraObject3D class, which is the super class of Camera3D. To sum up, Camera3D inherits from CameraObject3D, which inherits from DisplayObject3D.
So what does this mean? Because each camera inherits the x, y, and z properties from DisplayObject3D...
Cameras inherit from DisplayObject3D
Not only primitives inherit their properties and methods from DisplayObject3D, but also the CameraObject3D class, which is the super class of Camera3D. To sum up, Camera3D inherits from CameraObject3D, which inherits from DisplayObject3D.
So what does this mean? Because each camera inherits the x, y, and z properties from DisplayObject3D, we can move it around over the axes of the scene coordinate system (world space). Furthermore, you can rotate the camera in the same way as you would rotate any other instance of DisplayObject3D. Although the camera doesn't have a visual representation on the screen, we have a lot of tools to manipulate it. The camera even has some properties and methods that no other do3D has.
Basic settings that specifically apply to cameras are:
To get familiar with these settings, we will briefly examine some basics of 3D computer graphics. We will then look at a demo to get a better understanding of how the settings relate to each other.
The following illustration shows the camera and what it sees. Also notice the pyramid shape, cut off by a far plane and a near plane. The space inside the truncated pyramid is the viewing volume or frustum. The near and far planes are imaginary planes that define the frustum.
Now, let's take a look at how the frustum relates to the viewport sprite in which everything inside the frustum is eventually drawn. Different 3D programs have different ways of setting the viewport. In Papervision3D the viewport is set at the near plane. Therefore, although the viewport is a 2D sprite and the near plane is an imaginary plane perpendicular to the camera...
Papervision3D includes four types of cameras:
Target camera
Free camera
Debug camera
Spring camera
The target camera and the free camera are the most common types and will be discussed first. The debug camera is handy for testing purposes as it has some basic built-in navigation, and continuously displays information about its settings. A special type is the spring camera that provides an easy way to follow a moving 3D object, something that can be useful in game applications.
You set the camera type of your choice by passing it as an argument to the constructor of the BasicView class. Because we extend BasicView, we can use the super() call in our constructor to do so.
In Chapter 2 we have seen what the first three arguments do. And in the previous chapter we added a fourth one to set the interactivity of the viewport. Now we have added a fifth argument, which sets the type of camera you would like to use....
Setting a target with the lookAt() method
The lookAt() method enables you to make a camera look at a target. In this respect it behaves similarly to the previously discussed target property. However, besides target being a property and lookAt() being a method, there is a difference in how to use them. The target property needs to be set only once, for instance in the init() method, whereas lookAt() requires that you put it in the render method in order to keep being executed after the first frame is rendered. Therefore, to make the camera look at an object assigned to a variable plane, the following line should be added to the onRenderTick() method:
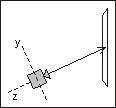
The camera will continuously rotate in such a way that its own z-axis is pointing at the origin of the target, as shown in the following illustration:
The lookAt()method is inherited from the DispayObject3D class. This means you can tell any do3D to look at any other do3D. So, you can't only tell a camera to look at a 3D...
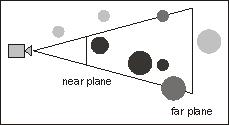
The following illustration shows a camera and the frustum with the near plane and the far plane. The light grey objects are outside the frustum, the black objects are inside the frustum, and the dark grey objects are partially inside the frustum.
Rendering objects that are outside the frustum would be a waste of performance. Even triangles that are not on the screen because objects are partially outside the frustum should better not be rendered.
Culling is the process of identifying what is totally or partially inside the frustum and getting rid of what is not inside (in the illustration, the light grey objects and parts of the dark grey objects). Papervision3D includes culling and does not render objects and triangles that are outside the frustum, which increases performance. Before we examine how we can tell Papervision3D to apply culling, let's see which types of culling are generally used in 3D computer graphics.
Note
Culling origins from the Latin word colligere, which means...
Clipping is a technique that solves a problem you may have seen before in 3D applications or demos, and that exists due to culling—an object comes too close to the camera, and because triangles are partially outside the frustum, they are culled and disappear. The following screenshot shows a sphere in Papervision3D that is very close to the camera. At the left side of the screenshot you can see that triangles have disappeared because of culling.
Clipping solves this problem by dividing the triangles that are too close to the camera into new triangles.
Note
Clipping is the process of dividing triangles of objects that are partially inside the frustum. Triangles that are divided into smaller ones will be rendered, whereas triangles that are outside the frustum will be thrown away.
Papervision3D includes the FrustumClipping class, which takes care of the clipping process described above.
Clipping in Papervision3D with FrustumClipping
The FrustumClipping class clips triangles that intersect...
The camera in Papervision3D represents a virtual point from which we view our scene. Because the Camera3D class inherits from DisplayObject3D, cameras have properties such as x, y, and z, and you can rotate them just like any other do3D.
The frustum is the 3D region that is rendered. Because it is cut off by the near and the far plane, which are imaginary planes perpendicular to the camera, the frustum is shaped like a truncated pyramid.
Zoom, focus, and field of view should be set while keeping in mind that they are inter-related. Focus is the equivalent of the near property and is defined by the distance from the camera to the near plane. Field of view is the vertical angle defined by the height of the viewport and the focus. The distance of the far plane to the camera can be set with the far property.
Papervision3D offers four types of camera—target, free, debug, and spring. The first two are the most commonly used types. The target camera is looking at a target, whereas the free...