Reader small image

You're reading from  Mastering Zendesk

Product typeBook
Published inJan 2017
PublisherPackt
ISBN-139781786461049
Edition1st Edition
Tools
Concepts
Right arrow
Author (1)
Cedric F. Jacob
Cedric F. Jacob
author image
Cedric F. Jacob

Cedric F. Jacob, before starting his own business as a customer service consultant, writer, and Zendesk admin for international companies, began his career as a customer service representative, from where he progressed to senior, team leader, and management roles. Working for clients such as Runtastic and Lovoo, he focuses on creating highly customized, scalable structures, utilizing his acquired customer service experience and broader passion for IT, which ranges from software and game development all the way to cyber security and hardware.
Read more about Cedric F. Jacob

Right arrow

Chapter 5. Customizing Business Rules and Ticket Escalation

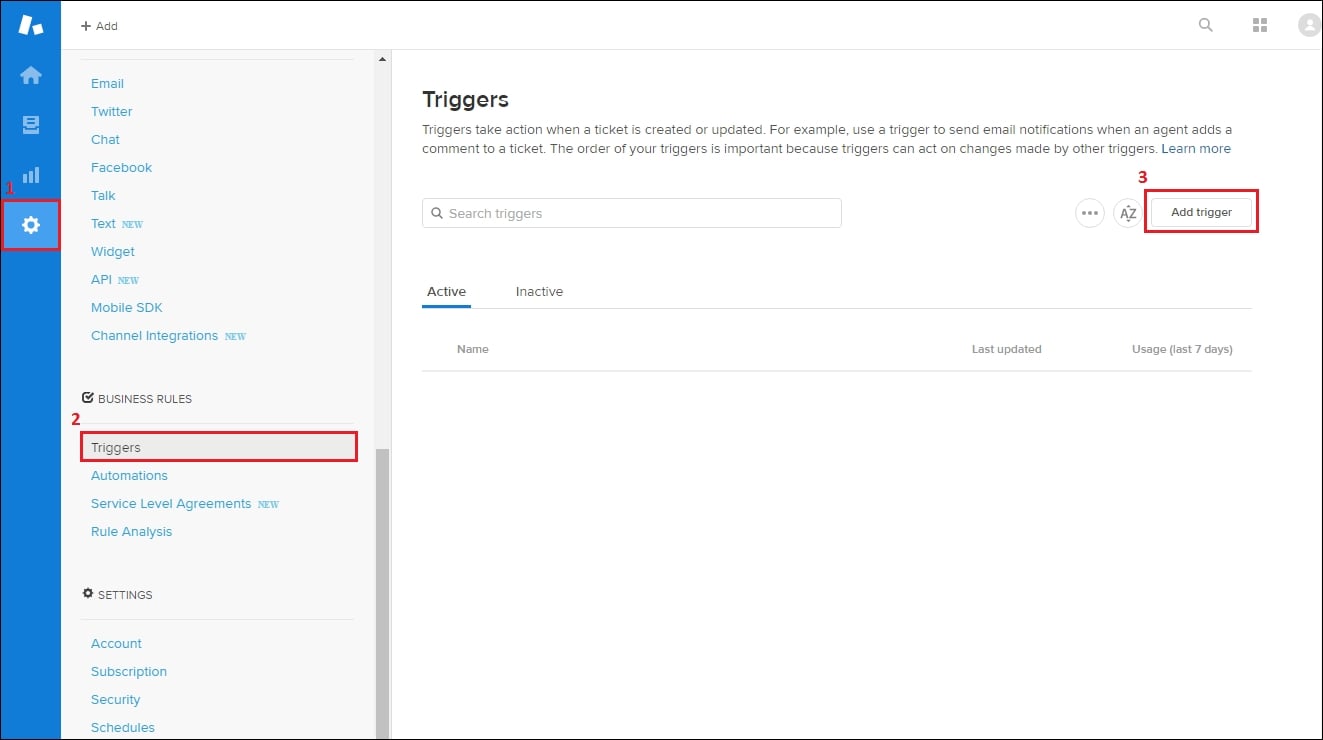
If I was asked to identify the most important part of any helpdesk setup, surely my answer would be "Business Rules".

Although, I might be biased. Having a huge inclination for anything related to programming could definitely be a reason why automating processes sounds appealing to me.

Either way, the sheer amount of benefits should speak for itself. Zendesk's business rules allow us to set rules by which tickets are automatically altered. This means that we can set up conditions for automatic responses, push tickets into specific views depending on their content, and implement a bunch of other timesaving ideas we may have.

Listing all the possibilities would surely go beyond the scope of this book. So let's focus on learning how to use Business Rules by example.

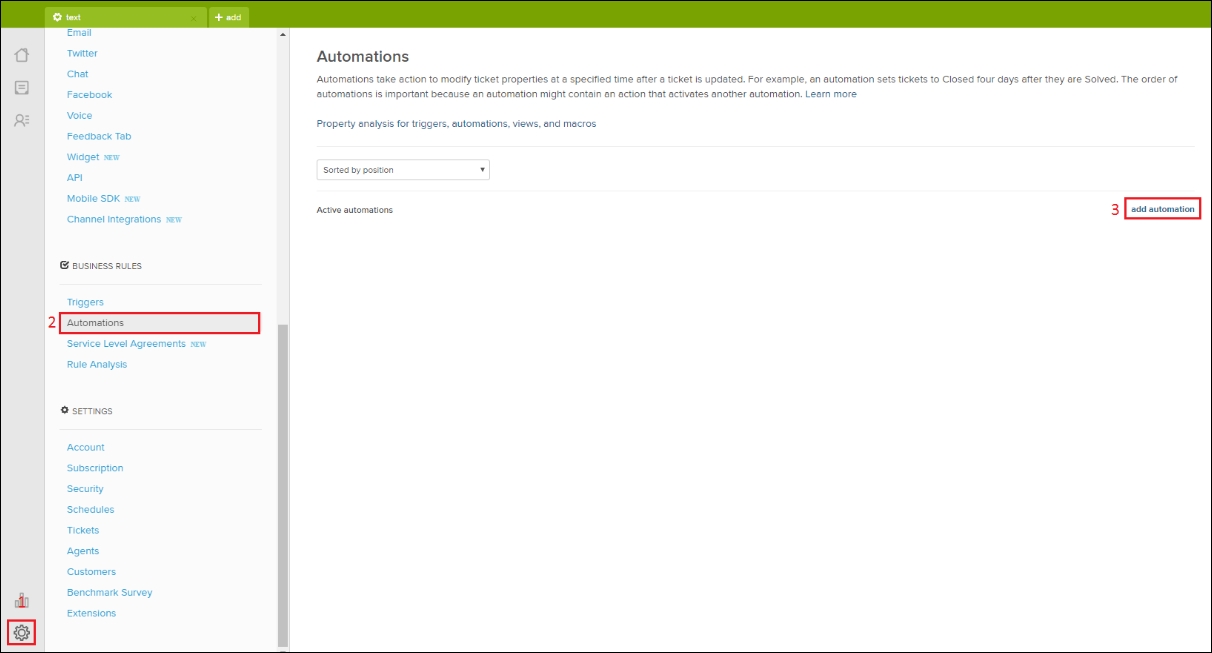
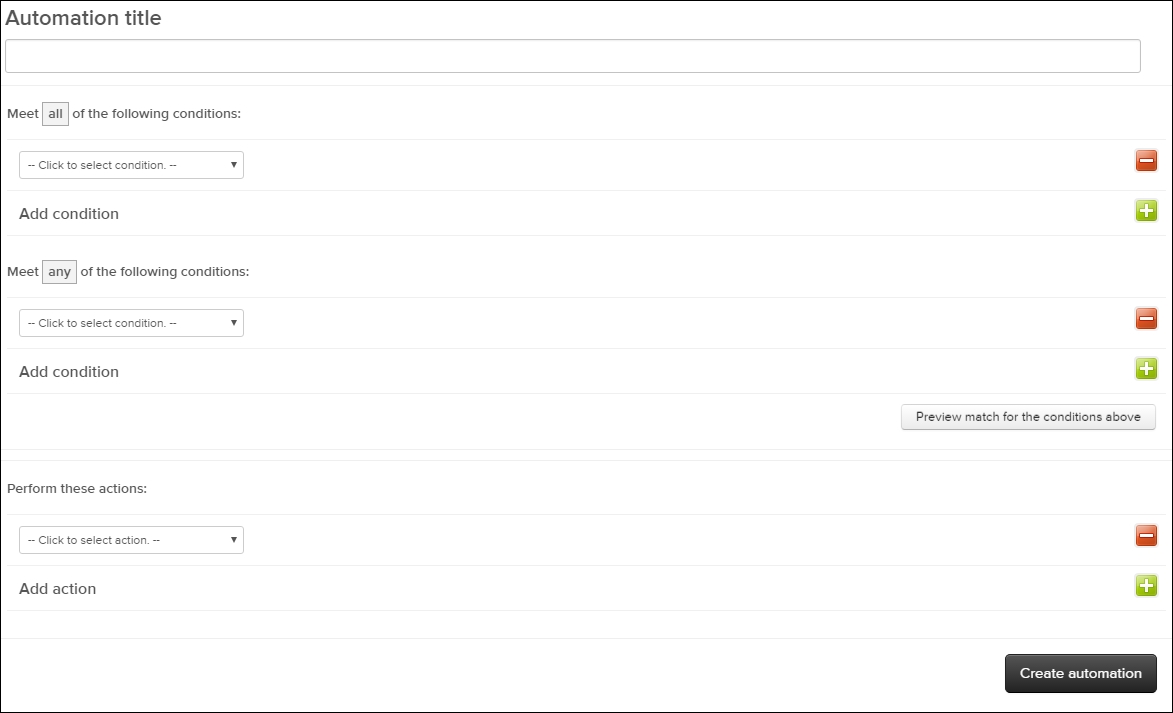
In this chapter, you will look at the two different types of Business Rules–triggers and automations. You will look at all their conditions and possible actions and learn how...

What are Business Rules?


We already have an idea about what Business Rules are. They are meant to automate certain processes and consist of conditions and actions. Still, it might be hard to wrap your head around the idea of Business Rules, especially if this is the first time you're dealing with such a concept.

In order to understand the idea behind Business Rules, let's look at a non Zendesk-related example.

Imagine being in charge of a food factory producing French fries. Every day, the factory receives three tons of potatoes. Currently, you have a few workers designated to handpick potatoes off the production line that do not make the cut due to their size.

This process can be automated by creating a machine taking care of this process. A simplified explanation would look something like this—if the potato is too small, then proceed by removing it from the production line.

This statement can be separated into two parts – the condition and the action.

Luckily, when it comes to Zendesk, we do...

Triggers versus automations


Both triggers and automations consist of conditions and actions. The difference lies in the type of event that has to occur in order for the actions to be executed.

Every time a ticket is updated or created, Zendesk will run through all the triggers, check if the right conditions are met, and move straight to the actions.

This is not so when it comes to automations. An automation's conditions always include an extra factor, which is time. An automation would check for these specific conditions four hours after the ticket has been updated.

So when do we use an automation over a trigger?

For now, remember that if you want to automate a process and include time as a condition, you will need to make use of an automation. If you want to automate a process that reacts to a certain condition straightaway, you will go for a trigger instead.

Next, let's take a detailed look at triggers.

Triggers in detail


In order to navigate to the triggers page, follow these steps:

  1. Click on the Admin icon (gear symbol) located in Zendesk's sidebar.

  2. Click on Triggers located under BUSINESS RULES within the admin menu.

  3. In order to create a new trigger, click on add trigger on the right-hand side of the screen:

We will be presented with an empty trigger waiting to be set up. We can divide this page into the following items:

  • Trigger title

  • Meet all of the following conditions

  • Meet any of the following conditions

  • Perform these actions

First, we can choose the Trigger title. It makes sense to use some sort of statement that explains the trigger's purpose. This way we understand what all our triggers do by simply reading their titles. Consider this example: Product feedback received -> Notify Product_Owners@ExampleComp + Tag with "feedback":

Next up, we can define our trigger's conditions. There are two types of conditions. The first section allows us to set conditions of which all must...

Automations in detail


In order to navigate to the automations page, follow these steps:

  1. Click on the Admin icon (gear symbol) located at the bottom of Zendesk's sidebar.

  2. Click on Automations located under BUSINESS RULES within the admin menu.

  3. In order to create a new automation, click on add automation on the right side of the screen:

We will be presented with an empty automation waiting to be set up. We can divide this page into the following items:

  • Automation title

  • Meet all of the following conditions

  • Meet any of the following conditions

  • Perform these actions

First we can choose the Automation title. Again, it makes sense to use some sort of statement that explains the automation's purpose. This way, we understand what all our automations do by simply reading through their titles. Look at this example—Ticket over 7 days old -> Notify Teamleader + Tag with "old_request".

Next up, we can define our automation's conditions. Just like for triggers, we can add the all and any conditions...

Custom ticket views


In order to take advantage of our ticket's automatic priority system, we will need to create views that sort tickets according to those values. Let's take a quick look at how we would set up such a view.

In order to navigate to the Views page, follow these steps:

  1. Click on the Admin icon (gear symbol) located in Zendesk's sidebar.

  2. Click on Views located under MANAGE within the admin menu.

  3. In order to create a new view, click on Add view on the right side of the screen:

We will be presented with an empty View waiting to be set up. We can divide this page into the following items:

  • View title

  • Meet all of the following conditions

  • Meet any of the following conditions

  • Formatting options

Setting up a view is not too different from setting up a trigger or automation. First we pick our conditions, followed by our preferred formatting options.

For ExampleComp, we will need three views according to our road map:

  • Tier 1 Support

  • Tier 2 Support

  • VIP Support

Our "Tier 1 Support" view should...

Service Level Agreements


Setting up SLAs in Zendesk is a pretty straightforward task. Similar to triggers and automations, you are asked to pick a name for your policy followed by conditions.

In order to navigate to the SLA page, follow these steps:

  1. Click on the Admin icon (gear symbol) located in Zendesk's sidebar.

  2. Click on Service Level Agreements located under BUSINESS RULES within the admin menu.

  3. In order to create a new policy, click on Add policy:

We will be presented with an empty policy waiting to be set up. We can divide this page into the following items:

  • Policy Name and Description

  • Meet all of the following conditions

  • Meet any of the following conditions

  • Targets

Since we focused on conditions quite extensively when dealing with triggers and automations, we will focus on targets instead:

Targets allow us to set specific time frames for a range of metrics depending on the priority of the ticket.

For instance, if we want our customers to receive their first reply within three hours while...

Summary


In this chapter, you learned about the different Business Rules Zendesk has to offer. We covered triggers, automations, SLAs, as well as a few different ways to utilize them efficiently in our project. By learning Business Rules, you added a great chunk of knowledge to your repertoire, helping you to understand the inner workings of Zendesk, bringing you closer to our goal of being able to fully customize our environment.

In the next chapter, we will focus on two different aspects: Zendesk's place in a greater ecosystem of tools and the creation of custom Zendesk apps to add more functionality to our setup.

lock icon
The rest of the chapter is locked
You have been reading a chapter from
Mastering Zendesk
Published in: Jan 2017Publisher: PacktISBN-13: 9781786461049
Register for a free Packt account to unlock a world of extra content!
A free Packt account unlocks extra newsletters, articles, discounted offers, and much more. Start advancing your knowledge today.
undefined
Unlock this book and the full library FREE for 7 days
Get unlimited access to 7000+ expert-authored eBooks and videos courses covering every tech area you can think of
Renews at €14.99/month. Cancel anytime

Author (1)

author image
Cedric F. Jacob

Cedric F. Jacob, before starting his own business as a customer service consultant, writer, and Zendesk admin for international companies, began his career as a customer service representative, from where he progressed to senior, team leader, and management roles. Working for clients such as Runtastic and Lovoo, he focuses on creating highly customized, scalable structures, utilizing his acquired customer service experience and broader passion for IT, which ranges from software and game development all the way to cyber security and hardware.
Read more about Cedric F. Jacob