Chapter 5. Creating a 2D Adventure Game
In this chapter, we will begin a completely new project; specifically, a 2D adventure game in which the player controls an alien character, exploring and navigating a dangerous world complete with quests and interactive elements. This project will incorporate elements and ideas from previous chapters, as well as focus on new techniques, such as Complex Collisions, 2D Physics, Singletons and Statics, and more. In short, we will cover the following topics:
2D characters and player movement
Assembling complex and multipart characters
Level design
2D Physics and collision detection
Note
The starting project and assets can be found in the book companion files in the Chapter05/Start folder. You can start here and follow along with this chapter if you don't have your own project already.
A 2D Adventure – getting started
Adventure games require the player to use their cunning, dexterity, mental sharpness, and acumen to make progress. Such games feature dangerous obstacles, challenging missions, and character interaction, as opposed to all-out action like many first-person shooter games. Our adventure game will be no exception. See Figure 5.1 for a glimpse of the game that we'll create. In this game, the player moves around using the keyboard arrows or W, A, S, D keys. Furthermore, they can jump with the spacebar and interact with characters simply by approaching them. During the game, the player will be tasked with a mission from an NPC character to collect an ancient gem hidden somewhere within a level. The player must then navigate dangerous obstacles in search of the gem, and then finally collect it before returning to the NPC, completing the game.
To get started with creating the adventure, create a completely new and empty Unity...
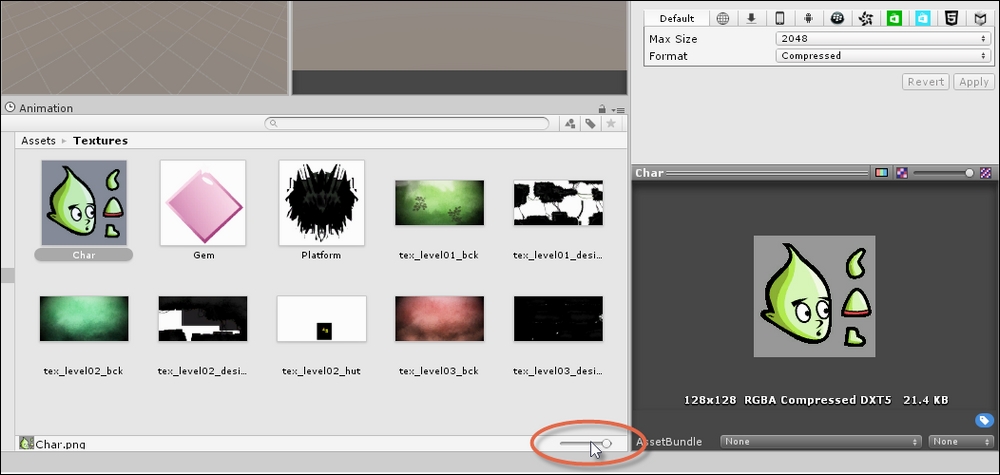
Starting from an empty project created in the previous section, let's now import the texture assets we'll be using, both for the player character and environment. The assets to import are included in the book companion files in the Chapter05/Assets folder. From here, select all textures together in Windows Explorer or Mac Finder, and drag and drop them to the Unity Project panel in a designated Textures folder. (Create one if you haven't already!). This imports all relevant textures to the active Project. See Figure 5.3:
Note
Remember that you can always use the Thumbnail Size Slider (at the bottom right corner of the Project panel) to adjust the size of thumbnail previews in order to get an easier view of your texture assets.
By default, Unity assumes that all imported textures will eventually be used as regular textures applied to 3D models in the scene, such as cubes, spheres, and meshes. In most cases, this assumption is...
Creating an environment – getting started
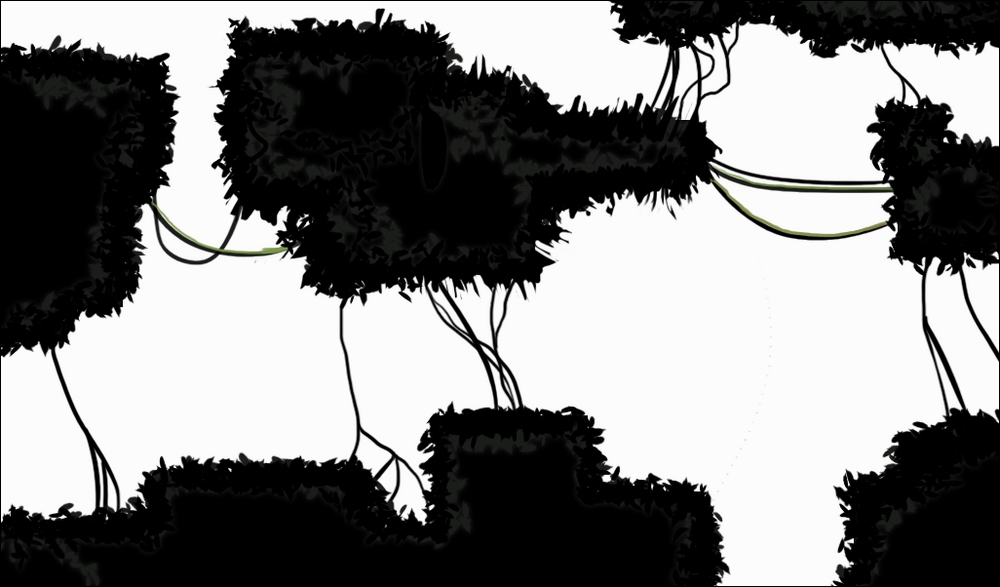
Our adventure game will feature three separate but connected scenes, which the player may explore, moving from one scene to the next. The player may travel between scenes, simply by walking off the edge of one and then moving into the next. Each scene consists primarily of platforms and ledges and, in some cases, dangers and obstacles. In terms of graphical assets, each scene is made from two textures or sprites: the background and foreground. An example for Scene 1 is shown in Figures 5.9 and Figure 5.10. Figure 5.9 represents the background scene:
and Figure 5.10 represents the foreground, which includes a complete layout of all the platforms and ledges that the player must traverse:
These files are included in the book companion files in the Chapter05/Assets folder
Let's create the first level now, based on the sprites in Figure 5.9 and Figure 5.10. To do this, use the existing empty scene...
The main problem with our level as it stands is that it lacks interactivity. Specifically, if we dragged and dropped a player object to the level and pressed play on the toolbar, the player would drop through the floor and walls because the foreground texture isn't recognized by Unity as a solid object. It's just a texture and exists only in appearance and not in substance. In this section, we'll correct this using Physics and Colliders. To get started, we'll create a temporary player object (not the final version but just a temporary White Box version used only for testing purposes). To create this, generate a capsule object in the scene by navigating to GameObject | 3D Object | Capsule from the application menu. Set the Z position of the transform to match the foreground texture (for me, this is -2). Once generated, remove Capsule Collider from the object. By default, the Capsule is assigned a 3D collider (such as the Capsule Collider), which is useful primarily for...
The player character is a small, green alien-looking creature that can be controlled and guided by the gamer through a level using many conventional platform-game mechanics, such as walking, jumping, and interacting. In the previous section, we built a White Box (prototype) character to test physical interactions with the environment, but here, we'll develop the player character in more depth. Figure 5.28 illustrates our character texture imported earlier in the chapter, representing all limbs and parts for the player:
The player texture, as shown in Figure 5.28, is called an Atlas Texture or Sprite Sheet because it contains all frames or parts of a character in a single texture space. The problem with this texture, as it stands, is that when dragged and dropped from the Project panel to the scene, it'll be added as a single, self-contained sprite. This is because Unity recognizes all the separate parts as a single...
Scripting the player movement
The game so far features an environment with collision data and a multipart player object that interacts and responds to this environment. The player, however, cannot yet be controlled, and this section explores controller functionality further. The user will have two main input mechanics, namely, movement (walking left and right) and jumping. This input can be read seamlessly and easily using CrossPlatformInputManager, which is a native Unity asset package. This package was imported at the project creation phase, but it can be imported now via the application menu with Assets | Import Package | CrossPlatformInput. Once imported, open the Standard Assets | CrossPlatformInput | Prefabs folder and drag and drop the MobileTiltControlRig prefab to the scene. This prefab lets you read input data across a range of devices, mapping directly to the horizontal and vertical axes that we've already seen in previous chapters. See Figure 5.44:
Our work so far has produced an interesting environment and a controllable character within this environment. Before moving forward, let's turn our attention to optimization—an issue that should be considered early during development. Optimization refers to the tips and tricks that we can apply to improve runtime performance as well as our workflow generally. Here, we'll consider prefabs to improve our workflow and Sprite Packing to improve runtime performance. Let's start with prefabs.
A prefab is a Unity asset that lets you group together many objects in a scene and package them together as a single unit that can be added to the Project panel as an asset. From here, the prefab can be added as a complete unit to any other scene or environment as though it were a separate and complete thing. The player character is an ideal candidate for a prefab because it must feature in all the other scenes we create. Let's create a prefab from the player. To do this, simply drag and drop...
Superb work! We've come a long way in this chapter, from a blank project to an effective 2D game in which a player character can navigate a complete 2D environment with 2D Physics. The character can move left and right and jump, and the sprite texture will change to match the direction of travel as well. In addition, Sprite Packing has been used to optimize runtime performance, which is ideal for mobile devices. In the next chapter, we'll continue working by adding obstacles, collectable objects, and more!
Q1. Edge Colliders lets you...
A. Create pretty patterns
B. Draw out collider edges
C. Create 3D volumes
D. Create physics animations
Q2. The Sprite Packer is useful for...
A. Create sprites in rows and columns
B. Group sprites onto a single atlas texture
C. Animate sprites
D. Create multiple color sprites
Q3. Physics Materials can...
Q4. The Sprite Editor lets you...