Chapter 4. Continuing the Space Shooter
This chapter continues from the previous one in creating a twin-stick space shooter game. At this stage, we have a working game. At least, the gamer can control a spaceship using two axes: movement and rotation. WASD keys on the keyboard control movement (up, down, left, and right) and the mouse cursor controls rotation—the spaceship always rotates to face the cursor. In addition to player controls, the level features enemy characters that spawn at regular intervals, fly around the level, and move toward the player with hostile intent. Finally, both the player and enemies support a Health component, which means both are susceptible to damage and can be destroyed. Right now, however, the player lacks two important features: it cannot fire a weapon and it cannot increase the score. This chapter tackles these issues and more. Firing weapons, as we'll see, represents a particularly interesting problem. Overall, this chapter covers the following topics...
Let's start tackling weapons in detail. Specifically, the level contains a player and enemy ships, which the player must shoot. See Figure 4.1. On thinking carefully about weapons, we identify three main concepts or things that need development. First, there's the spawner or generator—the object that actually fires ammo in the scene when the fire button is pressed. Second, there's the ammo itself that, once generated, travels through the level on its own. Third, there's the ability for ammo to collide with other objects and damage them.
Tackling each area in order, we begin with turrets—the points where bullets are spawned and fired. For this game, the player will have only one turret, but ideally, the game should support the addition of more, if desired, allowing the player to dual-fire or more! To create the first turret, add a new empty game object to the scene by selecting GameObject | Create Empty from the application menu. Name this Turret...
When the player presses the fire button, the spaceship should shoot ammo objects in the scene. These objects will be based on an Ammo prefab. Let's create this prefab now. To start, we'll configure the texture to be used as an ammo graphic. Open the Textures folder in the Project panel, and select the Ammo texture. This texture features several different versions of an ammo sprite, aligned in a row side by side. See Figure 4.3. When ammo is fired, we don't want to show the complete texture; instead, we want to show either just one of the images or the images played as an animation sequence, frame by frame:
Presently, Unity recognizes the texture (and each ammo element) as a complete unit. We can use Sprite Editor, however, to separate each part. To do this, select the Texture in the project (if it's not already selected), and then (from the Object Inspector) change the Sprite Mode drop-down from Single to Multiple. This signifies...
The Ammo prefab created so far presents us with a technical problem that, if not taken seriously, has the potential to cause some serious performance penalties for our game. Specifically, when the spaceship weapon is fired, we'll need to generate ammo that launches into the scene and destroys the enemies on collision. This is fine in general, but the problem is that the player could potentially press the fire button many times in quick succession and could even hold down the fire button for long periods of time, and thereby spawn potentially hundreds of ammo prefabs. We could, of course, use the Instantiate function seen already to generate these prefabs dynamically, but this is problematic because instantiate is computationally expensive. When used to generate many items in succession, it will typically cause a nightmarish slowdown that'll reduce the FPS to unacceptable levels. We need to avoid this!
The solution is known as Pooling, Object Pooling, or Object Caching. In essence...
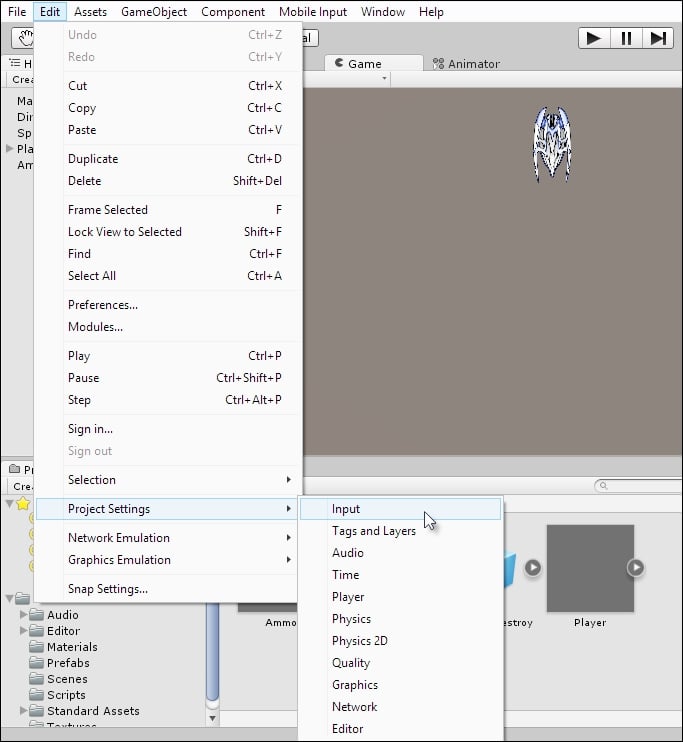
Maybe you don't like the default controls and key combinations associated with the input axes—Horizontal, Vertical, and Fire1. Maybe you want to change them. These input axes are read using the Input.GetAxis function (shown earlier) and are specified by human readable names, but it's not immediately clear how Unity maps specific input buttons and devices to these virtual axes. Here, we'll see briefly how to customize these. To get started, let's access the Input settings by navigating to Edit | Project Settings | Input from the application menu. See Figure 4.21:
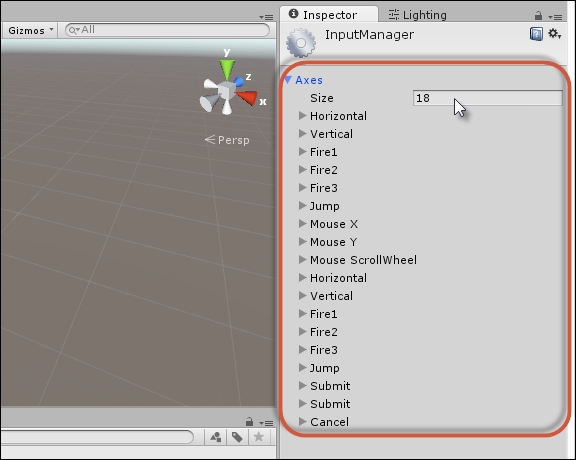
On selecting this option, a collection of custom-defined input axes appear as a list in the Object Inspector. See Figure 4.22. This defines all axes used by the input system. The Horizontal and Vertical axes should be listed here:
By expanding each axis in the Object Inspector, you can easily customize how user input is mapped, that is, how specific...
Scores and scoring – UI and text objects
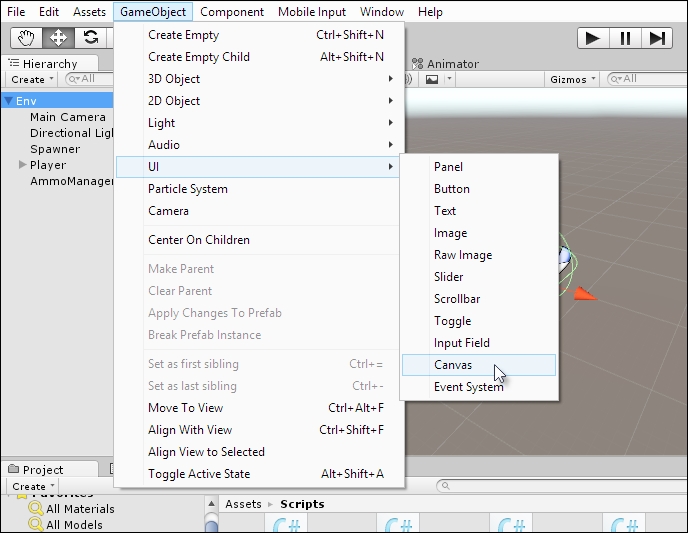
Let's move on to the scoring system and, in creating this, we'll create GameController. GameController is simply a script or class that manages all game-wide and overarching behavior. This includes the score because, for this game, the score refers to one single and global number representing the achievements and progress of the player. Before jumping into the implementation, start by creating a simple GUI to display the game score. GUI is an acronym for Graphic User Interface, and this refers to all the 2D graphical elements that sit atop the game window and provide information to the player. To create this, create a new GUI canvas object by selecting GameObject | UI | Canvas from the application menu. See Figure 4.25. More details on GUIs can be found in the next two chapters:
The Canvas object defines the total surface or area in which the GUI lives, including all buttons, text, and other widgets....
Working with scores – scripting with text
To display a score in the GUI, we'll first need score functionality, that is, code to create a score system. Essentially, the score functionality will be added to a general, overarching GameController class, responsible for all game-wide logic and features. The code for GameController and its score feature set is included in Code Sample 4.4, as follows. This file should be added to the Scripts folder of the project:
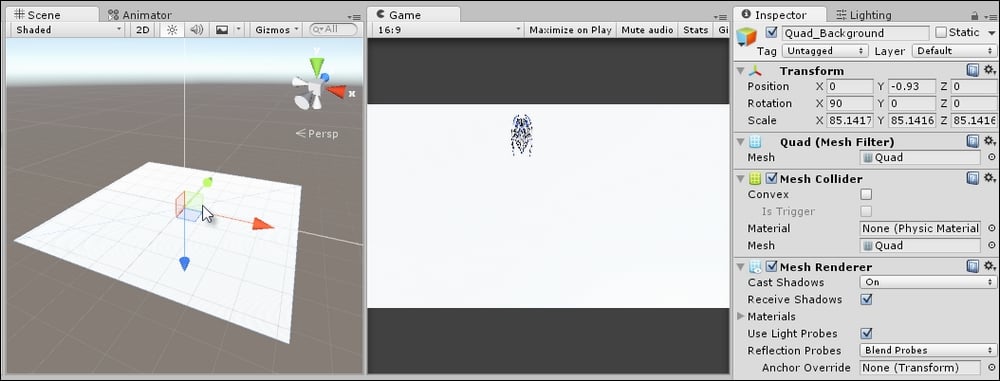
In this section, we'll add the final touches to the game. First on the agenda is to fix the game background! Until now, the background has simply displayed the default background color associated with the game camera. However, as the game is set in space, we should display a space background. To do this, create a new Quad object in the Scene that'll display a space image. Navigate to GameObject | 3D Object | Quad from the menu. Then rotate the object and move it downward so that it displays a flat, vertically-aligned backdrop. You may need to scale the object to look correct. See Figure 4.39:
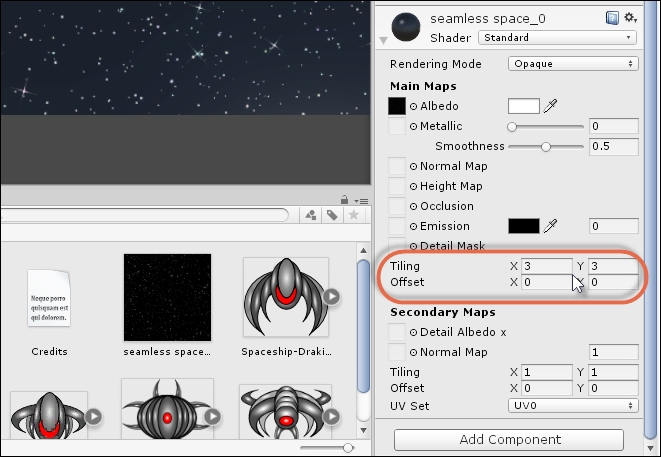
Now, drag and drop the space texture from the Project panel to Quad in the Scene to apply it as a material. Once assigned, select the Quad and change the Tiling settings from the material properties in the Object Inspector. Increase the X and Y tiling to 3. See Figure 4.40:
If texture...
With practically all games, you'll need to spend considerable time testing and debugging heavily to reduce bugs and errors as much as humanly possible. With this sample program, very little debugging and testing has been required by you, but that's not because the game is simple. It's because I've already prechecked and pretested most of the code and functionality before presenting the material to you in this book, ensuring that you get a smooth learning experience. For your own projects, however, you'll need to do lots of testing. One way to get started is using the Stats panel.
To open this, click on the Stats button on the Game tab. See Figure 4.46:
Another debugging tool...
Now, finally, we're ready to build our game to a standalone form ready to send off to friends, family, and testers! The process to do this is the same as detailed in Chapter 2, Creating a Collection Game, to build the coin collection game. From the application menu, choose File | Build Settings. From the build dialog, add our level to the level list by simply clicking on the Add Current button. Otherwise, drag and drop the level from the Project panel to the level list. See Figure 4.50:
For this game, the target platform will be Windows. Consequently, select the PC, Mac & Linux Standalone option from the Platform list, if it's not selected already. If the Switch Platform button (at the bottom-left) is not disabled, then you will need to press this button, confirming to Unity that it should build for the selected platform as opposed to a different platform.
Then, click on the Build And Run button. On clicking this, Unity prompts...
Great work! We're really on a roll now, having completed two solid Unity projects. The first project was a coin collection game and the second was a twin-stick shooter. Both are, ultimately, simple games in that they don't rely on advanced mechanics or display sophisticated features. However, even very sophisticated games, when boiled down to their fundamental ingredients, can be found to rest on a similar foundation of essential concepts such as the ones that we've covered so far. That's why our projects are so critical to understanding Unity in a deep way. Next, we'll move on to creating a more 2D-focused game, considering interfaces, sprites, and physics, and lots more!
Q1. Static Variables are...
Q2. The profiler is useful for...
Q3. UI Objects are useful for...
Q4. The Collision Matrix lets you
A. Prevent groups of objects colliding
B. Make objects collide
C. Removes all collisions
D. Activates low quality collisions

 Argentina
 Australia
 Austria
 Belgium
 Brazil
 Bulgaria
 Canada
 Chile
Chile
 Colombia
 Cyprus
 Czechia
 Denmark
 Ecuador
 Egypt
Egypt
 Estonia
 Finland
 France
 Germany
 Great Britain
 Greece
 Hungary
 India
India
 Indonesia
 Ireland
 Italy
Italy
 Japan
Japan
 Latvia
 Lithuania
 Luxembourg
 Malaysia
 Malta
Malta
 Mexico
 Netherlands
 New Zealand
 Norway
 Philippines
 Poland
 Portugal
 Romania
 Russia
 Singapore
 Slovakia
 Slovenia
 South Africa
 South Korea
 Spain
Spain
 Sweden
 Switzerland
 Taiwan
 Thailand
 Turkey
 Ukraine
 United States