Chapter 6. Continuing the 2D Adventure
In the previous chapter, we started work on a 2D adventure game. On reaching this point, we've now created a controllable character that can navigate a level using physics and collision detection as well as gravity. This chapter completes the 2D game project by adding the remaining features. Specifically, this chapter will cover the following topics:
Moving obstacles and features such as an elevator platform
Gun turrets to attack the player
An NPC with a quest system
Note
The starting project and assets can be found in the book companion files in the Chapter06/Start folder. You can start here and follow along with this chapter if you don't have your own project already.
Now let's refine the adventure further by adding a moving element to the existing scene; specifically, a moving-platform object. This platform should move up and then down again on a loop, ping-ponging between extremes. The player will be able to jump onto the platform to hitch a ride, and the object will be constructed as a prefab, allowing it to be reused across scenes. See Figure 6.1 for the result:
To start, select the platform texture in the Project panel, making sure that it's specified as a Sprite (2D and UI) texture type in the Object Inspector. The Sprite Mode should be set to Single. Drag and drop the platform texture to the scene and set its Scale to (0.7, 0.5, 1). See Figure 6.2:
Next, the platform should be a solid object, the kind of thing with which the player can collide. Remember, the player should be able to stand on the platform. Consequently, a Collider must be added. In this case...
Creating other scenes – levels 2 and 3
Unlike the other games created in the book so far, our adventure game will span multiple scenes. That is, our game features several different screens, which the player may move between by walking off the edge of one screen and entering from the edge of another. Supporting this functionality introduces us to some new and interesting problems in Unity that are well worth exploring, as we'll see later. For now, let's make a second and third scene for the game, using the remaining background and foreground objects, and configuring collisions for each level, allowing the player prefab to work seamlessly with each environment. The details to create a level with collisions (Edge Colliders) are covered in depth in the previous chapter. The final, completed scenes are as follows:
A common scripted feature required by all scenes, but not yet implemented, is the Kill Zone. That is, the functionality to mark out a region of 2D space in the level that, when entered by the player, will kill them or damage them. This is especially useful to kill the player whenever they fall down a hole in the ground. Thus, the Kill Zone will be required in every level because every level created so far contains pits and holes in the ground. To implement this functionality, create a new and empty GameObject in any scene. (It doesn't matter which because we'll be making a prefab object that can be reused anywhere.) As previously mentioned, new GameObjects are created with the menu option, GameObject | Create Empty. Once created, name the object KillZone, then position it at the world origin (0,0,0), and finally, attach a Box Collider 2D component using the menu command, Component | Physics 2D | Box Collider 2D. The Box Collider will define the Kill Zone area. Remember to make...
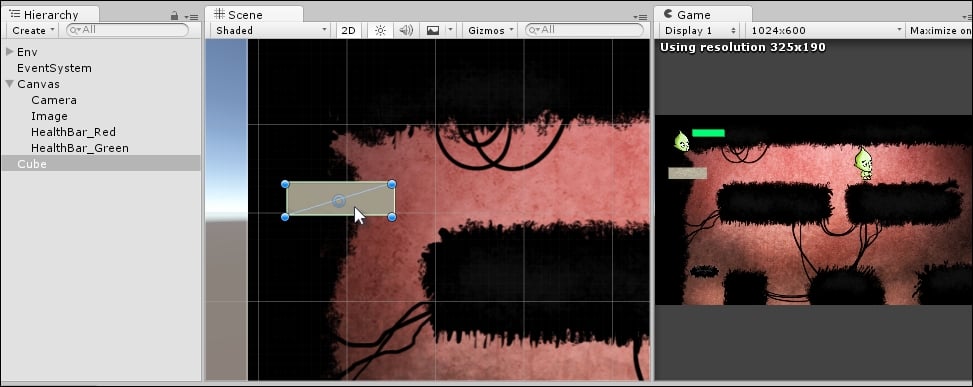
In the previous section, we introduced the first danger and hazard to the game; namely, a Kill Zone that can damage and potentially kill the player. As a result, their health has the potential to reduce from its starting state. It's therefore useful both to us as developers and gamers to visualize the health status. For this reason, let's focus on rendering player health to the screen as a UI health bar. This configuration of objects will also be made as a prefab, allowing reuse across multiple scenes This will prove a highly useful feature. Figure 6.9 offers a glimpse of the future, displaying the result of our work to come:
To get started, create a new GUI Canvas in the scene (any scene) by choosing GameObject | UI | Canvas from the application menu. Selecting this will automatically create an EventSystem object in the scene, if one does not exist already. This object is essential for proper use of the UI system. If you accidentally...
Level 2 is a hazardous place. It should feature not only pits and holes leading to kill zones, but also fixed dangers such as gun turrets that can shoot the player. This section focuses on their creation. To get started, let's make a gun turret. Now, the course companion files don't include a texture or image for the gun turrets, but when using the dark silhouette style as we are here, we can easily make a consistent turret prop from primitives. In particular, create a new cube object (GameObject | 3D Object | Cube), rescale it to approximate a gun turret, and then position it to the upper ledge in the scene where it will appear as part of the scenery. See Figure 6.22. Note that you can also use the Rect Transform tool to resize primitives!
Of course, the gun turret created so far is a conspicuous and obvious gray color. To solve this, create a new black material. Right-click in the Project panel and choose Create | Material from...
We've now created an ammo object (a projectile) and we've started to engineer a gun turret object, but it doesn't yet spawn ammo. Let's create this functionality now. We have a spawn point positioned in front of the turret parented to it as a child object. We'll attach a new script file called AmmoSpawner.cs to this object. This script is responsible for generating ammo at regular intervals. Refer to the following code:
NPC stands for Non-player Character and typically refers to any friendly or neutral characters other than the player-controlled character. In our adventure, Level 3 should feature an NPC character standing outside their house, and they provide us with a quest; specifically, to collect a gem item from Level 2, which features many hazards, including pits and gun turrets, as we've seen. To create the NPC character, we'll simply duplicate the player and adjust the character color, making them appear distinct. Thus, simply drag and drop the Player prefab from the Project panel to the Level 2 scene and position it near the house area. Then, remove all additional components (such as the Player Controller and Collider) to return this character back to a standard sprite that is not player-controlled. See Figure 6.34:
Now, let's invert the character's X scale to make him or her face left instead of right. Select the parent...
Great work! We've now completed the 2D adventure game. Some minor details were not covered in this chapter for the sake of clarity and conciseness because we've seen the methods or content already in earlier chapters. Hence, it's important to open the course files and check out the completed project, seeing how the code works. Overall, in having reached this far in the book, you have three completed Unity projects to your name. So, in the next chapter, we'll wrap up everything that we've seen so far and get started on the grand finale: the final, fourth project!
Q1. OnTriggerExit2D is...
A. A function that runs on repeat
B. A function that runs when an object leaves a trigger
C. A function that runs when the player completes the level
D. A function that runs when the level exits
Q2. A Canvas Group lets you
A. Play UI Animations
B. Change the Alpha of multiple UI Objects
C. Deletes many objects together
D. Adjust objects for different resolutions
Q3. Enumerations are good for...
Q4. You can pick a random number by using
A. Random.Range
B. SelectRandomNumber
C. ChooseRandom
D. GetRandomNumber

 Argentina
 Australia
 Austria
 Belgium
 Brazil
 Bulgaria
 Canada
 Chile
Chile
 Colombia
 Cyprus
 Czechia
 Denmark
 Ecuador
 Egypt
Egypt
 Estonia
 Finland
 France
 Germany
 Great Britain
 Greece
 Hungary
 India
India
 Indonesia
 Ireland
 Italy
Italy
 Japan
Japan
 Latvia
 Lithuania
 Luxembourg
 Malaysia
 Malta
Malta
 Mexico
 Netherlands
 New Zealand
 Norway
 Philippines
 Poland
 Portugal
 Romania
 Russia
 Singapore
 Slovakia
 Slovenia
 South Africa
 South Korea
 Spain
Spain
 Sweden
 Switzerland
 Taiwan
 Thailand
 Turkey
 Ukraine
 United States