

Our game is now playable, and you can progress from the title screen to the game. If you're patient enough, you have even worked out how to finish the level, but don't worry if not, we'll explain the solution shortly. In this chapter, we'll be adding some polish to our game, texturing the cubes, so they fit in more with the design of the main character you added in Chapter 4, Adding a Character and Making Them Move. We'll also be adding a new level or two, and also indicate when the player has finished the level by playing a fanfare sound.
While the mechanics of the game have been developed, we're still using our initial place holder prefabs. We can add a texture to the prefabs really easily and it should hopefully improve the look of the game immensely.
Import the package texturesAndMaterials.unitypackage from the files for this chapter, you should have the following new files:
Materials/crate.matMaterials/moonsurface.matMaterials/rock_seamless_256.matScripts/AstroDude.shaderSkyboxes/MoonReflection.cubemapTextures/astrod00d_selfillum.tifTextures/flag.pngTextures/moonsurface.tifTextures/moonsurface_normals.tifTextures/stars.tif
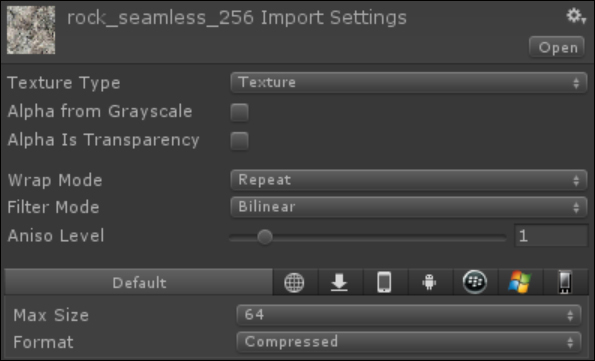
First things first, we need to update some of the materials and textures to be better suited to our prefabs. Click on Textures/ rock_seamless_256, and in the Inspector panel, change the Max Size to 64 as shown in the following screenshot. Do the same with rocks_normals, moonsurface, and moonsurface_normals:
There is still a lot of black in the background and as the game has a space theme, let's add some stars in there. The way we'll do this is to add a sphere that we can map the stars texture to, so click on Game Object | Create Other | Sphere, and position it at X: 0, Y: 0, Z: 0. We also need to set the size to X: 100, Y: 100, Z: 100. Drag the stars texture, located at Textures/stars, on to the new sphere that we created in our scene. That was simple, wasn't that? Unity has added the texture to a material that appears on the outside of our sphere while we need it to show on the inside. To fix it, we are going to reverse the triangle order, flip the normal map, and flip the UV map with C# code. Right-click on the Scripts folder and then click on Create and select C# Script. Once you click on it, a script will appear in the Scripts folder; it should already have focus and be asking you to type a name for the script, call it SkyDome. Double-click on the script in Unity and...
Now that the game is looking better, we can add some more content in to it. Luckily the jagged array we created earlier easily supports adding more levels. Levels can be any size, even with variable column heights per row. Double-click on the Sokoban script in the Project panel and switch over to MonoDevelop. Find levels array and modify it to be as follows:
  // Create the top array, this will store the level arrays
  int[][][] levels =
  {
    // Create the level array, this will store the row array
    new int [][] {
    // Create all row array, these will store column data
    new int[] {1,1,1,1,1,1,1,1},
    new int[] {1,0,0,1,0,0,0,1},
    new int[] {1,0,3,3,0,3,0,1},
    new int[] {1,0,0,1,0,1,0,1},
    new int[] {1,0,0,1,3,1,0,1},
    new int[] {1,0,0,2,2,2,2,1},
    new int[] {1,0,0,1,0,4,1,1},
    new int[] {1,1,1,1,1,1,1,1}
  },
  // Create a new level
  new int [][] {
    new int[] {1,1,1,1,0,0,0,0},
    new int[] {1,0,0,1,1,1,1,1},
new int[] {1,0,2,0...It's all well and good having three levels, but without a mechanism to move between them they are useless. We are going to add a check to see if the player has finished a level, if they have then increment the level counter and load the next level in the array. We only need to do the check at the end of every move; to do so every frame would be redundant.
We'll write the following method first and then explain it:
// If this method returns true then we have finished the level
boolhaveFinishedLevel () {
  // Initialise the counter for how many crates are on goal
  // tiles
  int cratesOnGoalTiles = 0;
  // Loop through all the rows in the current level
  for (int i = 0; i< levels[currentLevel].Length; i++) {
    // Get the tile ID for the column and pass it the switch
    // statement
    for (int j = 0; j < levels[currentLevel][i].Length; j++) {
      switch (levels[currentLevel][i][j]) {
        case 5:
        // Do we have a match for a crate on goal
...When you start adding sounds in to your game, it takes on a whole new dimension, you'd be surprised how a game that seems unfinished can suddenly feel almost complete just by adding some sounds effects. We're going to add a sound that will play every time a crate is moved on to a goal tile. With keeping our project tidy in mind, the first step is to create a folder that will store all our sound files.
Click on the Create dropdown menu in the Project panel. Click on Folder and a new folder will be created in the project panel, call the folder Sounds. Import the asset crateOnGoal.mp3 from the files for this chapter to your new Sounds folder.
Sound in Unity requires the following three things:
A sound to play
A source for the sound to come from
A listener to hear the sound
Our Main Camera already has an Audio Listener component attached to it and we have already imported our sound to play, all that's left is to add an audio source with a reference to our sound and a trigger to call...
The game now has some structure in the form of levels that you can complete and is easily expandable. If you wanted to take a break from the book, now would be a great time to create and add some levels to the game and maybe add some extra sound effects. All this hard work is for nothing if you can't make any money though, isn't it? Chapter 6, Show Me the Money!, will help you on your way to monetizing your creation.
The rest of the chapter is locked
You have been reading a chapter from
Ouya Unity Game DevelopmentPublished in: Oct 2013Publisher: PacktISBN-13: 9781783559701
Register for a free Packt account to unlock a world of extra content!
A free Packt account unlocks extra newsletters, articles, discounted offers, and much more. Start advancing your knowledge today.
undefined
Unlock this book and the full library FREE for 7 days
Get unlimited access to 7000+ expert-authored eBooks and videos courses covering every tech area you can think of
Renews at $15.99/month. Cancel anytime