Reader small image

You're reading from  Sculpting in ZBrush Made Simple

Product typeBook
Published inMar 2024
Reading LevelN/a
PublisherPackt
ISBN-139781803235769
Edition1st Edition
Languages
Right arrow
Author (1)
Lukas Kutschera
Lukas Kutschera
author image
Lukas Kutschera

Lukas Kutschera is a 3D artist known for his digitally sculpted characters and creatures for high-end clients in the VFX, Games, and Collectibles industries. These clients include Platige Image, Pixomondo, Hot Toys, and many more. He has also earned recognition for his contributions to the Golden Globe-winning TV show House of the Dragon, where he sculpted the shows' largest dragon, Vhagar. Lukas' interest and expertise in anatomy is evident in his personal artwork, featuring digitally sculpted anatomy studies and portraits. Besides his professional work, he inspires and educates future sculptors by sharing his knowledge and techniques with his following on YouTube and Instagram.
Read more about Lukas Kutschera

Right arrow

Preparing and Exporting Our Model for 3D Printing

To successfully 3D print your 3D models, they need to meet several requirements that ensure that the printing works well and that no issues occur. In this chapter, you will learn how to prepare your digital sculpture for 3D printing, based on the gladiator example created in the previous chapters.

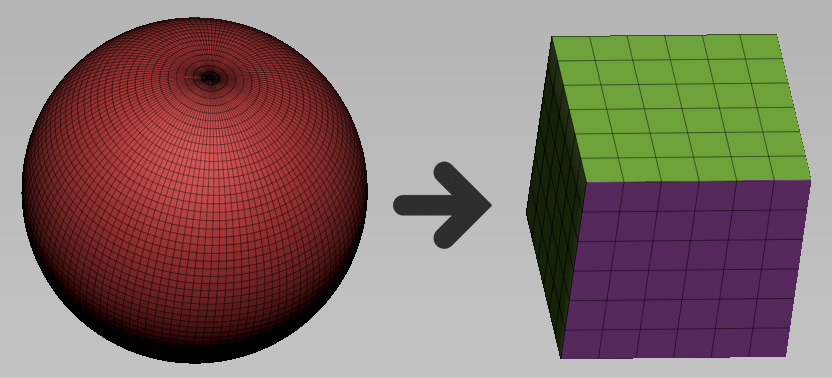
First, you will learn how to test the mesh topology for holes and errors so that you can create a watertight model with the right properties for printing.

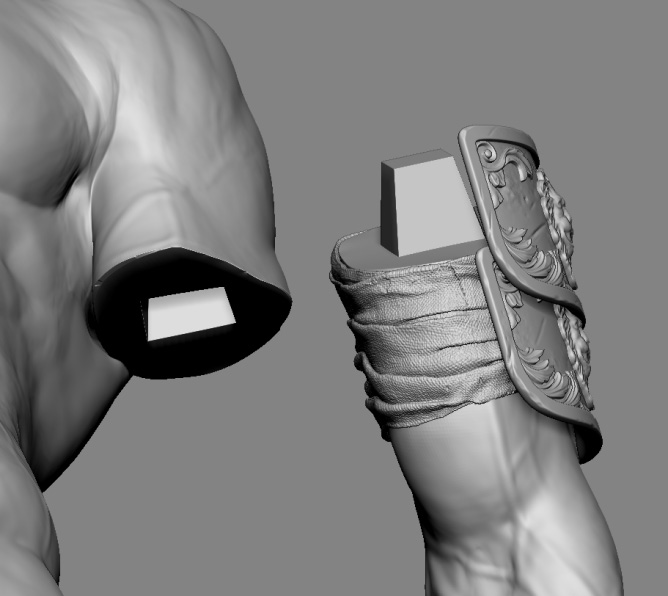
Next, you will learn about good practices for cutting your model, which will save print time and material costs. Based on this information, you will merge parts of the gladiator model and split it into multiple pieces. After that, you will create a key model that you can use to create matching male and female keys. This will allow you to assemble your printed figure out of multiple pieces.

Finally, you will learn how to scale and export the model. Your 3D-printing software of choice...

Technical requirements

For the best experience, it is recommended that you have a strong PC that meets the minimum requirements described in the first chapter’s Technical requirements section. However, you can work on this chapter with just a mouse, a functional PC setup, and a ZBrush license.

If you completed Chapters 8 and 9 and created a gladiator (or your own character model), you can apply the lessons in this chapter to your character, but of course, you can use the workflows and tools on any other 3D model.

Creating watertight models and troubleshooting errors

When you prepare 3D models for printing, the first thing to do is reduce their polycount by decimating them. Then, you need to ensure that your model has the proper topology and is watertight, giving it a volume. Errors and inconsistencies in the topology, such as non-manifold geometry or overlapping parts, will not be translated properly, leading to faulty or failed printing. In this section, you will learn how to prepare your model accordingly.

Using Decimation Master to reduce your meshes’ polycount

If you have highly detailed models with a high polycount, decimating them allows you to significantly reduce their polycount while still keeping their details. This is done through a topology with varying densities of polygons based on where the detail is – so, the polycount is low in smooth areas while it has a higher poly density in highly detailed areas, capturing the detail there. You can see what the decimation...

Merging and cutting your model

Before starting with the actual process, you need to decide what the best way to merge and split your model will be. These are some things to take into consideration:

  • Consider the size of the printer that you will be using and the size of the object that you want to print. Splitting the model into smaller pieces will allow you to print larger objects, even with a smaller printer.
  • Think about overhangs in your model. Some parts will require the printer to create significant support structures, which wastes a lot of material and slows down the printing process. Splitting a model in these critical areas helps to reduce this:
Figure 10.14 – Areas that have a lot of overhangs

Figure 10.14 – Areas that have a lot of overhangs

  • Following on from the previous point, you can split the model where the cut is hidden or less obvious. This could be in an area where different elements meet, such as the beginning of a clothing piece or a piece of armor covering...

Adding keys, scaling, and exporting your model

In this section, you will add keys that let you combine individual pieces to assemble the full character. Then, you will learn how to scale and export your model so that it can be properly interpreted and processed by the printing software. Let’s get started.

Creating a key model

There are many options for the shape of the key, but a simple tapered cube is a popular choice that gets the job done well:

Figure 10.24 – Male key as a tapered cube (on arm) and matching female key (on torso)

Figure 10.24 – Male key as a tapered cube (on arm) and matching female key (on torso)

To create this shape, follow these steps:

  1. Go to Tool | Subtool | Append and pick any shape (for example, Sphere3D).
  2. Navigate to Tool | Initialize. Set X Res, Y Res, and Z Res to 6, and select QCube:
Figure 10.25 – Turning a mesh into a primitive shape with the Initialize function

Figure 10.25 – Turning a mesh into a primitive shape with the Initialize function

  1. Now, open the Gizmo menu, click on the gear icon, and select Taper. Taper...

Summary

In this chapter, you learned how to turn your digital sculpture into a 3D model that can be 3D printed effectively.

First, you explored potential issues with your 3D models that prevent them from being 3D printed flawlessly, and you learned how to troubleshoot these problems to create watertight, print-ready meshes. Next, you learned how to merge parts and make clean cuts to separate your model into multiple pieces that can be printed individually, saving time and material costs.

In the last section of the chapter, you created a key model that you used to add a male key and a female key to have two matching pieces. Then, finally, you learned how to scale your character and export it so that it can be processed by any 3D-printing software.

In the next chapter, we will dive into head sculpting, which will cover everything from facial anatomy and blockout to likeness tips and hair creation with FiberMesh.

lock icon
The rest of the chapter is locked
You have been reading a chapter from
Sculpting in ZBrush Made Simple
Published in: Mar 2024Publisher: PacktISBN-13: 9781803235769
Register for a free Packt account to unlock a world of extra content!
A free Packt account unlocks extra newsletters, articles, discounted offers, and much more. Start advancing your knowledge today.
undefined
Unlock this book and the full library FREE for 7 days
Get unlimited access to 7000+ expert-authored eBooks and videos courses covering every tech area you can think of
Renews at $15.99/month. Cancel anytime

Author (1)

author image
Lukas Kutschera

Lukas Kutschera is a 3D artist known for his digitally sculpted characters and creatures for high-end clients in the VFX, Games, and Collectibles industries. These clients include Platige Image, Pixomondo, Hot Toys, and many more. He has also earned recognition for his contributions to the Golden Globe-winning TV show House of the Dragon, where he sculpted the shows' largest dragon, Vhagar. Lukas' interest and expertise in anatomy is evident in his personal artwork, featuring digitally sculpted anatomy studies and portraits. Besides his professional work, he inspires and educates future sculptors by sharing his knowledge and techniques with his following on YouTube and Instagram.
Read more about Lukas Kutschera