Reader small image

You're reading from  Raspberry Pi Projects for Kids (Second Edition)

Product typeBook
Published inApr 2015
Reading LevelBeginner
Publisher
ISBN-139781785281525
Edition1st Edition
Languages
Right arrow
Author (1)
Daniel Leonard Bates
author image
Daniel Leonard Bates

Daniel Bates is a computer science researcher at the University of Cambridge. His day job involves inventing designs for future mobile phone processors and when he gets home, he likes playing games or working on one of his coding projects (or both!). Daniel has been a volunteer for the Raspberry Pi Foundation since 2011 and is enthusiastic about introducing new people to computing. He has previously written Instant Minecraft: Pi Edition Coding How-to and Raspberry Pi Projects for Kids (First Edition), both published by Packt Publishing.
Read more about Daniel Leonard Bates

Right arrow

Chapter 6. Making an Interactive Map of your City

In this chapter, we're going to learn more about Python and its available modules by creating a program that will allow us to create notes on a map of our local area.

A program such as this needs a proper Graphical User Interface (GUI), which is just a complicated way of saying that it is a visual program with things to see and buttons to click. Here's what the program looks like when it's finished:

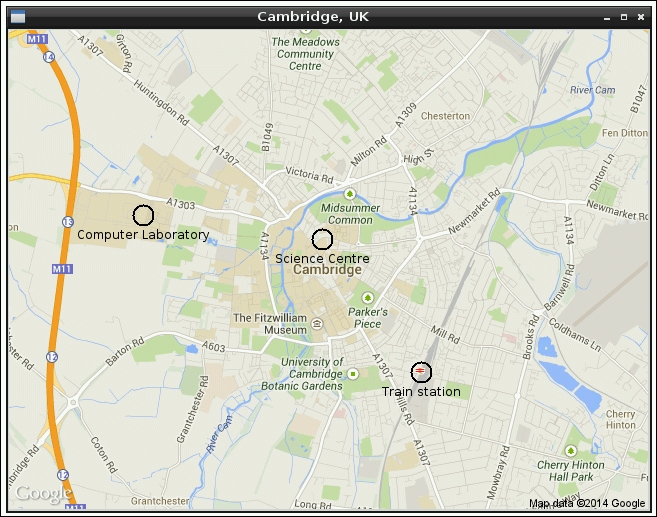
As you can see, the program looks quite professional with its title bar and buttons. You will be able to click on locations on the map and give helpful labels. By the end of this chapter, you will know enough about building GUIs to be able to add all sorts of additional features.

Hello world!


As is traditional when we learn about a new technology, we're going to start with the simplest program possible, just to make sure that we understand the basics. In this case, we're going to create a basic window with a title and some text inside.

Tkinter

There are many different Python modules available that let us create graphical programs, but we're going to use one called Tkinter. This module is included with Python by default and works on almost all computers and operating systems. It allows Python to communicate with the Tk toolkit, and it is Tk which will generate our displays.

Tkinter has easy-to-use functions to create textboxes, buttons, scroll bars, menus, and more. Collectively, these components are called widgets. To create a graphical user interface, we combine a number of widgets with a layout, which tells Tkinter how the widgets should be arranged. For example, we could say that all the buttons should be placed in a row or that they should be arranged vertically...

Getting a map


In this section, we're going to use Google Maps to get an image of our local area to display in our window.

No Internet? No problem!

Since Google Maps is an online service, an Internet connection is required to download a map. However, if your Raspberry Pi isn't connected to the Internet, there is still a way to proceed. Python is cross-platform. This means that it works on lots of different computers and operating systems. So long as you have access to another computer that does have an Internet connection, all the code in this chapter will work.

Python can be downloaded from http://www.python.org/download/, and the code in this book is based on Python 2.7 (Python is often preinstalled on Linux and Mac OS X operating systems, and it is best to keep it up to date with your built-in packaging system). Once installed on any computer, IDLE will be available and should behave exactly as Python 2 does on the Raspberry Pi.

Google Maps

Google has made it very easy to access its maps from...

Adding markers


The next thing we want to do is add a marker to the map whenever we click on it with the mouse. This can be done in two parts: by detecting the click and reacting to the click.

Detecting mouse clicks

Detecting mouse clicks is very simple. Tkinter does most of the work for us. All we have to do is bind a function to the mouse button. Once the program has entered its main loop, whenever the mouse button creates an event (by being clicked on), the function will be executed. Reacting to an event in this way is similar to using a when key pressed code block in Scratch. Place the following line of code with the rest of the Canvas code before the main loop:

canvas.bind("<Button-1>", canvasclick)

This code says that whenever Button-1 (the left mouse button) is clicked on, run the canvasclick function. We'll write this function next.

We can create these bindings for as many buttons and keys as we like and for any widget that we like. The "<Button-3>" button is the right mouse...

Adding labels


It would be useful if whenever we clicked on the map, along with adding a circular marker, we could also add a few words to describe what we're marking.

Basic labels

Getting some text from the program's user is going to be slightly complex, so let's create a simple version first to make sure we have the right code structure. Add the following two lines of code right at the end inside the canvasclick function:

    label = getlabelname()
    widget.create_text(x, y+2*size, text=label)

The first line of code gets some text from a function that we haven't written yet called getlabelname. This function will eventually ask the user to type some text into a small pop-up window, but for now, it will just give us a default message. The second line of code draws our text at a particular position just underneath the circle. As with widget.create_oval earlier, widget.create_text allows the text color to be set using the extra arguments of fill="colour" and activefill="colour".

Here is our most...

Code listing


Here is the complete code for the project used in this chapter. It can be used if you're getting strange error messages and want to compare your code with something that is known to work. It can also help you see what order the various snippets of code should be in.

The very first thing in the file should be the import statements. It's a good idea to put these in alphabetical order so that we can search through them more quickly when we import a lot of modules; this is shown in the following code snippet:

import base64
import Tkinter

import urllib

Next, we have two functions that work together. The first one creates a web address and the second downloads the map image from this address, as shown in the following code snippet:

def getaddress(location, width, height, zoom):
    locationnospaces = urllib.quote_plus(location)
    address = "http://maps.googleapis.com/maps/api/staticmap?\
center={0}&zoom={1}&size={2}x{3}&format=gif&sensor=false"\
.format(locationnospaces...

Extensions


There are lots of things we could do now that we have a basic working GUI. Here are a few possible ideas:

  • Adding buttons to zoom in or out

  • Adding a textbox and button to update the location

  • Adding a way to select different styles of map marker

  • Selecting whether the map is a satellite image or a road map

  • Saving and loading the map settings (the location, position of markers, labels, and so on)

  • Allowing markers and their labels to be changed after they have been created

Complete details on how to use Tkinter can be found online at https://wiki.python.org/moin/TkInter.

Layout

In this chapter, we have used only the pack layout, but there are also other ways to tell Python where you want your widgets to be displayed.

The pack layout is useful to fill the screen with a single widget (similar to our map) or to place widgets in a line (similar to our window when we type in label names).

The grid layout allows us to line up widgets both vertically and horizontally. All the widgets that we put in...

Summary


In this chapter, we learned how to make a GUI in Python. We learned how to create all sorts of different widgets that let the GUI do interesting things, and we also learned how to react to events, such as mouse buttons being clicked.

In particular, we created a mapping program that lets us click on the map to mark points of interest and even add useful descriptions for the markers. We have the knowledge and skills to add many extra features to our program by continuing to add buttons and other widgets.

In the next chapter, we'll explore how we can create music with code.

lock icon
The rest of the chapter is locked
You have been reading a chapter from
Raspberry Pi Projects for Kids (Second Edition)
Published in: Apr 2015Publisher: ISBN-13: 9781785281525
Register for a free Packt account to unlock a world of extra content!
A free Packt account unlocks extra newsletters, articles, discounted offers, and much more. Start advancing your knowledge today.
undefined
Unlock this book and the full library FREE for 7 days
Get unlimited access to 7000+ expert-authored eBooks and videos courses covering every tech area you can think of
Renews at $15.99/month. Cancel anytime

Author (1)

author image
Daniel Leonard Bates

Daniel Bates is a computer science researcher at the University of Cambridge. His day job involves inventing designs for future mobile phone processors and when he gets home, he likes playing games or working on one of his coding projects (or both!). Daniel has been a volunteer for the Raspberry Pi Foundation since 2011 and is enthusiastic about introducing new people to computing. He has previously written Instant Minecraft: Pi Edition Coding How-to and Raspberry Pi Projects for Kids (First Edition), both published by Packt Publishing.
Read more about Daniel Leonard Bates