Reader small image

You're reading from  Raspberry Pi Projects for Kids (Second Edition)

Product typeBook
Published inApr 2015
Reading LevelBeginner
Publisher
ISBN-139781785281525
Edition1st Edition
Languages
Right arrow
Author (1)
Daniel Leonard Bates
author image
Daniel Leonard Bates

Daniel Bates is a computer science researcher at the University of Cambridge. His day job involves inventing designs for future mobile phone processors and when he gets home, he likes playing games or working on one of his coding projects (or both!). Daniel has been a volunteer for the Raspberry Pi Foundation since 2011 and is enthusiastic about introducing new people to computing. He has previously written Instant Minecraft: Pi Edition Coding How-to and Raspberry Pi Projects for Kids (First Edition), both published by Packt Publishing.
Read more about Daniel Leonard Bates

Right arrow

Chapter 3. Making Your Own Angry Birds Game

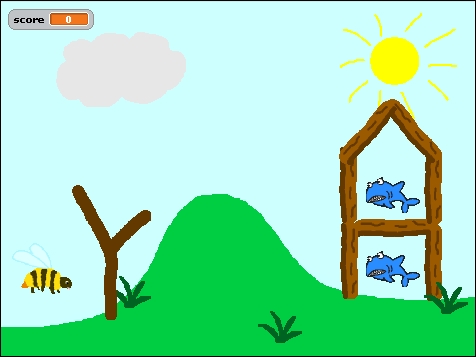
In this chapter, we are going to make our own version of the popular Angry Birds™ game. What's more, when we're finished, we will be able to add all sorts of new rules and enemies to keep the game fresh. The following screenshot shows a completed version of our game:

If you haven't played Angry Birds before, here's a quick description of how the game works. The player launches a bird through the air using a slingshot and attempts to hit all the pigs at the other end of the level. In order to make things more challenging, the pigs are often hidden behind hills or inside flimsy buildings that the player must knock down.

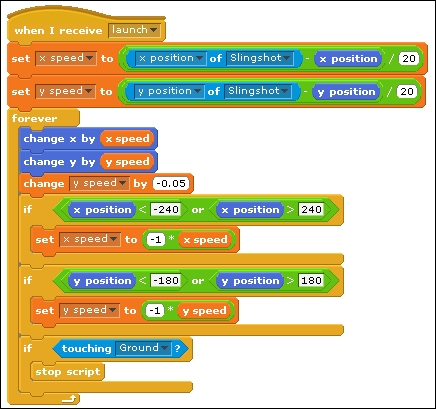
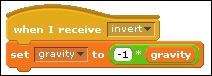
By creating our own version of the game, we have the freedom to change whatever we like. We can change the level design, decrease gravity, fire the bird faster (or bee, in our case), replace all the characters, and add new power-ups and prizes. The sky is the limit!

Creating a character


We're going to use the Scratch programming language to create this game. To start our game, we will need a character to fling through the air. Angry Birds, of course, uses birds as its main characters, but we can use whatever we like.

At the top of the sprite list you should see the three buttons, as shown in the following screenshot. The first lets you draw your own character, the second lets you use an existing image (including a wide range of images included in Scratch), and the third gives you a random image from Scratch's selection. We've only used the second button in the previous chapter, but now is a good chance to explore the others:

If you click on the first button, you will be shown the following window; it has plenty of easy-to-use options that can help you create your own drawings. Hover your mouse cursor over any of the buttons to see what they do:

The second button brings up a fairly standard file explorer, which contains lots of neatly categorized images...

Creating a level


Now, let's make the game look a little more interesting by adding some scenery through following these steps:

  1. To the left of the sprite list, you'll see a white rectangle called Stage. Click on it and then select the Backgrounds tab in the script area. Again, you have the option of drawing your own background or using a preexisting image, but this time, I recommend creating your own so that you can make the level fun to play.

  2. Click on the Edit button. Try to keep your background as simple as possible; it will be easier to add extra objects (for example, the ground, trees, and clouds) as additional sprites later, because then you will be able to move them around more easily. It is perhaps easiest to simply fill the background with a solid sky blue color (and maybe some distant mountains).

  3. Now back in the Sprite list, create sprites for all the scenery you want in your game. At the minimum, you will need to create a sprite for the ground, but you can add all sorts of little details...

Moving the character


Now, let's start adding some code and making the game interactive! In this section, we'll do everything necessary to launch our main character using the slingshot.

Initialization

The first thing we want to do is make sure that the position of our main character resets every time we start the game. Click on the main character and create the following script in the script area:

The code snippet states that when the green flag is clicked, the current sprite (the main character) will move to the same position as the slingshot.

Check whether your code works by clicking on the green flag. You should see your character jumping to the same position as the slingshot. You may find that the character is behind the slingshot; if you would prefer for it to be in front, simply click on it on the Stage and drag it a short distance. Interacting with any sprite in this way will put it on top of all the other sprites.

Moving the character with the keyboard

Now, let's allow the player to move...

Adding physics


The next thing for us to do is to give our character a more interesting flight path. The game would be too easy (and no fun) if we just flew in a straight line through all the obstacles.

Gravity

First, let's add some gravity. Gravity has the effect of pulling objects down toward the ground. How can we model gravity in our game? The answer lies in the way we split our speed into both x speed and y speed. Gravity will only affect y speed, our speed in the up-down direction, so we can leave x speed as it is. Since the y coordinate increases as we move up but gravity pulls us down, we want gravity to keep subtracting a small amount from y speed. Add the following code block inside the forever block of your second script:

Try out the game now. You should arc through the air until you hit one of the edges of the screen. You may tweak the number in this code block if you wish; a higher negative number will give you stronger gravity. What happens if the number is positive?

Bouncing

Next...

Ending the game


The problem now is that you bounce around forever. We want the bouncing to stop at some point, and a good time to do this is when the character hits the ground. This is easy to do in Scratch with the following code:

Add this inside the forever block, and the script will end when the character sprite hits the ground sprite (you will need to choose the name of the sprite that you used for the ground). Since this script is in control of the character's movement, ending the script ends the movement, which is what we wanted.

Give your physics of the game a final test by playing the game. Your character should fly through the air while being pulled downwards by gravity, bounce off the edges of the screen, and stop when it hits the ground. This is how your second script should now look:

Scoring


Now that our main character can be launched properly, it's time to give the player something to aim at. In Angry Birds, there are pigs, but we can have anything we like. Draw a new sprite or use an existing one in the same way we created the main character earlier. I am going to use a premade shark in this example. Resize the sprite and put it in a good position.

Do you remember how we checked to see when the main character hit the ground? We're going to need to do something very similar here to detect when an enemy is hit by the main character. The following is the main piece of code to detect collisions, and inside it, we're going to put all the effects we want to happen when the enemy is hit. Make sure the enemy sprite is selected when you create this script—it controls the enemy's behavior and not the main character's. Note that we're using forever if rather than just if as we want to keep checking for collisions. Buzzy is the name of the sprite for my main bee character:

If everything...

Extensions


So far, we have created the bare minimum required for a game. There are all sorts of extra features we could add, such as the following:

  1. An end-game screen, which shows when all the enemies have been hit or when the main character touches the ground.

  2. Animation when two sprites collide.

  3. A special enemy that gives bonus points.

  4. Barriers that slow the player down.

  5. Power-ups that increase the player's speed or flip gravity, for example.

  6. Extra controls so that the player can continue to affect the character after it has been launched.

I will leave the rest of your game up to you, but here are some example scripts to give you some ideas. Try to work out what they do and where they might go, or just try them out! Some scripts might require minor modifications elsewhere to fit in properly:

Summary


In this chapter, we continued to learn how to use the Scratch programming language, and we went as far as creating an entire game.

In the next chapter, we'll take our knowledge of Scratch and see how we can apply it to a different programming language called Python. There, we'll learn how to use randomness to create lighthearted insults.

lock icon
The rest of the chapter is locked
You have been reading a chapter from
Raspberry Pi Projects for Kids (Second Edition)
Published in: Apr 2015Publisher: ISBN-13: 9781785281525
Register for a free Packt account to unlock a world of extra content!
A free Packt account unlocks extra newsletters, articles, discounted offers, and much more. Start advancing your knowledge today.
undefined
Unlock this book and the full library FREE for 7 days
Get unlimited access to 7000+ expert-authored eBooks and videos courses covering every tech area you can think of
Renews at $15.99/month. Cancel anytime

Author (1)

author image
Daniel Leonard Bates

Daniel Bates is a computer science researcher at the University of Cambridge. His day job involves inventing designs for future mobile phone processors and when he gets home, he likes playing games or working on one of his coding projects (or both!). Daniel has been a volunteer for the Raspberry Pi Foundation since 2011 and is enthusiastic about introducing new people to computing. He has previously written Instant Minecraft: Pi Edition Coding How-to and Raspberry Pi Projects for Kids (First Edition), both published by Packt Publishing.
Read more about Daniel Leonard Bates