Reader small image

You're reading from  Mastering Ubuntu Server - Fourth Edition

Product typeBook
Published inSep 2022
PublisherPackt
ISBN-139781803234243
Edition4th Edition
Concepts
Right arrow
Author (1)
Jay LaCroix
Jay LaCroix
author image
Jay LaCroix

Jeremy "Jay" LaCroix is a technologist and open-source enthusiast, specializing in Linux. He has a net field experience of 20 years across different firms as a Solutions Architect and holds a master's degree in Information Systems Technology Management from Capella University. In addition, Jay also has an active Linux-focused YouTube channel with over 250K followers and over 20M views, available at LearnLinuxTV, where he posts instructional tutorial videos and other Linux-related content. He has also written Linux Mint Essentials and Mastering Linux Network Administration, published by Packt Publishing.
Read more about Jay LaCroix

Right arrow

Virtualization

There have been a great many advancements in the IT space in the last few decades, and a few technologies have come along that have truly revolutionized the technology industry. I’m sure few would argue that the internet is by far the most revolutionary technology to come around, but another technology that has created a paradigm shift in IT is virtualization. This concept changed the way we maintain our data centers, allowing us to segregate workloads into many smaller machines being run from a single server. This allows us to get even more use out of our hardware. Since Ubuntu features the latest advancements of the Linux kernel, virtualization support is actually built right into it. After installing just a few packages to allow us to interact with the virtualization features, we can create virtual machines on our Ubuntu server without the need for a pricey license agreement or support contract. In this chapter, I’ll walk you through setting up your...

Prerequisites and considerations

I’m sure many of you have already used a virtualization solution before. In fact, I bet a great many readers are following along with this book while using a Virtual Machine (VM) running in a solution such as VirtualBox, Parallels, VMware, or one of the others. Those applications and others like them are great for testing Ubuntu or other operating systems on your desktop or laptop. In this section, we’ll set up a VM server that can act as a centrally available server on which to run VMs.

This will be easier than you may think—Ubuntu has virtualization built right in. This comes in the form of a dynamic duo consisting of Kernel-based VM (KVM) and Quick Emulator (QEMU), which together form a virtualization suite that enables Ubuntu (and Linux in general) to run VMs without the need for a third-party solution. KVM is the feature that is built right into the Linux kernel that performs the magic under the hood. It handles the low...

Setting up a virtual machine server

With all the discussion out of the way, let’s start the process and set up our virtualization server. Even though KVM is built into the Linux kernel, we’ll still need to install some packages in order to properly interface with it. Specifically, we’ll need to install several libvirt packages, as well as QEMU itself. libvirt itself gives us access to manage virtualization platforms on our server, as it provides us with a set of useful tools to manage our virtual machines.

These packages will require a decent number of dependencies, so it may take a few minutes for everything to install:

sudo apt install bridge-utils libvirt-clients libvirt-daemon-system qemu-system-x86

You’ll now have an additional service running on your server, libvirtd. Once you’ve finished installing KVM’s packages, this service will be started and enabled for you. Feel free to take a look at it to see for yourself:

systemctl...

Creating virtual machines

Now, the time has come to put your new VM server to the test and create a VM. At this point, I’m assuming that the following is true:

  • You’re able to connect to your KVM server via virt-manager
  • You’ve already copied one or more ISO images to the server
  • Your storage directory has at least 10 GB of space available
  • The KVM server has enough free RAM to be associated with the VM you intend on creating

Go ahead and open up virt-manager, and let’s get started!

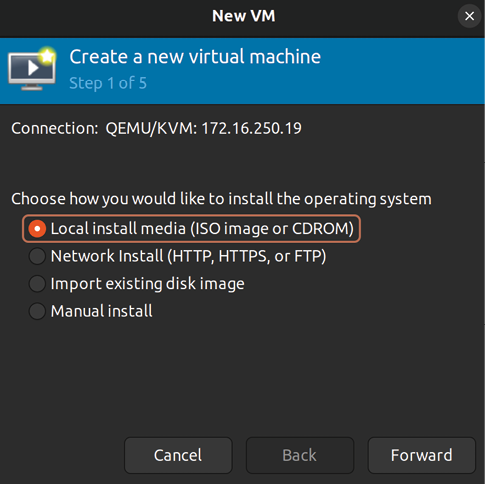
In virt-manager, right-click your server connection and click on New to start the process of creating a new VM. The default selection will be on Local install media (ISO image or CDROM); leave this selection as is and click on Forward:

Figure 16.9: The first screen while setting up a new VM

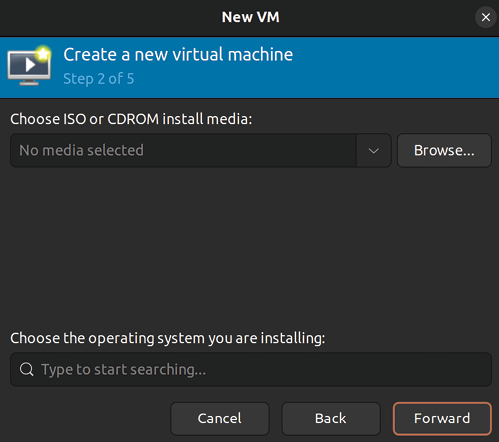
On the next screen, click on Browse to open up another window where you can select the ISO image you’ve downloaded:

Figure...

Bridging the virtual machine network

Your KVM VMs will use their own network unless you configure bridged networking. This means your VMs will get an IP address in their own network, instead of yours. By default, each machine will be a member of the 192.168.122.0/24 network, with an IP address in the range of 192.168.122.2 to 192.168.122.254. If you’re utilizing KVM VMs on your personal laptop or desktop, this behavior might be adequate. You’ll be able to SSH into your VMs via their IP addresses if you’re connecting from the same machine the VMs are running on. If this satisfies your use case, there’s no further configuration you’ll need to do.

Bridged networking allows your VMs to receive an IP address from the DHCP server on your network instead of its internal one, which will allow you to communicate with your VMs from any other machine on your network. This use case is preferable if you’re setting up a central VM server to power infrastructure...

Simplifying virtual machine creation with cloning

Now that we have a KVM server, and we can spin up an army of VMs to do our bidding, we can try and find clever ways of automating some of the workload of setting up a new VM. Every time we go to create a new VM, we need to go through the entire installation process for its operating system again. While this process is not difficult, we can certainly simplify it.

Most prominent virtualization solutions include a feature that allows you to create a VM Template. With a template, we can create a VM once and get it completely configured. Then, we can convert it into a template and use it as a base for all future VMs that will use that same operating system. This saves a tremendous amount of time. You’ll probably recall the handful of screens you had to navigate through to install Ubuntu Server in our first chapter. Imagine not having to go through that process again (or at least not nearly as often).

Unfortunately, as great...

Managing virtual machines via the command line

In this chapter, I showed you how to manage VMs with virt-manager. This is great if you have a secondary machine with a GUI running Linux as its operating system. But what do you do if such a machine isn’t available, and you’d like to perform simple tasks such as rebooting a VM or checking to see which VMs are running on the server?

On the VM server itself, you have access to the virsh suite of commands, which will allow you to manage VMs even if a GUI isn’t available. To use these commands, simply connect to the machine that stores your VMs via SSH. What follows are some easy examples to get you started. Here’s the first one:

virsh list

This command will return an output like that shown in the following screenshot:

Figure 16.19: Showing running VMs with the virsh list command

With one command, we were able to list the VMs running on the server. In the example screenshot, you can see...

Summary

In this chapter, we took a look at virtualization, specifically with QEMU/KVM. We walked through the installation of KVM and the configuration required to get our virtualization server up and running. We walked through the process of creating a bridged network so that our VMs can be accessible from the rest of the network and created our first VM. In addition, although QEMU/KVM doesn’t have its own solution for templating, we worked around that and created our own solution.

In Chapter 17, Running Containers, we’ll take a look at containerization, which will include both Docker and LXD. Stay tuned!

Relevant video

Further reading

Join our community on Discord

Join our community’s Discord space for discussions with the author and other readers:

https://packt.link/LWaZ0

lock icon
The rest of the chapter is locked
You have been reading a chapter from
Mastering Ubuntu Server - Fourth Edition
Published in: Sep 2022Publisher: PacktISBN-13: 9781803234243
Register for a free Packt account to unlock a world of extra content!
A free Packt account unlocks extra newsletters, articles, discounted offers, and much more. Start advancing your knowledge today.
undefined
Unlock this book and the full library FREE for 7 days
Get unlimited access to 7000+ expert-authored eBooks and videos courses covering every tech area you can think of
Renews at $15.99/month. Cancel anytime

Author (1)

author image
Jay LaCroix

Jeremy "Jay" LaCroix is a technologist and open-source enthusiast, specializing in Linux. He has a net field experience of 20 years across different firms as a Solutions Architect and holds a master's degree in Information Systems Technology Management from Capella University. In addition, Jay also has an active Linux-focused YouTube channel with over 250K followers and over 20M views, available at LearnLinuxTV, where he posts instructional tutorial videos and other Linux-related content. He has also written Linux Mint Essentials and Mastering Linux Network Administration, published by Packt Publishing.
Read more about Jay LaCroix