Reader small image

You're reading from  Mastering Adobe Photoshop Elements 2023 - Fifth Edition

Product typeBook
Published inDec 2022
PublisherPackt
ISBN-139781803248455
Edition5th Edition
Right arrow
Author (1)
Robin Nichols
Robin Nichols
author image
Robin Nichols

Born in the UK, Robin Nichols has always had a great love for recording the world with a camera. After finishing school, he studied fine art, before moving on to study at Nottingham Trent University, where he gained a degree in creative photography. He subsequently worked in the advertising industry for several years, before emigrating to Australia in 1985. Robin has always worked in photography: as a black and white printer, a cameraman, a stock photographer, and a freelance photographer. During the 1990s, Robin contributed to several photo-centric publications in Australia, New Zealand, Singapore, and the UK.
Read more about Robin Nichols

Right arrow

Easy Creative Projects

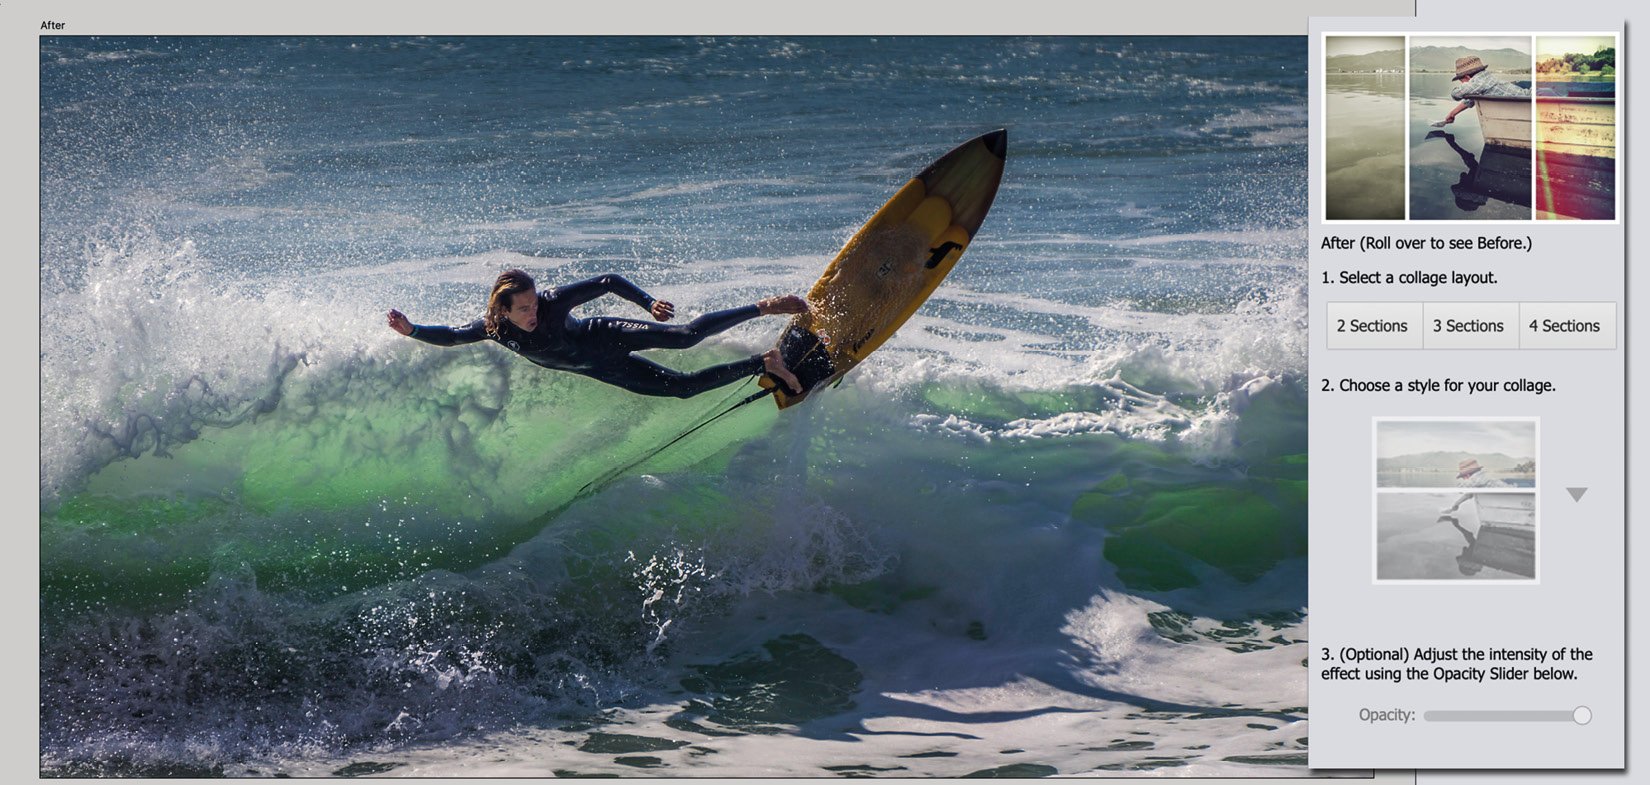
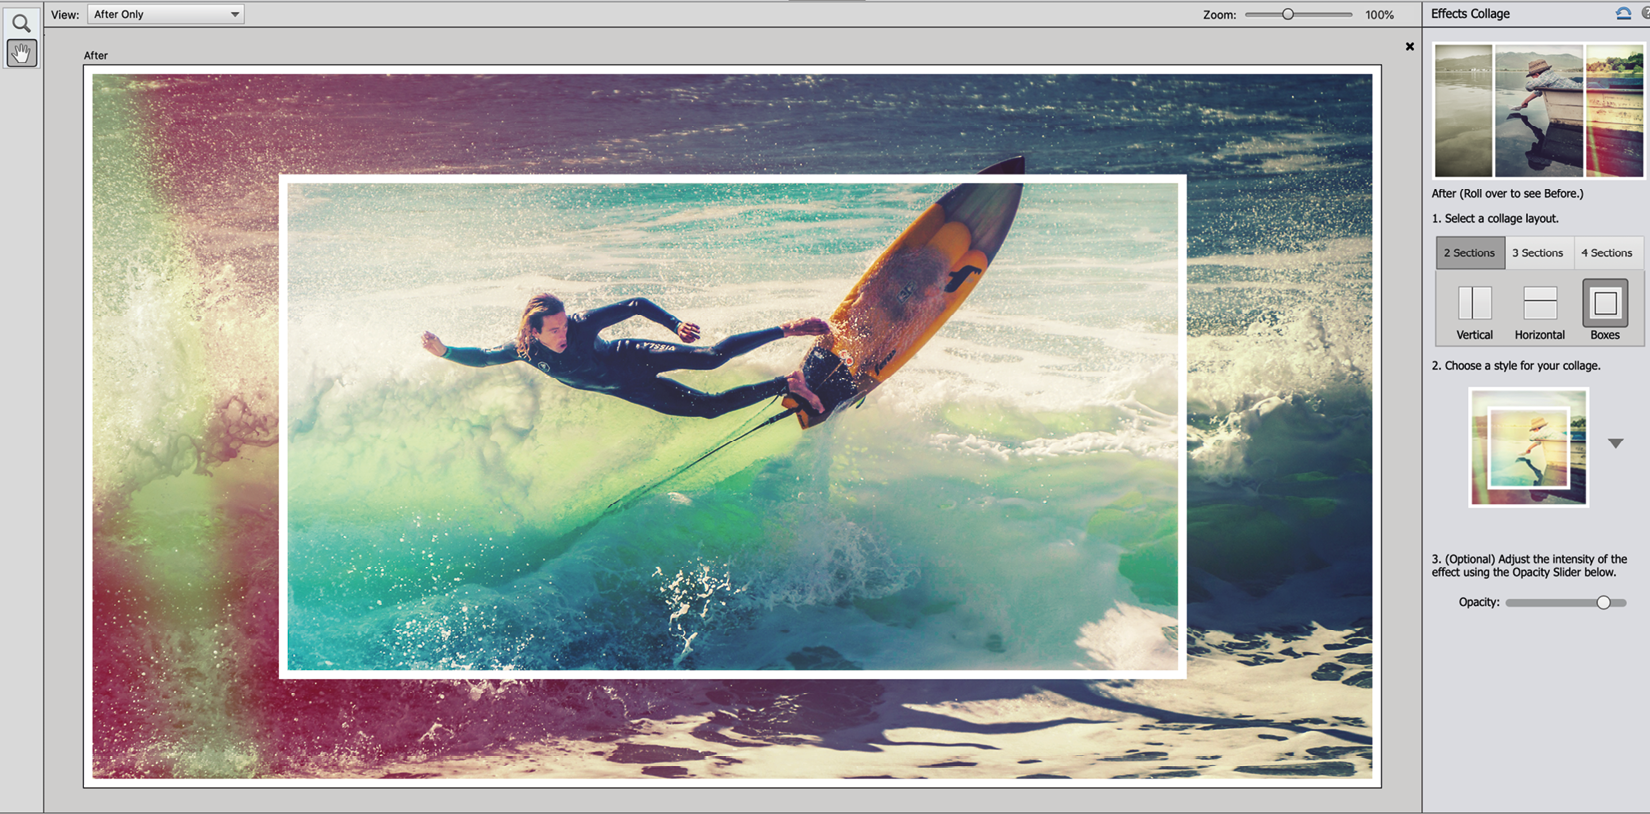
In this chapter you'll discover a fantastic array of semi- and fully automatic special effects, most of which can be mastered with little or no previous experience. Even better, each effect produces a different style, significantly pushing your creativity in directions you may never have considered before.

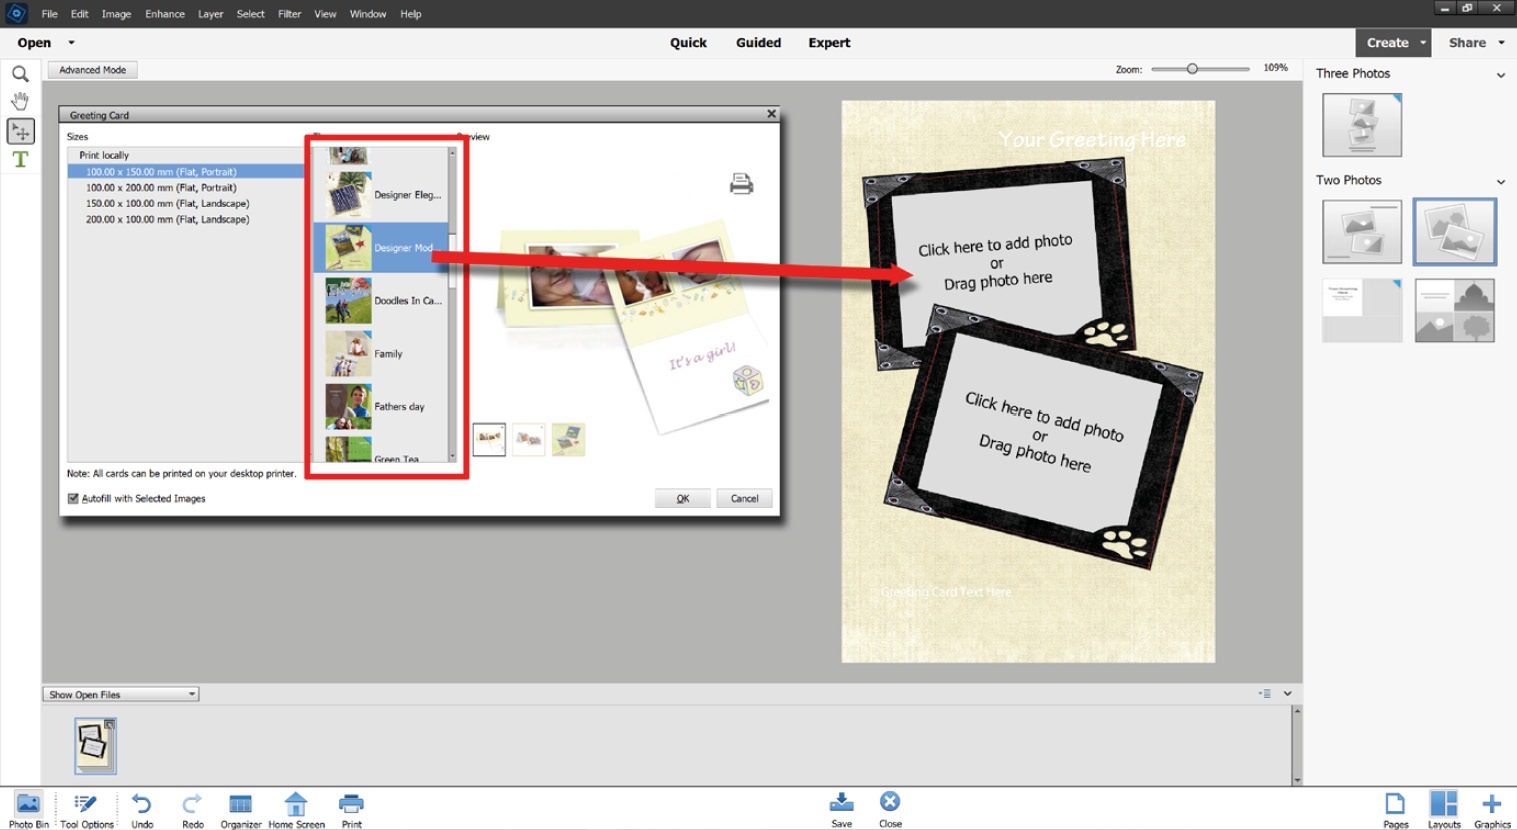
I have always liked Elements' slightly alternative approach to photo editing because it includes a lot of project-based activities rather than concentrating on just the skills of picture editing. However, over the years, this has changed—Elements now boasts some of the most sophisticated editing features—tools that you'd normally expect from the top end of town—while still retaining awesome project based features, such as panorama stitching, calendar making, and photo slideshows.

This chapter highlights a number of features that anyone can use to produce truly great results—without having to climb that steep...

Simple visual effects: using Filters

Elements is heading in the direction of the smartphone. By this, I mean that the visual effects achievable are increasingly preset-driven. Open a file, check out a range of special effects, and apply one to your snap by clicking the thumbnail image. Nothing could be easier, and while doing this doesn't teach you how the effect is really achieved, it makes enhancing your work simple, fast, and approachable for the majority of camera users not wanting to spend hours in front of a screen.

As there are over 100 filters in Elements, they are carefully subdivided into collections: Adjustments, Artistic, Blur, Brush Strokes, Distort, Noise, Pixelate, Render, Sketch, Stylize, Texture, and Other. To make it easier to use the filters, Adobe supplies a mini-program called the Filter Gallery, which displays the filter effects in a large window alongside the various sliders that can make it look really good, or not. You might not like all of the filter...

Instant Artistic Effects

New to Elements 2022 was this neat feature called Artistic Effects—you'll find it in the Quick Edit mode, sharing a Panel with the regular Classic Effects that have been in Elements for several versions now. Its regular Effects are already brilliant—choose a tonal "flavor," click the thumbnail image, and it applies that recipe to your photo in seconds. There are more than 50 variations to choose from. The difference between these and the new Artistic effects, apart from the obviously very colorful palette that they display, is that you can auto-select the subject or the background before you add the arty effect. If the effect goes over the subject, it can obscure features with too much color and texture. Uncheck the subject from the panel first and you get an amazingly accurate subject selection before the effect is applied. This is another feature that can produce fabulous effects with no need for prior experience. Just click...

Lomo Camera Effect

I saw my first Lomo camera in a GUM store in Warsaw, shortly after the Berlin Wall had come down in 1990. It was, in fact, the only camera on sale in that huge store, and it piqued my interest. Lomo cameras were made in the Lomo factory in St. Petersburg (along with a lot of other specialized optics—for telescopes, cine cameras, microscopes, and more). Its 35 mm Lomo LC-A film camera was adopted by a group of enthusiast photographers who used to take pictures almost randomly—from all manner of angles, locations, and subjects. Lomography, as it is called, often spawned huge exhibitions of images, mass-printed and displayed almost like wallpaper. The Lomography movement started in Vienna in the 90s and continues today, although not quite with the mass appeal of the last century. Elements' Lomo Camera Effect produces a soft, heavily vignetted effect similar to that produced by the LC-A and the Diana toy camera, and many more unsophisticated...

Effects Collage

This Guided Edit feature, located under Guided Edit>Fun>Effects Collage, is impressive because it can add a collage and coloring effect to your images in seconds, where it might take most of us over an hour to do this manually—which quite probably we'd never bother trying. Elements is full of these clever little effects that compress an often tedious manual process into an automated feature that works a treat.

Open your image, go to Guided Edit>Fun>Effects Collage, choose from a two, three, or four-panel effect, and click the Style tab to view, and choose, a color effect. It's easy and if it's not what you expected, undo the previous action and try a different combination, such as the picture-in-a-picture effect seen below. Use the Opacity slider to reduce the effect intensity if needed.

Colorize: AI-driven creativity

One feature that Adobe has been developing is its use of artificial intelligence (AI), something that is perfectly demonstrated in this epic feature: Colorize Photo. You'll find it under the Enhance menu in the Expert Edit window.

Initially, I was drawn to this effect because I have actually spent many years hand-coloring black-and-white images for sale around the city I live in. It's great fun but involves a lot of printing, coloring in, erasing, ripping up prints, and starting again. The oils used added a permanence to the print, so they naturally lasted a long time—I'm sure you'll find a few hand-colored photos among your family albums. Before color photography was an affordable thing, this was the only way to get a color print!

To use this feature, all that's needed is a black and white image (in this example, I started with a sepia picture) and choose one of the colorized "looks" from the...

Photomerge Panorama

Everyone likes a panorama—which is why smartphones and compact cameras have an inbuilt fully automated panorama feature. These usually work well—I find myself using my iPhone for this all the time because it's so convenient. But if you only ever look at the results produced by a smartphone, and its small screen, you'll never get to fully appreciate what a bunch of high-resolution images and Elements' Photomerge Panorama can offer a serious photographer.

Save a file and display it on a large screen, and you'll begin to appreciate how much better multiple high-resolution sections assembled using Photomerge can be. It's a powerful feature.

We all visit beautiful places on our travels, many of which are too large or too majestic to warrant just one snap. A panorama is the perfect answer. Above: Ait Ben Haddhu, Morocco. This shows a five-frame panorama, complete with a black border and Arabic-style text. Architecture...

Making a multi-deck panorama

One of the problems you will encounter when stitching a panorama is that, if it's too wide, it's nearly impossible to print. Although it might be 48-inches wide, it might only be 8 inches high, especially if all of your sections were shot horizontally. One fun and creative answer to this is to zoom in first and shoot multiple decks so that, even after cropping, the image quality isn't compromised.

City of Fes, Morocco: Don't think that you have to shoot horizontally all of the time. This is like a jigsaw, comprising 37 sections, shot in three decks, from left to right. I love the fact that, although Elements does an amazing job of lining up all of the images near-perfectly, it's not put off by having images at an angle, horizontally, vertically, zoomed in, or shot at wide-angle settings.

It handles such a challenge with ease (although this took 20 minutes to process). If you think you have missed a section while...

Photomerge Scene Cleaner

Elements began by offering Photomerge Panorama on its own, but within a few versions, the designers came up with a number of other useful applications for Photomerge technology, including the ability to remove random people and objects to "clean up" a scene with ease.

Busy or clean? Scene Cleaner is an efficient, automated copy-and-paste feature designed to clean up heavily populated and cluttered scenes with the least amount of hassle. Important note: This only works if you take multiple images (two or more) of the same scene preferably without moving the camera.

Step one is to open all the images shot on location (there are four here) and open Photomerge Scene Cleaner from the Guided menu. Note that Scene Cleaner has its own separate panel showing one image on the left and an empty space on the right. Choose the least cluttered image from the thumbnails at the base of the screen and click-drag it up into the right...

Photomerge Faces

Ever taken a snap of friends only to discover, after they have all gone home, that one of them is looking in the wrong direction, has their eyes closed, or just looks a bit grumpy?

This is a common photo-taking error that many experience. Before Photoshop Elements came along, the only remedy was to get your friends back together to reshoot, or to spend time selecting, copying, and pasting figures from one picture to another. This was a time-consuming and complex process, so no one bothered.

By leveraging the power of the Photomerge AI technology, Elements has three fantastic features: Photomerge Faces, Photomerge Compose, and Photomerge Group Shot, all designed to fix compositional errors, however heinous they might appear. The Faces tool enables you to remove a face from one image and transfer it to another, all without the need for making complex selections—in much the same way that Scene Cleaner works when copying and pasting one part of the shot over...

Creating Slideshows

A slideshow in Elements is not quite what I was used to as a child when my parents would drag out the Kodak projector and screen to view various snaps that were taken that summer holiday. A slideshow these days is a multimedia event, normally presented as a video file that can be replayed on a computer or uploaded to a range of social media sites.

If you already have images in your Organizer, and you look at the home page, chances are you'll see that Elements has already created a slideshow through its Auto Creations feature.

Making a slideshow in Elements is quick and easy. Previous versions featured a far more sophisticated slideshow-making utility, but it was both complex and time-consuming to use. It then got dumbed down too much—but I'm happy to see that the 2023 version has a larger set of theme presets from which to make a show. As with previous versions, making a half-decent show is easy to do—and fast.

Save and Export: The...

Creating Photo Calendars

A calendar is a marvelous gift for family, friends, and even work colleagues. What's more, it's also a great way to show off your prowess as a photographer, and creating a calendar has never been easier. Once again, Adobe has packed some incredibly complex imaging actions into a simple-to-understand, single-click operation, and on the whole, it works very well.

My only niggle with the slideshow feature is that I don't really like the offered templates - but that's a matter of personal taste. If you are of the same view, you can customize the calendar using the Advanced Mode (selectable once the calendar style has been chosen) or make your own design by adapting some of the techniques you'll discover in Chapter 9, Advanced Drawing, Painting and Illustration Techniques.

Step one: It saves time to sort through your work first and save potential calendar images to an Organizer Album.

Step two: Choose Photo Calendar...

Creating simple greeting cards

To make a greeting card, the process is almost identical to that of the calendar, except that you are making one page, not 12. Image placement and proportions are controlled through the menu.

Step one: To make a greeting card, arrange a few images into an Organizer Album.

Step two: Select one, two, or three images from this album (depending on how many you'd like to put into the card) and choose Greeting Card from the Create menu.

Step three: From the tiny theme menu that opens (outlined in red), choose a style and click OK. The graphic downloads and you then click, or drag, an image from the Photo Bin into the card art. Note that, on the right-hand side of the Greeting Card window is a panel of design layouts, which includes the ability to choose how many images are to be displayed on each page.

Working tips:

I have a few problems with using this particular utility—to begin, it's only designed for single-sided...

Summary

Adobe Photoshop Elements started life as very much a scrapbooking-type, project-based photo editor, and while that feel has been somewhat replaced by an increasing number of hardcore image-editing features, it continues to surprise with the types of clever instant and automated features we discussed in this chapter. But for many, these automated processes, while extraordinarily useful, also have finite practicality—you can only go so far with them.

In this chapter, we have seen the power of Adobe's AI develop further with its semi-automated processes, such as its all-new Artistic Effects located in the Quick Edit mode, as well as its equally fantastic Colorize Photo feature, the clever Photomerge Scene Cleaner, plus its equally cool siblings, Photomerge Faces and Photomerge Panorama functions, a newly-expanded Slideshow feature, automated greetings card designs and DIY calendars, plus Lomo camera effects and effects collages, and, of course, there's a whole...

lock icon
The rest of the chapter is locked
You have been reading a chapter from
Mastering Adobe Photoshop Elements 2023 - Fifth Edition
Published in: Dec 2022Publisher: PacktISBN-13: 9781803248455
Register for a free Packt account to unlock a world of extra content!
A free Packt account unlocks extra newsletters, articles, discounted offers, and much more. Start advancing your knowledge today.
undefined
Unlock this book and the full library FREE for 7 days
Get unlimited access to 7000+ expert-authored eBooks and videos courses covering every tech area you can think of
Renews at $15.99/month. Cancel anytime

Author (1)

author image
Robin Nichols

Born in the UK, Robin Nichols has always had a great love for recording the world with a camera. After finishing school, he studied fine art, before moving on to study at Nottingham Trent University, where he gained a degree in creative photography. He subsequently worked in the advertising industry for several years, before emigrating to Australia in 1985. Robin has always worked in photography: as a black and white printer, a cameraman, a stock photographer, and a freelance photographer. During the 1990s, Robin contributed to several photo-centric publications in Australia, New Zealand, Singapore, and the UK.
Read more about Robin Nichols