Reader small image

You're reading from  Mastering Adobe Photoshop Elements 2023 - Fifth Edition

Product typeBook
Published inDec 2022
PublisherPackt
ISBN-139781803248455
Edition5th Edition
Right arrow
Author (1)
Robin Nichols
Robin Nichols
author image
Robin Nichols

Born in the UK, Robin Nichols has always had a great love for recording the world with a camera. After finishing school, he studied fine art, before moving on to study at Nottingham Trent University, where he gained a degree in creative photography. He subsequently worked in the advertising industry for several years, before emigrating to Australia in 1985. Robin has always worked in photography: as a black and white printer, a cameraman, a stock photographer, and a freelance photographer. During the 1990s, Robin contributed to several photo-centric publications in Australia, New Zealand, Singapore, and the UK.
Read more about Robin Nichols

Right arrow

Feature Appendix

This appendix features a summary description of every important tool, panel, and feature to be found in this amazing photo-editing program. There's also a comprehensive overview of all the major menus along with the items that you'll find displayed there.

Bear in mind that not everything you find in this application is 100% perfect, so I have also endeavored to add my personal thoughts on the usefulness of some of the tools and features to prevent people who are new from wasting time by choosing inappropriate tools—or the wrong tools for the job. Though this chapter is by no means comprehensive (that would require another book), it's designed to shed additional light on the workings of this multifarious and powerful editing application.

Treat it as a quick reference section. If you are trying to achieve a specific effect, look, or result, use these pages to provide inspiration and the right tool or process for the job at hand.

As a...

Home Screen

Start by double-clicking on the Elements icon on your Windows PC or Mac to open the Home Screen.

This screen acts a gateway into the various parts of Elements itself. Firstly, it provides creative inspiration by offering examples of its features through Auto Creations, a clever AI-driven feature that presents examples of its features using your own images automatically selected from the Organizer. This includes slideshows, Pattern Brush, Painterly, B&W Selection, Depth of Focus effects, collages, and special text effects. The Home Screen also features web inspiration links, a list of previously viewed files, and three shortcuts to open the Organizer, Editor, or Video Editor.

Organizer – Import

This big button, at the top left of the Organizer window, is pretty much where it all starts. Use this to bring images into the Photoshop Elements database (called the catalog). Note: Elements never actually copies the original files into the program—it just imports thumbnails and metadata, while forming links to the original files.

There are several ways to do this: Import from Files and Folders, from Camera or Card Reader, from Scanner, or In Bulk. (You can also import files using the File>Get Photos and Videos command.)

Organizer—its five view spaces

Media: This is the central window in which you see all of your photos, music, video, and graphics files stored in the catalog. Use it as a base—but further sort and categorize your images by placing them into albums.

People: If you decide to analyze your image database, Elements can file your photos based on the people it identifies in each image. It's a clever feature that seems to work well.

Places: An internet-reliant viewing mode that's geared toward photographers with GPS-enabled cameras. Images appear on a Google world map according to the coordinates sourced from the file's metadata. This is a nice feature for anyone embarking on a road trip, or perhaps researching travel. This feature is not supported by versions older than Elements 2020.

Events: Use Events to group your images based on the date. This is handy if you need quick access to files that were shot at specific times. If they are travel...

Quick Edit mode: Tool bar

This tool bar shares many common features that are also found in Expert Edit mode, including Zoom, Hand, Quick Selection, Red Eye, Straighten, Type, Spot Healing, Crop, and Move. One that is unique to this tool rack is the curious Whiten Teeth tool.

Whiten Teeth (F): This tool produces a select-and-brighten effect. If you click and drag across teeth, or anything else that might need a bit of brightening, it selects the area (based on edge contrast) while adding a brightness boost. This isn't a good substitute for regular visits to your dentist.

Tip:

The letters in brackets, for example, (Z), denote the keyboard shortcut letter for that tool, or group of tools.

Quick Edit: Adjustments

On the right-hand side of the Quick Edit space, you'll find this handy tone-fixing utility.

It features the Smart Fix (pictured below), Exposure, Lighting, Color, Balance, and Sharpen tools, all of which can be adjusted using a slider or by clicking on one of the nine thumbnails under each subheader. It's easy to use and produces good results.

Every tool in this application has its own unique settings that can be used to modify that specific tool's efficiency. If you find that the tool you are working with doesn't work as effectively as you had hoped it would, simply open the corresponding Options panel at the bottom of the screen and adjust the settings to make it work more effectively.

(The small semi-circular arrow icon at the top of this, and most other Elements processes, is for resetting the image back to its original state. The ? icon takes you to Adobe's online community Help section.)

...

Guided Edit mode

The Guided Edit mode offers 53 step-by-step editing processes—from a basic color fix, to far more sophisticated processes, such as panorama stitching, tilt-shift, and watercolor effects. It's a neat feature that works very well—plus it's a good place to look for image-editing inspiration. This excellent edit space is subdivided into the following subsections.

Basics

Brightness and Contrast: This has got to be the most useful edit for most digital photos. (Also in Expert>Enhance>Adjust Lighting>Brightness and Contrast.) Adding a bit of brightness and contrast might be all that's needed to significantly improve the visual strength of the picture.

Correct Skin Tone: Fixes color casts and inconsistencies. Also in Expert> Enhance>Adjust Color>Adjust Color for Skin Tone.

Crop Photo: Trim bits off the image to remove distractions and improve the composition.

Levels: Easy-to-use and powerful contrast and brightness...

Drop-down menus

(Quick and Expert Edit modes only)

File menu

Use this important menu to do the following:

  • File>New - Create a new, blank document, and a new image from the clipboard.
  • File>Open - Open a file from a hard drive (Alt/Opt + Ctrl/Cmd + O).
  • File>Open in Camera RAW - Force-open non-RAW files in the Camera RAW utility.
  • File>Open Recently Edited File - Locate the last 10 or 20 recently edited files without having to navigate through the usual file structure.
  • File>Duplicate - Copy the currently open image and rename it, if needed.
  • File>Close and File>Close All - To close single pictures (Ctrl/Cmd + W), or groups of pictures (Alt/Opt + Ctrl/Cmd + W), with one action.
  • File>Save - To Save your progress (important—Ctrl/Cmd + S).
  • File>Save As - To save your progress and to rename/relocate the file (File>Save As..., or Ctrl/Cmd + Shift + S).
  • File>Save for Web - To save a file and specifically...

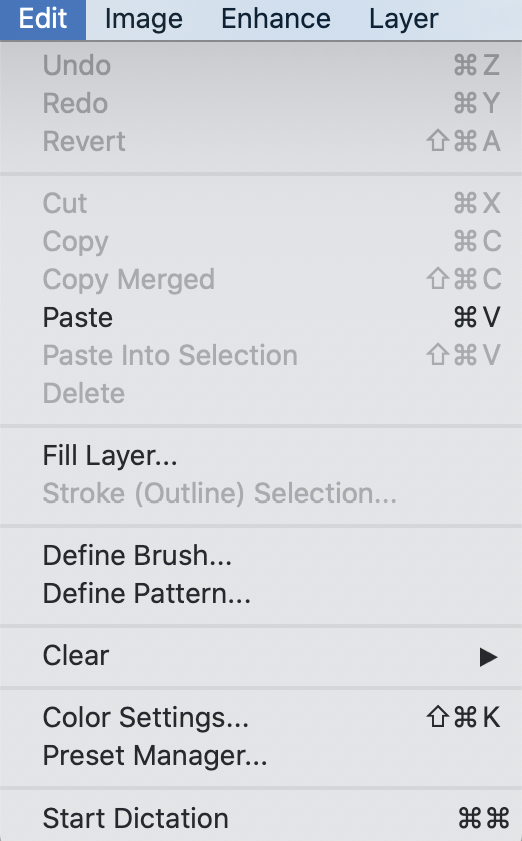
Edit menu

This is an important menu because it gives you multiple undo/redo commands. In fact, Photoshop Elements allows you to go backward as much as required. Also, try using the Ctrl/Cmd + Z (undo) and Ctrl/Cmd + Y (redo) keyboard shortcuts.

Also use this menu to copy and paste data into an image or to do any of the following:

  • Edit>Revert - Return the file to its pre-edited state (Shift + Ctrl/Cmd + A).
  • Edit>Copy - Copies the content of a selection (Ctrl/Cmd + C).
  • Edit>Copy Merged - this copies the contents of a selection plus any layers in the document by merging them, then copying the result (Shift + Ctrl/Cmd + C).
  • Edit>Cut - deletes the content of a selection (Ctrl/Cmd + X)—although it can be pasted back into the same document, or a different document, if needed, but only before further saving.
  • Edit>Paste - Pastes the (copied) content of a selection (Ctrl/Cmd + V).
  • Edit>Paste Into Selection - Pastes the copied...

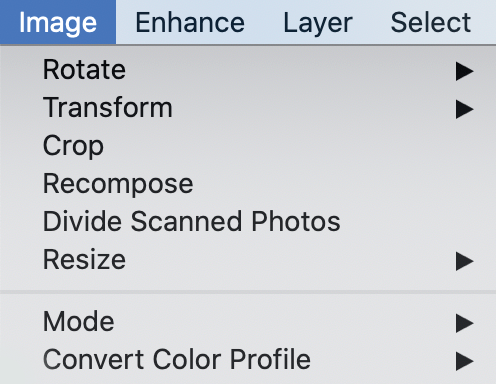
Image menu

In this menu, you'll find all of the functions that apply directly to the image:

  • Image>Rotate - An extensive menu used to manipulate the orientation of the file: Rotate 90 deg left/right, 180 deg, Custom, Flip Horizontally, and Flip Vertically. Also used to rotate individual layers—90 degrees left/right, 180 deg, free rotate, plus Flip Layer Horizontally/Vertically. It also has two other commands: Straighten and Crop Image, plus Straighten. I find both functions alarmingly inaccurate—but it really depends on how the subject in the frame is aligned.
  • Image>Transform - A superbly important part of image editing. Ctrl/Cmd + T allows you to change the size, proportion, or perspective of any object on a layer—this is a valuable function that you'll use a lot.
  • Image>Crop - If you make a selection, then choose this item, it crops everything not selected off the file.
  • Image>Recompose - This is a menu shortcut...

Enhance menu

In this powerhouse menu, you'll find all of the features and tools you need to improve the tones and clarity of your creations:

  • Auto Smart Fix (Alt/Opt + Ctrl/Cmd + M).
  • Auto Smart Tone (Alt/Opt + Ctrl/Cmd + T).
  • Auto Levels (Shift + Ctrl/Cmd + L).
  • Auto Contrast (Alt/Opt + Shift + Ctrl/Cmd + L).
  • Auto Haze Removal (Alt/Opt +Ctrl/Cmd + A).
  • Auto Color Correction (Shift + Ctrl/Cmd + B).
  • Auto Shake Reduction
  • Auto Sharpen
  • Auto Red Eye Fix (Ctrl/Cmd + R).
  • Adjust Color - Includes: Remove Color Cast, Hue/Saturation (very useful—Ctrl/Cmd + U), Remove Color (Shift + Ctrl/Cmd + U), Replace Color, Adjust Color Curves, Adjust Color for Skin Tone, and Defringe Layer.
  • Adjust Lighting—Includes Shadow Highlight, Brightness and Contrast, and the useful Levels (Ctrl/Cmd + L).
  • Adjust Smart Fix (Shift + Ctrl/Cmd + M).
  • Convert to Black and White (Alt/Opt + Ctrl/Cmd + B).
  • Colorize Photo - Uses Adobe AI to select...

Layer menu

Not surprisingly, everything pertaining to the use and the modification of layers is found under this menu:

  • Layer>New>Layer - This simply adds a new (blank) layer to the Layers panel (Shift + Ctrl/Cmd + N).
  • Layer>New>Layer from Background - converts the background layer into a regular layer.
  • Layer>New>Group - Creates a new (empty) group—this is a method to tidy up a busy layer panel by placing common layers together into a folder (as a group).
  • Layer>New>Group from Layers: Collects all selected layers automatically into one group.
  • Layer>New>Layer via Copy - this takes the entire content of a layer or the selected part of a layer and converts it into a new layer (Ctrl/Cmd + J).
  • Layer>New>Layer via Cut - The same as the previous command but by removing the cut layer rather than copying it (Ctrl/Cmd + Shift + J).
  • Layer>Duplicate Layer... - Copy (duplicate) an existing (sele...

Select menu

As its name suggests, this menu contains everything to do with selections. Use its features to do the following:

  • Select>All – A very handy command—select an entire image or the content of a selection, prior to you pasting it somewhere (Ctrl/Cmd + A).
  • Select>Deselect - this effectively kills off the current selection (that is, turns it off—Ctrl/Cmd + D).
  • Select>Reselect - used to bring the previous selection back into the image (Shift + Ctrl/Cmd + D).
  • Select>Inverse - use this to flip your selection into a negative state. An excellent technique if your subject is hard to select but the background is not (Shift + Ctrl/Cmd + I).
  • Select>Feather - this is an integral part of the selection process—to feather the edge means the sharp selection line is made softer.
  • Select>Refine Edge - no selection is ever 100% perfect, so use this mini-utility to modify that selection edge.
  • Select...

Filter menu

There are too many filter tools to mention here. Under the Filter menu, you'll find a huge range of filter special effects, some of which are designed to lend an artistic look to your work. I use filters for jobs such as blurring pixels (depth-of-field effects) and some for distorting, sketching, stylizing, adding texture, and even for adding more digital noise. All filter effects can be used globally or simply applied to a smaller part of the image once they're confined inside a selection.

Correct Camera Distortion - Separate from the rest of the filters, Correct Camera Distortion is designed for correcting lens distortion. Use this to add or subtract optical errors, as well as creating a vignette and adjusting perspective.

View menu

The tools that are found inside the View menu are used principally to line up, arrange, enlarge, or reduce the image size that you're currently viewing. Note that none of these overlay helpers, such as Grid, Rulers, or Guides, will show once the images are printed or uploaded to the internet. They are merely there in order to assist your page layout and design:

  • View>Zoom In - A handy command to enlarge the image on the main screen. Learn the keyboard shortcuts for this as they will streamline your workload immeasurably (Ctrl/Cmd + =).
  • View>Zoom Out - The opposite to the previous action (Ctrl/Cmd + -).
  • View>Fit on Screen - another excellent shortcut to learn (Ctrl/Cmd + 0).
  • View>Actual Pixels - Enlarges the image to pixel level (Ctrl/Cmd + 1).
  • View>Print Size
  • View>Selection - Hides the selection line temporarily (Ctrl/Cmd + H—a handy shortcut to learn and use when you're working with selections, but...

Window menu

In this drop-down menu, you'll find references to all of the panels inside Photoshop Elements. These include the following:

  • Window>Actions – An Action is a prerecorded editing process that can be played back on single or multiple files. Actions are recorded in Photoshop CC so not all actions copied (from online resources) will work in Elements.
  • Window>Adjustments – Useful and easy Quick Edit special effects and tonal fixes.
  • Window>Color Swatches – Useful for setting, saving, and reusing text and painting colors.
  • Window>Effects – Excellent bunch of preset effects—inspirational (F2).
  • Window>Favorites Drag often-used features here so that they can be found and used again quickly without having to hunt through all the menus.
  • Window>Filters – Too many to mention here—hundreds of filters and creative possibilities (F3).
  • Window>Graphics...

(Quick and Expert Modes)

Layers panel

This is possibly the most important panel in this program, especially if you're working with multi-image files or images with text (because different image elements can be placed onto separate layers). In some of the more complex operations offered by Photoshop Elements, this panel is hidden unless you specifically search out its advanced mode. (It's hidden because, since that process might involve a very complex list of functions, having everything visible might be a recipe for disaster. Deleting, moving, or renaming any one of those layers might prevent the (prerecorded) action from being completed.)

Effects panel

As its name might suggest, this panel is all about choosing a special "look" to apply to a pixel-based image. From Elements 2022, the panel is split between Classic effects ("looks" from previous versions) and Artistic, 30 new "looks" that can be added globally or, using...

More tabs

Histogram panel

The histogram, that curious mountain range depicting where in the image the tones sit in relation to absolute black and absolute white, is a very handy tool. At a glance, you can tell whether an image is overexposed or underexposed.

History panel

History contains a list of all the steps and mouse clicks that are made while editing an image. Everything is recorded in a linear fashion, so it's entirely possible to go back in time to a previous edit state in order to re-work a specific part of the edit process. It doesn't allow you to combine different states—once a state has been deleted, everything later than that is also lost.

Favorites panel

Store frequently used clip art, filters, effects, and text, by dragging the effect thumbnail into this panel. This is a huge time-saver because everything is in one place for fast access.

Navigator panel

This small panel displays a large thumbnail of the image that's displayed...

Create Menu

(Organizer and Editor, left and right)

Slideshow

This is one of the easiest ways to create a slideshow (in MP4 movie format) and probably the fastest. Because it's so quick, you get very little input and a few style choices and that's it. Previous versions of Elements enjoyed quite a sophisticated and feature-rich slide-making utility. This new version has been dumbed-down—it's fast and easy, but if you want greater control, you'll have to turn to a third-party application.

Photo Collage

This is an amazing feature that takes a bunch of images and assembles them into a nicely designed collage. To achieve this the traditional way, that is, using layers and masks, would take a long time. This feature takes a few seconds. Brilliant.

Photo Prints

This is a feature that links your Elements output to a local printer. Options include Local printer (single prints), Picture Package (a set of differently sized pictures all...

Share menu

(Organizer and Editor)

Email

Link your email account with this utility to attach images easily and efficiently.

Twitter

Sign up, then upload your images directly to the Twitterscape.

Flickr

Sign up, then load images directly into your Flickr Photostream or be more specific and target a specific Flickr folder.

Facebook

Sign into FB and upload your images directly.

Vimeo and YouTube

Both of these features are only relevant for video—linking your Vimeo and YouTube accounts to provide a direct link between the two features makes posting so much simpler.

PDF Slideshow

Here, you can add multiple images in the PDF slideshow window. Then, the software binds it all together into a universally readable PDF file that can then be distributed via email, a blog, website, disk, or USB media.

lock icon
The rest of the chapter is locked
You have been reading a chapter from
Mastering Adobe Photoshop Elements 2023 - Fifth Edition
Published in: Dec 2022Publisher: PacktISBN-13: 9781803248455
Register for a free Packt account to unlock a world of extra content!
A free Packt account unlocks extra newsletters, articles, discounted offers, and much more. Start advancing your knowledge today.
undefined
Unlock this book and the full library FREE for 7 days
Get unlimited access to 7000+ expert-authored eBooks and videos courses covering every tech area you can think of
Renews at $15.99/month. Cancel anytime

Author (1)

author image
Robin Nichols

Born in the UK, Robin Nichols has always had a great love for recording the world with a camera. After finishing school, he studied fine art, before moving on to study at Nottingham Trent University, where he gained a degree in creative photography. He subsequently worked in the advertising industry for several years, before emigrating to Australia in 1985. Robin has always worked in photography: as a black and white printer, a cameraman, a stock photographer, and a freelance photographer. During the 1990s, Robin contributed to several photo-centric publications in Australia, New Zealand, Singapore, and the UK.
Read more about Robin Nichols