Reader small image

You're reading from  Mastering Adobe Photoshop Elements 2023 - Fifth Edition

Product typeBook
Published inDec 2022
PublisherPackt
ISBN-139781803248455
Edition5th Edition
Right arrow
Author (1)
Robin Nichols
Robin Nichols
author image
Robin Nichols

Born in the UK, Robin Nichols has always had a great love for recording the world with a camera. After finishing school, he studied fine art, before moving on to study at Nottingham Trent University, where he gained a degree in creative photography. He subsequently worked in the advertising industry for several years, before emigrating to Australia in 1985. Robin has always worked in photography: as a black and white printer, a cameraman, a stock photographer, and a freelance photographer. During the 1990s, Robin contributed to several photo-centric publications in Australia, New Zealand, Singapore, and the UK.
Read more about Robin Nichols

Right arrow

Getting Started with Simple Solutions

For many, the real difficulty in learning how to make your photos look awesome is not by learning what functions all the features and tools have, it's much more about being able to match a specific feature to fit your realistic picture editing requirements.

If you don't do this, you could spend hours trying all sorts of things before you find the one that works. And if it's such a random search, chances are you won't remember what the solution was next time you need similar help. Searching for answers online can help of course, but I think most readers will agree when I say you can also waste a heap of time looking, but not finding. It is far better to head straight to the specific problem first, then deal with the process. And that's really what this chapter is about: providing answers to some of those awkward questions we all ask that begin with "How do I do that...?"

I have compiled several common photo...

What's that strange-looking graph?

Cameras and editing software use a Histogram to display the distribution of tones in the picture. Is this important? Actually it's very useful—the histogram acts a bit like a graphical exposure meter. The shape of what I call the black 'mountain' is not as important as its position in relation to the baseline axes, that the mountain is sitting on. The left hand side of the graph represents shadows, while the right hand side represents the highlights. The middle section represents the midtones (greys).

Graph A is from a very dark photo—a lot of the tones are slumped against the left hand (shadow) axis, resulting in detail lost in the dark areas of the photo.

Graph B is from a near perfect picture while Graph C is very overexposed.

You'll find this display in several places in Photoshop Elements— the Camera RAW utility and Levels for starters, as...

How do I make a dull-looking photo appear better?

While there are many things that can go wrong in our picture making, you'll come to appreciate that a simple brightness and contrast boost might be all that's needed to make your picture look stronger/brighter—even punchier. Here are a few suggestions on how to get this done:

Firstly you might try the simple to use Brightness and Contrast tool:

  • Guided > Basics > Brightness and Contrast (includes step-by-step instructions).

This scene (inset, right) is tonally quite accurate—the evening atmosphere was slightly misty, producing a very soft light. I wanted to add more visual drama to the scene so, I purposely darkened the file using the basic but effective Brightness/Contrast sliders and voila, the color intensified, producing a more dramatic result.

Other tools you can try include:

  • Auto Smart Fix, or Auto Smart Tone (both of these are located under the...

My contrast looks 'greyish', what's wrong?

A lack of contrast (i.e. no deep black or bright whites) usually produces flat-looking, lacklustre images. This is usually fixed quite easily with a simple contrast boost.

Low contrast photos are more common that those that are too dark. It's usually caused when the light meter 'overreacts' to the scene brightness. In this picture, taken at a local wildlife park, the slightly darker than average scene forced the meter to over-expose, and that's why the koala looks paler than he really was. Here, Auto Contrast (Quick/Expert Edit>Enhance>Auto Contrast) provided an instant fix, leaving a near perfect result. And a happier looking koala!

Here are some other 'instant' contrast fixes that are well worth trying out:

  • Quick/Expert Edit > Enhance > Lighting > Levels. Start by trying the Auto button to improve the tone. If that doesn't work, manually...

My colors look weak or 'desaturated'

If the brightness and contrast have been improved but the colour still looks 'underwhelming', try increasing the colour intensity using one of the following possible fixes:

I had to smile when I tried this first fix, Auto Color Correct, as Photoshop Elements transformed my late afternoon sunset to an early morning look. The color in the fixed version is good, just not the result I was after. I then tried the Vibrance and Saturation sliders under the Quick > Adjustments > Color panel and struck lucky, forcing the color enhancement you see below. Although you could enhance the color more, if you take it too far, it produces a richness than can not be printed accurately. Worth considering.

Here are a few more color fixes worth noting:

  • Quick > Enhance > Auto Color Correction
  • Quick > Adjustments Panel > Colour > Saturation/Vibrance
  • Quick/Expert...

My photo looks boring – how can I add interest?

Chances are adding a tonal filter effect might be just the boost to make your shots appear more professional, 'different', and unique. You'll find some of the best ones in the Quick Edit mode.

  • Quick > Effects Panel > Classic or Artistic. There are more than 40 single-click visual effects or filter 'looks' to choose from. It's also an excellent place to get inspiration for future projects.

Another fantastic color booster to try is this:

  • Quick/Expert > Enhance > Colorize Photo. This feature adds a gorgeous old-fashioned hand-colored look to the picture at the click of a button.

This is an old post office and general store dating back to 1894 so I thought my snap needed to reflect that age somehow—I chose one of Elements' 50 or so Classic Effects from the Quick Edit mode to give it that little extra color boost. The problem...

I want to make my complexion look better

Use the excellent Spot Healing Brush to click-and-remove small blemishes instantly.

  • Guided > Special Edits > Scratches and Blemishes. Effective with easy-to-follow instructions for fixing small blemishes.
  • Quick/Expert > Tool Bar > Spot Healing Brush (J). This is the same as the Guided Edit Mode technique but with no step-by-step instructions.

The Perfect Portrait tool incorporates a host of cool retouching tools and was the best fit to improve this model's complexion (Guided>Special Effects>Perfect Portrait). This took a couple of minutes to perfect.

I look a bit overweight in photos. Help!

OK, we've all encountered this issue at one time or another and Elements has the solution: the Liquify Filter! (Quick or Expert > Filter > Distort > Liquify).

At right: Here I used Liquify's Shift Pixels Brush Tool to give the model a more shapely curve under her chin. A little adjustment goes a long way. Liquify sort of treats pixels like wet oil paint that can be pushed back and forth for the perfect weight loss and beautification result.

My kid looks too serious in family photos. Help!

Sometimes its just too hard to get everyone smiling in your pictures. Either develop some funnier jokes to get them laughing, or use this amazing Photoshop Elements feature—you'll find it under: Expert > Enhance > Adjust Facial Features.

As the name suggests, use this tool to auto - isolate then, modify the major facial features of your subject, one at a time. Quickly adjust lips, eyes, nose and face shape and angle using the sliders. It's easy. Make your subject smile or frown, lose a little weight or look like they have put on a few pounds. Change your family photos, or change history with a cheekier looking Mona Lisa!

I want to remove people from my picture

How often does this happen to you? You wait for ages for folk to move out of your shot, but they don't, so you give up and take the snap. Now there's an easy way to remove people digitally!

Use the superb Object Removal utility (Guided > Basics > Object Removal). Note: This feature works well providing that the object being removed is not overlapping or touching important parts of the subject. If this is the case, use the manually operated Clone Stamp Tool.

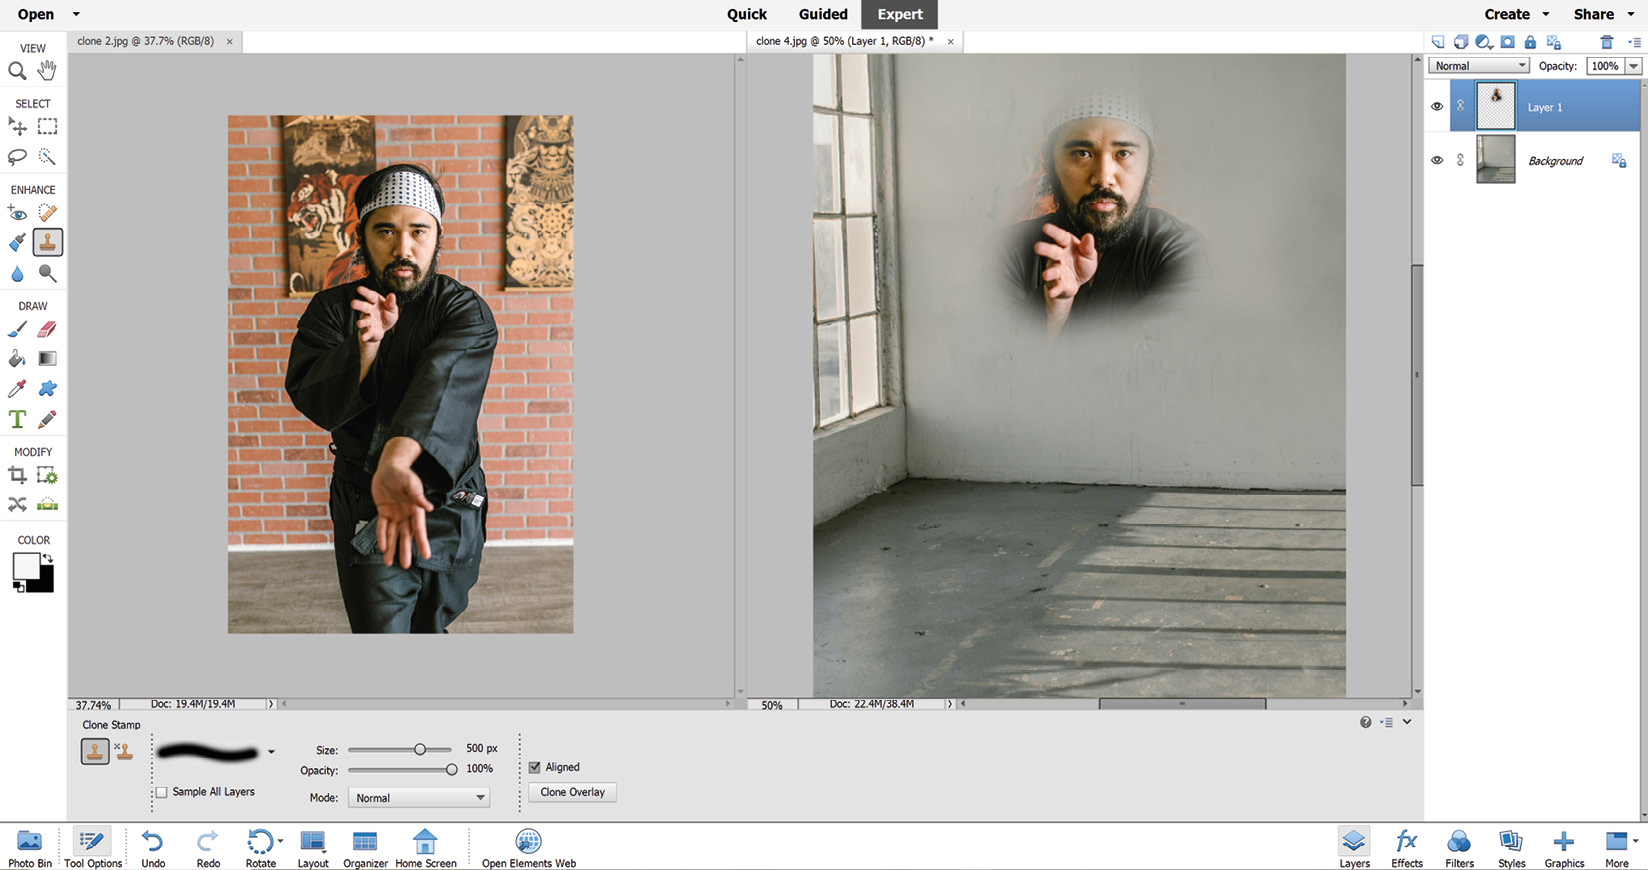
  • Expert > Tool Bar > Clone Brush Tool: use this the same way as the Healing Brush. Hold Alt/Opt and click on some 'good' pixels to copy that area before moving to the damaged area, and clicking a second time to paste the copied pixels over the bit you want covered up. For large areas, you could also first carefully select the offending object, then either paint over it (Brush Tool) or cover it up using pixels from another part of the same image,...

I want to move a person/object to make a better composition

  • Guided > Basics > Move and Scale Object. A powerful feature for selecting, then cutting out part of an image, before moving and pasting it to another part of the picture. The space left by the cutting out action is automatically filled in. This process works really well, especially if the person/object is not too close to the main subject.
  • Expert > Select > Subject. Like most auto select features, this works well if the subject is clearly delineated. Elements selects the subject which can then be moved (using the Move Tool) and/or have its size changed (a process called Transformation—see Chapter 6, Advanced Techniques: Transformations, Layers, Masking, and Blend Modes).
  • Guided > Special Edits > Recompose. Includes a step-by-step demo on how to stretch the background to change or improve the composition.
  • Expert > Tool Bar > Recompose Tool. Essentially the same as the...

My picture looks 'messy'—how can I clean it up?

How often have you visited a famous location wanting to get a great shot only to be frustrated by the number of other people wanting exactly the same shot? Here's a neat way to clean up your image to make it look like you are the only person left on the planet: it's called Scene Cleaner.

  • Guided > Photomerge > Photomerge Scene Cleaner. Note: this process only works if you remember to shoot a series of images, of the same scene, at suitable intervals while you are actually there. Snap a shot, wait for people to move a few feet, snap a second, wait till they've moved on, and repeat. Try and shoot without moving position—a tripod is really helpful.

Photomerge Scene Cleaner replaces people with empty spaces created by waiting for the crowds to move. The trick is to remember to take the shots while you are still on location. See Chapter 5, Easy Creative Projects for more information...

My pictures never look 100% level

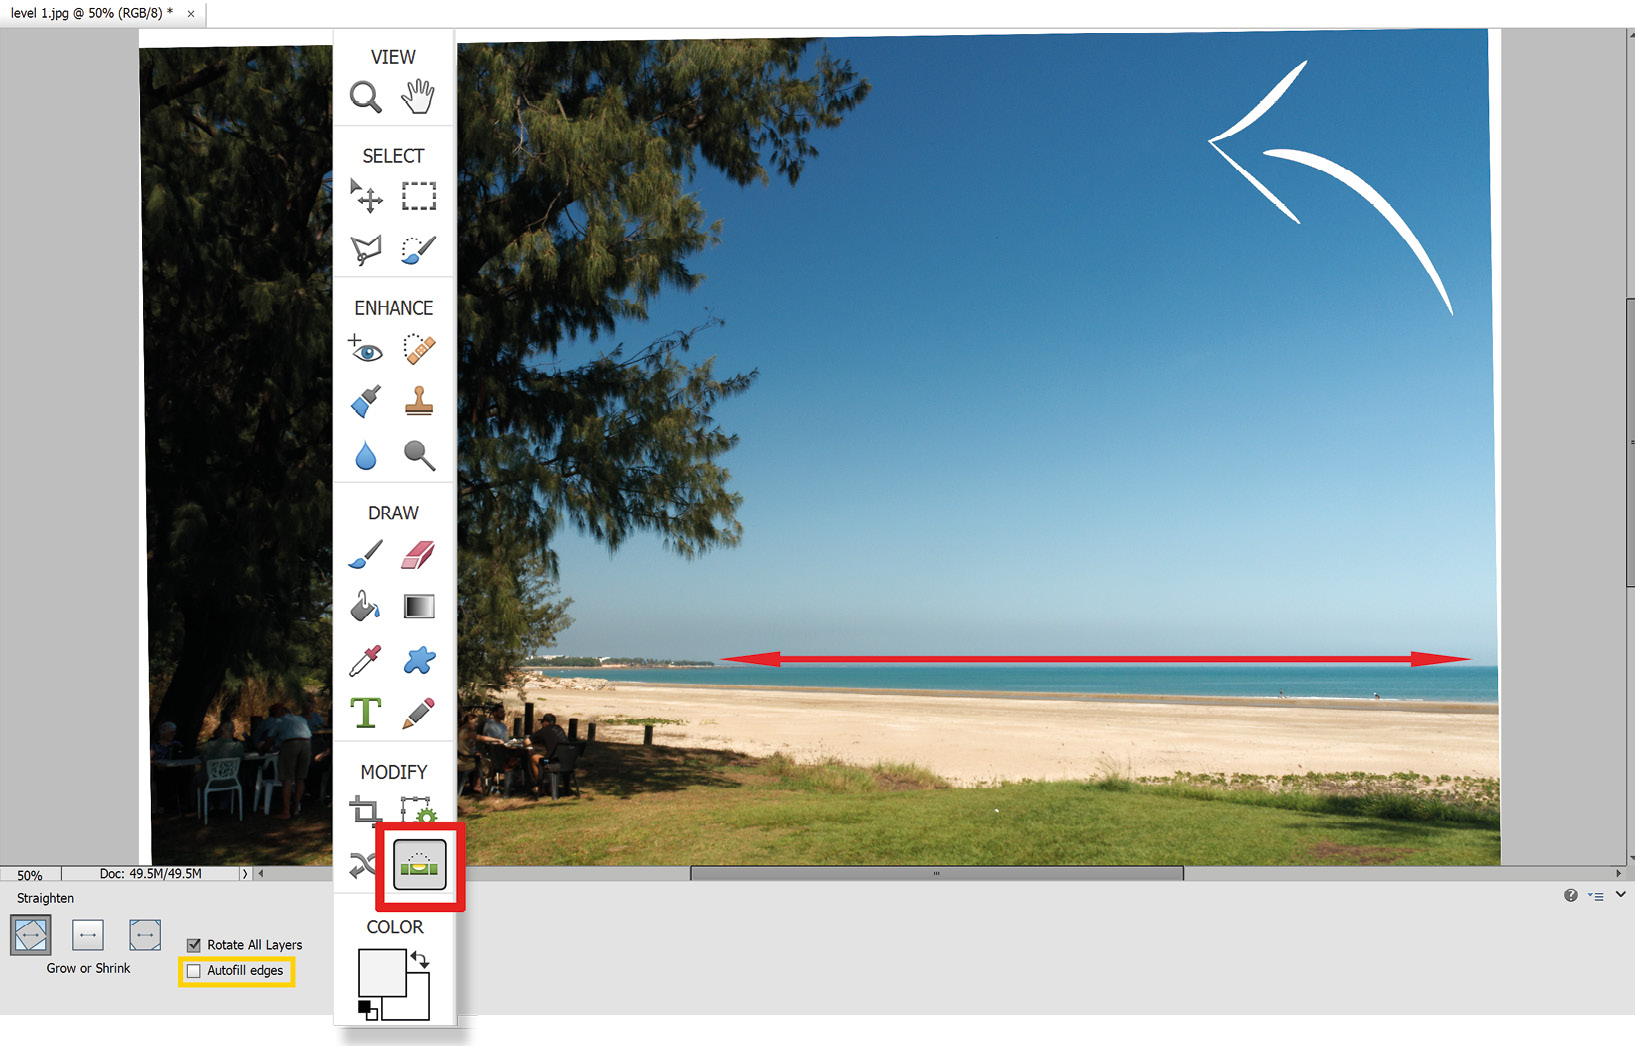
Most people lean slightly when taking a picture, right? You might not be aware that this is the case until you look at the photos on a computer screen. Fixing this slight error is easy. First, check your camera. Many feature an inbuilt digital level originally designed for use on a tripod. Ensure this feature is switched on and keep an eye for it in the viewfinder, or on the LCD screen when shooting. If you still get wonky horizons, it's easy to fix with software.

  • Quick > Tool Bar > Straighten Tool. Click and hold the cursor on the horizon, then drag the cursor across where the horizon should be, and when you release the mouse button, the picture is automatically rotated to make your stretched line the new horizon.

The Straighten Tool (the icon resembles a builder's level) allows you to make a very quick click, drag, and release action that 'tells' Elements that the line you have drawn...

My photo needs cutting (cropping)

Photographers use the Crop Tool to remove bits of the picture that they don't like. It's easy to do but don't forget, a downside of cropping is that you lose pixels, therefore receive a lower resolution. This might negatively impact how large the photo can be printed and still appear sharp. If you've never cropped a photo, here's a good place to start:

  • Guided > Basics > Crop Photo. This mode provides step-by step directions on how it works. Otherwise I'd recommend going directly to the Crop Tool located on the Tool Bar.
  • Quick/Expert > Tool Bar > Crop Tool (C). Same as above but manual operation.

Once the Crop Tool is selected, a crop marquee (grid) appears over the image. You can also customise the color around the outside of this marquee to make it easier to see (here, it's done in red). Mouse-click one of the marquee edges or corners to resize and reposition...

My background looks too clear (sharp)

Use Elements to simulate the look of a shallow depth of focus by selecting and blurring the background details. There are several ways to achieve this:

  • Guided Edit Mode > Special Edits > Replace Background. A simple tool, enabling you to select the main subject, then replace whatever else is in the frame with a flat color, a texture, or one of your own photos. This makes a complex operation seem easy; providing you choose simple images, the results are stunning—import one of your own out-of-focus shots or, as this process adds the new background on a seperate layer, blur it afterwards in the Expert Edit mode!
  • Guided > Fun Edits > Speed Pan. This feature protects your subject while blurring the background to exaggerate the look of fast-moving subjects.
  • Guided > Fun Edits > Zoom Burst Effect. Protects the subject while adding a zooming effect to the background.

Left...

How can I add a person from another picture?

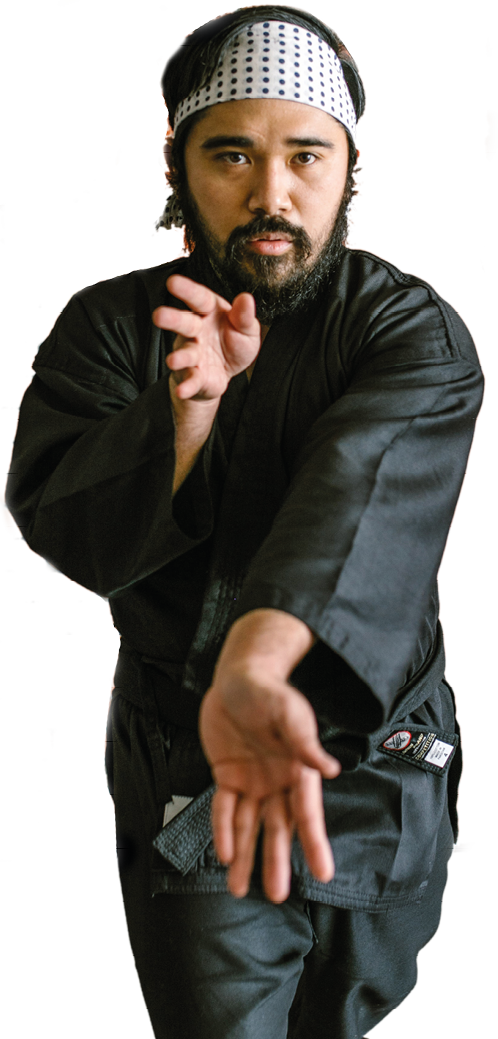
This is where we get a bit ambitious. If you are OK with basic retouching (using the Healing Brush Tool and the Clone Stamp Tools), you'll find copying from one image to a second reasonably easy. Best results come from choosing what I call 'simple' images, ones that don't have complex detailed backgrounds—this makes selecting one subject to paste into another image that much easier. Also make sure that the two photos are the same orientation (i.e. vertical/horizontal) and the same, or similar resolution (i.e. two 24MB files). If you use wildly different resolution files, what you paste into the second photo might be too big or too small. To rectify this, open the first image and change the resolution (Image > Resize > Image Size) to match the second image.

Open both files, and from the Window menu, choose Window > Image > Tile. Click the source image once, select...

My picture doesn't look sharp

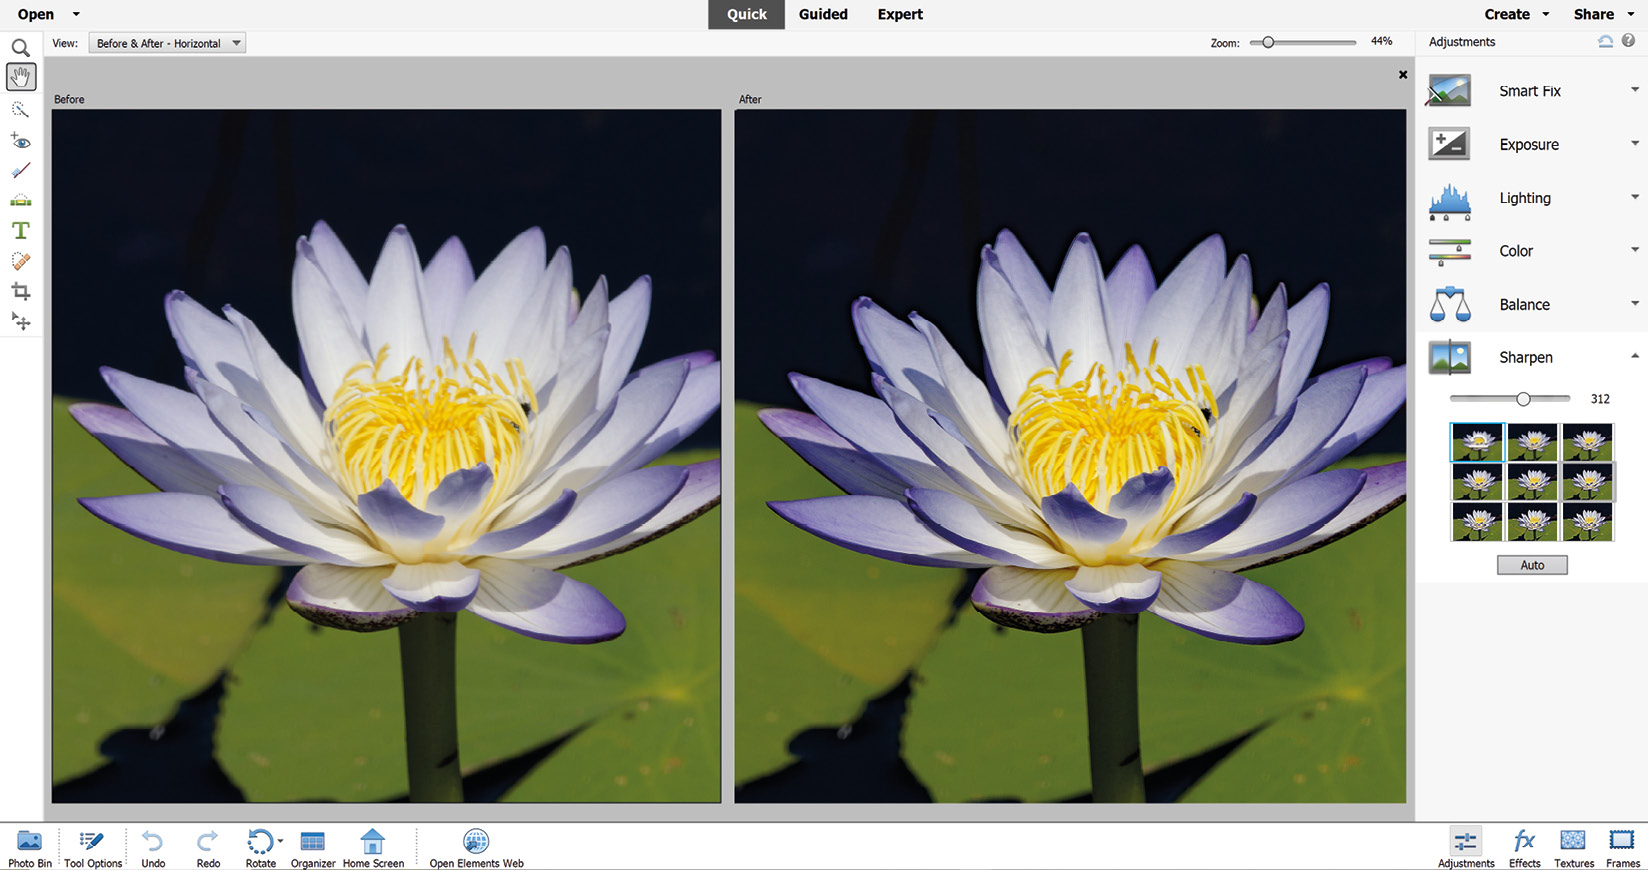
Sharpness has a lot to do with contrast so, if you increase the image contrast (see the contrast enhancing techniques earlier in this section) you'll most likely see the photo looking sharper and clearer. But Elements does have a great range of sharpening tools that work well providing the picture is not hopelessly out of focus:

Quick/Expert > Enhance > Auto Sharpen. If it doesn't sharpen enough, try repeating it.

  • Quick/Expert > Adjustments > Sharpen. Use the slider (or click one of the nine thumbnails) to add your required degree of sharpening. Don't add too much!
  • Quick/Expert>Enhance> Shake Reduction. This feature is designed specifically to 'save' a slightly blurred-looking picture, but it also works on normal images.
  • Quick/Expert > Enhance > Adjust Sharpness. A more complex tool for those wanting more control over the process.
  • Quick/Expert > Enhance...

My picture looks great on screen but dark once printed

Computer screens look bright and colorful, especially when set for video replay, gaming, and HDR. Because most just keep photos online, it can be a shock to see what happens once it gets printed, in a lab or at home on an inkjet printer. Here are a few tips on how to get the most accurate printing results.

To begin, a simple, non-technical technique to represent 'true' color and brightness is to slightly darken the brightness level of your monitor.

  • On a Mac, set the screen brightness slider three clicks less than full. This should provide a good reference point of how bright an image might print.
  • On a PC, go to the Control Panel and then Display to make a brightness adjustment (Note: access to this setting might vary depending on the PC operating system, plus the make and model of your monitor (check manufacturer's specifications).

Re-edit the brightness of your photo once you have adjusted...

How can I make my scans look perfect?

I admit that I scan my artwork first then perform all my repairs using Photoshop Elements, ignoring the accompanying scanner software. It's just sometimes easier and faster to do everything in one application. This is doubly true when using specialist tools that are not part of the scanning suite, like the Burn and Dodge Brush Tools and even the Shadows/Highlights tool (Enhance > Adjust Lighting > Shadows/Highlights). Use these to darken or lighten shadow, highlights, or the important mid-tone contrast.

If the scanned file contains uneven tones—and many do due to poor storage conditions, fading, and chemical staining—use the Burn and Dodge Brush Tools (Tool Bar > Burn/Dodge) to 'paint in' darkness or lightness where required. Fine-tune the tool via its Options Panel. Go slow: always set the speed of the tool (called Exposure) to a low value to avoid leaving tell-tale retouching marks.

At...

Summary

In this chapter, we have seen how simple photo editing can be. In so many examples, all that's needed is the click of the mouse to bring about a radical tone or color change. And, of course, being such a mature application, Photoshop Elements provides not one but several possible solutions for your creative requirements.

You will also now appreciate that the first technique is not necessarily always the best solution—inevitably there are three or four other ways of achieving a similar result and it's up to you to choose the one that works best for your style.

One thing that I have found after years of teaching is that photographers tend to choose a certain tool or editing technique not so much because it's deemed to be 'the best' but more often because they can do it using the mouse, or they can do it using a keyboard shortcut—or because it was the first thing they tried and they prefer to stick with 'what works'. I never...

lock icon
The rest of the chapter is locked
You have been reading a chapter from
Mastering Adobe Photoshop Elements 2023 - Fifth Edition
Published in: Dec 2022Publisher: PacktISBN-13: 9781803248455
Register for a free Packt account to unlock a world of extra content!
A free Packt account unlocks extra newsletters, articles, discounted offers, and much more. Start advancing your knowledge today.
undefined
Unlock this book and the full library FREE for 7 days
Get unlimited access to 7000+ expert-authored eBooks and videos courses covering every tech area you can think of
Renews at $15.99/month. Cancel anytime

Author (1)

author image
Robin Nichols

Born in the UK, Robin Nichols has always had a great love for recording the world with a camera. After finishing school, he studied fine art, before moving on to study at Nottingham Trent University, where he gained a degree in creative photography. He subsequently worked in the advertising industry for several years, before emigrating to Australia in 1985. Robin has always worked in photography: as a black and white printer, a cameraman, a stock photographer, and a freelance photographer. During the 1990s, Robin contributed to several photo-centric publications in Australia, New Zealand, Singapore, and the UK.
Read more about Robin Nichols