

You must first open first.html (from the downloadable files for the book) in your browser, and then open less/first.less in your text editor. In your browser, you will see a representation of a header, body, and footer.
As expected, less/first.less contains the Less code that will be converted into valid CSS by the less.js compiler. Any error in this file will stop the compiler and throws up an error message. Although the Less code shows some similarities to the plain CSS code, the process described here totally differs from editing your CSS directly.
The following screenshot shows you how this layout will look when opened in your web browser:

Your first layout in Less
CSS3 introduced vendor-specific rules, which offer you the possibility of writing some additional CSS applicable for only one browser. At first sight, this seems the exact opposite of what you want. What you want is a set of standards and practicalities that work the same with every browser, and a standard set of HTML and CSS that has the same effect and interpretation for every browser. Actually, these vendor-specific rules are intended to help us reach this utopia. Vendor-specific rules also provide us with early implementations of standard properties and alternative syntax. Last but not least, these rules allow browsers to implement proprietary CSS properties that would otherwise have no working standard (and may never actually become the standard).
For these reasons, vendor-specific rules play an important role in many new features of CSS3. For example, animation properties, border-radius, and box-shadow, depend on vendor-specific rules. You can easily see that some properties may evolve from vendor prefixes to standard. Currently, most browsers support the border-radius and box-shadow properties without any prefix.
Vendors use the following prefixes:
WebKit:
-webkitFirefox:
-mozOpera:
-oInternet Explorer:
-ms
Vendor prefixes make writing the CSS code, and therefore the Less code, more complex. Also, you will have to change your code when your requirements change. In this book, you will find the code examples that use mixins for prefixing your CSS properties. Autoprefixing your code will be a better practice in many cases by consensus of the community. Examples of mixins used for prefixing can help you understand why mixins are easier to maintain and how they prevent code duplication. Even when you autoprefix your code, you will need mixins for non-standard code.
To autoprefix your code, you can use the Less autoprefix plugins. Note that you can read more about plugins in general in the Server-side compiling section.
With the autoprefix plugin, you can compile the following Less code:
#grad {
  background: linear-gradient(red, blue);
}
The preceding Less code compiles into the following CSS code:
#grad {
  background: -webkit-gradient(linear, left top, left bottom, from(red), to(blue));
  background: -webkit-linear-gradient(red, blue);
  background: -moz-linear-gradient(red, blue);
  background: -o-linear-gradient(red, blue);
  background: linear-gradient(red, blue);
}
The autoprefix plugin has got a browser's option. This option enables you to specify your target browsers. The Less autoprefix plugin is based on the autoprefixer plugin for PostCSS and gets its information about the browsers' features and usage statics from the Can I use (http://caniuse.com/) database. You can find the documentation for the Less plugin at https://github.com/less/less-plugin-autoprefix. The documentation of the Less plugin also refers to the PostCSS autoprefixer documentation to show you how to set your target browsers. The PostCSS autoprefixer, including documentation, can be found at https://github.com/postcss/autoprefixer.
Note that the autoprefixer only adds prefixes; adding polyfill or other alternative syntaxes is beyond the scope of the autoprefixer. Later on in this chapter, we will discuss how to create a background gradient. The background gradient code has an alternative fallback syntax for Internet Explorer 7 and 8. The autoprefixer does not add this alternative syntax to your CSS code.
In many situations, you can also consider a strategy of graceful degradation for older syntaxes. Graceful degradation means that you only add more user experience for modern browsers, without breaking the functionality of your design. One of the advantages of a graceful degradation strategy is that you do not have to try to run complex code on old and slow hardware, which can slow down your website. You can read more about graceful degradation at http://www.w3.org/wiki/Graceful_degradation_versus_progressive_enhancement.
Unfortunately, the current version of the Less autoprefix plugin does not work when compiling your Less code in browser. The -prefix-free library offers an alternative for prefixing your code. The -prefix-free library runs client side in your browser and requires JavaScript. Client-side JavaScript can be a reason to not use it in production. The -prefix-free library only adds prefixes when needed, so it keeps your CSS as clean as possible. More information about -prefix-free can be found at https://github.com/LeaVerou/prefixfree.
To use prefixfree.js, you will just have to include prefixfree.js anywhere in your page. It is recommended to put it right after the style sheets, to minimize Flash of unstyled content (FOUC). FOUC means that your visitor sees your content before all styles have been loaded and applied. When you are using the -prefix-free library, your HTML should look as follows:
<link rel="stylesheet/less" type="text/css" href="less/project.less">

<script src="../../less.js" type="text/javascript"></script>
<script src="prefixfree.js"></script>
The border-radius property is a new CSS3 property, which will make many web developers happy. With border-radius, you can give the HTML elements a rounded corner. In previous years, many implementations of rounded corners using images and transparency have been seen. However, these were inflexible (not fluid) and difficult to maintain.
Vendor-specific rules are required for implementation, so you will have to compile your code with the Less autoprefix plugin.
To give an element rounded corners with a radius of 10 pixels, you can use the CSS code with vendor-specific rules as follows:
-webkit-border-radius: 10px;
-moz-border-radius: 10px;
border-radius: 10px;
For rounded corners with different radii, use a list with values separated by spaces: 10px 5px 20px 15px;. The radii are given in the following order: top-left, top-right, bottom-right, and bottom-left. By keeping these rules in mind, you will see how Less can keep your code clean.
You can open roundedcornersbordered.html from the download section of this chapter in your browser, and open less/roundedcornersbordered.less in your text editor. In your browser, you will see a representation of a header, body, and footer with a dark blue border and rounded corners.
The CSS code for header in less/bordered.less looks like the following code:
#header{
  background-color: red;
  border-radius: 10px;
  border: 5px solid darkblue;
}
You can see that the corners have been created with a radius of 10 pixels, set by the border-radius property, and the border itself has been set with the border property. If you were using CSS, you would have to repeat these properties three times for the header, footer, and body. In order to change these rules or add a vendor, you would also have to change the same code three times. To begin with, you might perhaps think, "Why not group the selectors?" in a fashion similar to the following code:
#header, #content, #footer{
  border-radius: 10px;
  border: 5px solid darkblue;-webkit-border-radius: 10px;
  -moz-border-radius: 10px;
  border-radius: 10px;
}
The preceding code is syntactically correct in order to write the CSS or Less code. However, as your code base grows, it won't be easy to maintain. Grouping selectors based on properties makes no sense when reading and maintaining your code. Moreover, such constructs will also introduce many duplicated and unstructured usages of the same selectors.
With Less, you are able to solve these problems efficiently. By creating a so-called mixin, you can solve the issues mentioned earlier. For the border radius, you can use the following code:
.bordered(@radius; @border-color) {
  border-radius: @radius;
  border: 5px solid @border-color;
}
To use the mixin mentioned in the preceding code, you should call it as a property for the selector, using the following code:
#header{
  background-color: red;
  bordered(10px, darkblue);
}
The compiled CSS of this Less code will now be as follows:
#header {
  background-color: red;
  border-radius: 10px;
  border: 5px solid darkblue;
}
Looking at the original code in the less/bordered.less file, you can see that the preceding code wouldn't be able to work for #content. The border radius for the content is 20 pixels instead of 10 pixels, as used for header and footer. Again, Less helps you solve this problem efficiently. Mixins can be called with parameters in the same way as functions can be called in functional programming. This means that in combination with a value and a reference for this value, mixins can be called in order to set the properties. In the following example, this will change to the following code:
.bordered(@radius: 10px; @border-color: darkblue) {
  border-radius: @radius;
  border: 5px solid @border-color;
}
In the .bordered(@radius: 10px; @border-color: darkblue) mixin, the @radius and @border-color variables are your parameters. The default value of the @radius parameter will be 10px and the default value of the @border-color parameter will be darkblue.
From this point onwards, mixins can be used in your code. The .bordered(50px); statement will set the corners with a radius of 50px and the .bordered(); statement will do the same with a radius of 10px and darkblue border color (default).
The same is true for the second @border-color parameter, which has a default value set to darkblue. A .bordered(10px; white); call will set a white border with a radius of 10px. Note that Less supports both a comma and a semicolon as separator for the parameters of the mixins. Using commas can become confusing when your arguments are
comma-seperated values (CSV).
Using this, you can rewrite less/borderedmixinsroundedcorners.less so that it changes to the following code:
/* mixins */
.bordered(@radius: 10px; @border-color: darkblue;) {
  border-radius: @radius;
  border: 5px solid @border-color;
}
#header{
  background-color: red;
  .bordered();
}

#content{
  background-color: white;
  min-height: 300px;
  .bordered(20px);
}

#footer{
  background-color: navy;
  .bordered(10px; white);
}
The less/roundedcornersborderedmixins.less file, which is available in the download section, contains a copy of this code. To use this, you also have to change the reference in your HTML file to <link rel="stylesheet/less" type="text/css" href="less/groundedcornersborderedmixins.less" />.
Note
Note that this code leaves out the general styling of the div and body tags in HTML. These styles are only used to make the demo look good and do not actually demonstrate Less in any useful manner.
After rewriting your Less code, reload your browser or watch it if you have applied the #!watch trick. You will see that the output will be exactly the same. This shows you how to get the same results with Less, using a more efficiently structured code.
The preceding code will result into an example of a simple layout with borders and rounded corners. The final result should look like the following screenshot:
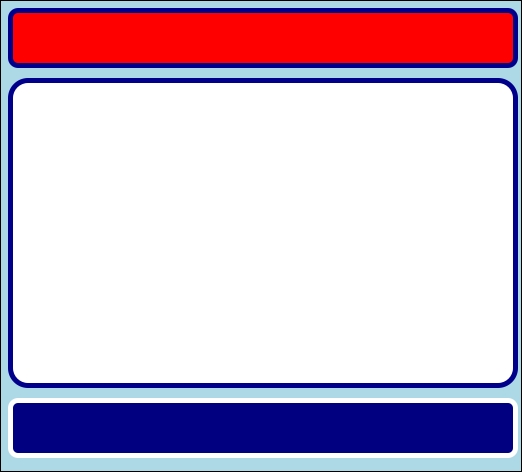
Layout with borders and rounded corners