


The board is now powered on, and you have blinking LEDs. You have been able to access the basic functionality via the USB port. However, you want to do much more. This task will help you accomplish your goals.
Now that you know that your board works and you've verified the connection via the provided USB cable to your computer, you're going to add the peripherals so that it can operate as a standalone computer system. This step is a bit optional, as in the future your projects will be in systems where you won't connect directly to the board with a keyboard, mouse, and display. However, this can be a great learning step and in the off chance, you need to do some debugging on the system. It is good to know how to connect directly to the board. You'll also use this configuration to verify the basic SW installation before you start your projects.
You'll need:
A USB mouse.
A keyboard.
A display device.
You may also need a USB hub, and if you don't have one, get a powered USB hub. This will be important later in your project work.
Many of you will have most of this stuff already, but if you don't, there are some things to consider before buying additional equipment. Let's start with the keyboard and mouse. Most mice and keyboards have separate USB connectors. You'll notice, however, that on your BeagleBone Black there is only one USB port; thus, there is a need for the USB hub.
Before deciding on the hub to connect to your board, you need to understand the difference between a powered USB hub, and one that gets its power from the USB port itself. Almost all USB hubs are not powered; that is, you don't plug in the USB hub separately. The reason for this is, almost all of these hubs are hooked up to computers with very large power supplies, and so powering USB devices from the computer is not a problem. This is not the case for your board. The USB port on your board has very limited power capabilities, so if you are going to hook up devices that require significant power—for instance, a WLAN adapter or Kinect sensor—you're going to need a powered USB hub, one that provides power to the devices through a separate power source.
If you already have a hub that is not powered and want to use it to connect your keyboard and mouse, feel free, it should work fine as these do not draw too much power. If you don't already have a keyboard and mouse, or are looking for a keyboard and mouse that you can dedicate to your board, I suggest choosing a keyboard with a mousepad. That way you only have one USB connection to the two devices.
To complete this step you'll also need a display. You need to investigate which display types can be used with the BeagleBone Black. The only video output on the board is a micro-HDMI connector. The easiest connection to create is to connect the board directly to a monitor or TV that has an HDMI input; however, you'll probably need to buy either a cable that has micro-HDMI on one end and regular HDMI on the other, or an adapter from micro-HDMI to regular HDMI. HDMI monitors are relatively new, but if you have a monitor that has a DVI input, you can buy adapters or HDMI to DVI cables relatively inexpensively that provide an interface between DVI and HDMI. The display I use has a DVI input.
Don't be fooled, however, by adapters that claim that they go from HDMI to VGA, or HDMI to s-video. These are two different kinds of signals: HDMI and DVI are digital standards, and VGA and s-video are analog standards. There are adapters that can do this, but they must contain circuitry and require power, so are significantly more expensive than any simple adapter, and they result in a lower quality output.
Now that you have your parts, connect the USB hub to the standard USB port, the keyboard and mouse to the USB hub, and the display to the micro-HDMI connector as shown here:
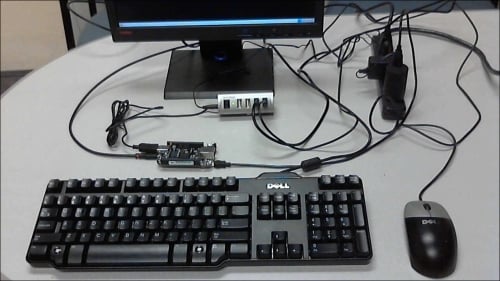
Once these are all connected, plug in the USB hub, the display, and finally the BeagleBone Black board. Since I am no longer going to use the USB connection to the computer, I am using a standard USB 5 volt power supply. Make sure you connect all your devices before you power on the unit. Most operating systems support hot-swap of devices, which means you are able to connect a device after the system has been powered, but this is a bit shaky in the embedded environment. You'll always cycle power when you connect a new HW.
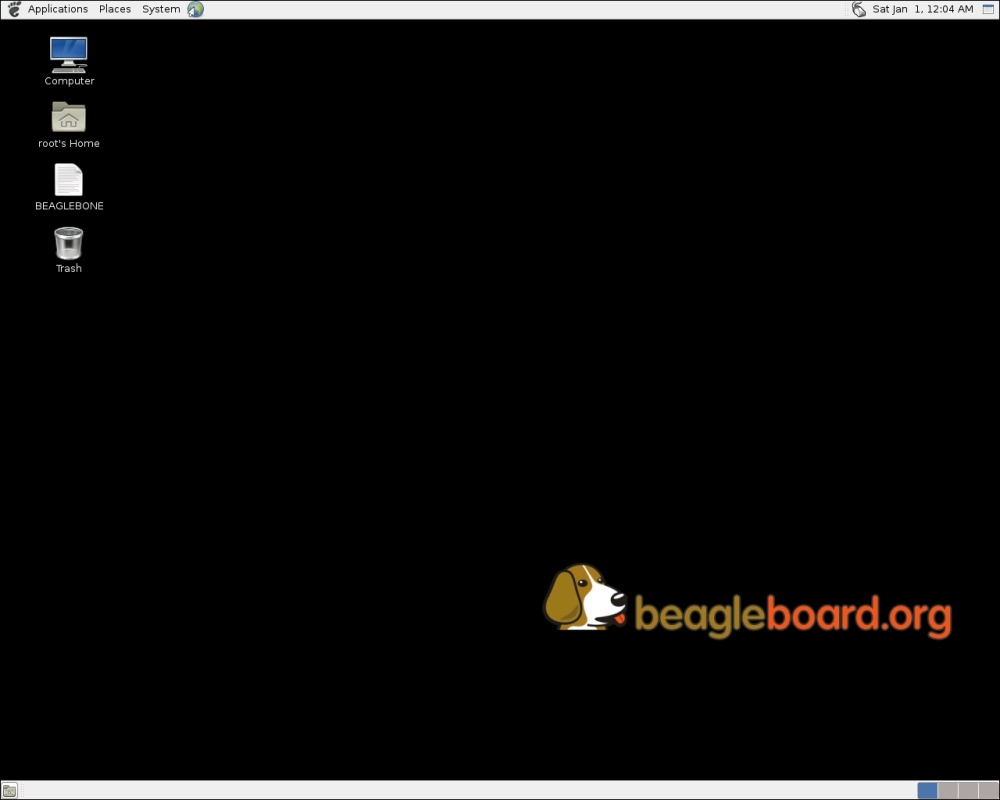
Once this is complete, the unit should power on; it will boot its default operating system from the internal eMMC space, which is a sort of internal memory card and the display will look like this:
So you should now be able to interact with your BeagleBone Black directly. This is an important step, although for most of your projects you'll use a remote computer to program and control your device. Keep the components you have gathered around for debug purposes, you may need them later, as there is at least a possibility that things might go wrong and you'll need to find out how to fix them.
Just a couple of notes about this task. First, if you have problems powering the system, check to make sure your power supply can supply enough current. Don't even consider powering the system with less than 1 amp. Also, if you are using a power supply with a USB connector, make sure you use the cable that came with the unit to connect between the USB and the unit. Some cables also limit the current, and the unit will sense this and not power on correctly.
Also, a note on connecting to the display: the board's HDMI connector is micro-HDMI, which almost begs for an adapter. The display I chose to use is an inexpensive monitor with DVI input, so I purchased a cable that went from standard HDMI to DVI. Then I purchased a micro-HDMI to standard HDMI adapter. For some reason, I had problems with this configuration, and chalked it up to a bad HDMI adapter. I now prefer a cable that has a micro-HDMI connector on one end, and a standard HDMI connector on the other, and then a standard HDMI to DVI adapter. This seems to be the most reliable and, if I choose, I can quickly change and use my HDTV as the display. One of the challenges in choosing the components for your system is trying to anticipate how it might be used in the future.