Reader small image

You're reading from  Arduino Robotic Projects

Product typeBook
Published inAug 2014
Reading LevelIntermediate
Publisher
ISBN-139781783989829
Edition1st Edition
Languages
Tools
Right arrow
Author (1)
Richard Grimmett
Richard Grimmett
author image
Richard Grimmett

Richard Grimmett has more fun that should be allowed working on robotics projects while teaching Computer Science and Electrical Engineering at Brigham Young University Idaho. He has a Bachelors and Masters degree in Electrical Engineering and a PhD in Leadership Studies. He also has 26 years of experience in the Radar and Telecommunications industries, and even has one of the original brick phones. He has written books on the basics of using the BeagleBone Black for robotics projects, and another for the Raspberry PI and yet another for the Arduino.
Read more about Richard Grimmett

Right arrow

Chapter 3. Simple Programming Concepts Using the Arduino IDE

Now that you have downloaded, installed, and initiated the Arduino IDE, in this chapter, you'll learn some basic programming concepts. If you are already comfortable with programming, especially the C programming language, you can skip this chapter. If you're not, or need a quick review, this chapter discusses some simple programming examples on how to program Arduino. At the end of the chapter, I'll cover additional important programming constructs.

To get started, open your Arduino IDE and make sure your Arduino is connected to your development environment via its USB cable. You may want to open and run the Blink example from Chapter 2, Getting Started with the Arduino IDE. When you have uploaded the file successfully, the IDE should tell you by displaying Done uploading in the lower-left corner of the IDE.

The program should also be running on Arduino and the orange LED blinking. If all of this seems clear and natural, you may...

Creating, editing, and saving files on Arduino


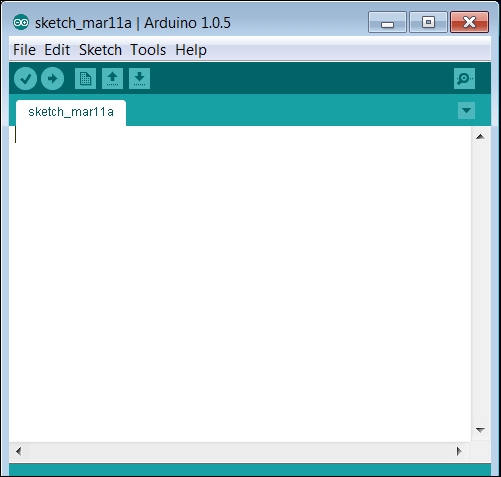
You know how to start the IDE, but you've not been introduced to all the available functionalities. So let's take a quick tour of the IDE. Again, here is what the IDE should look like when you first start it up:

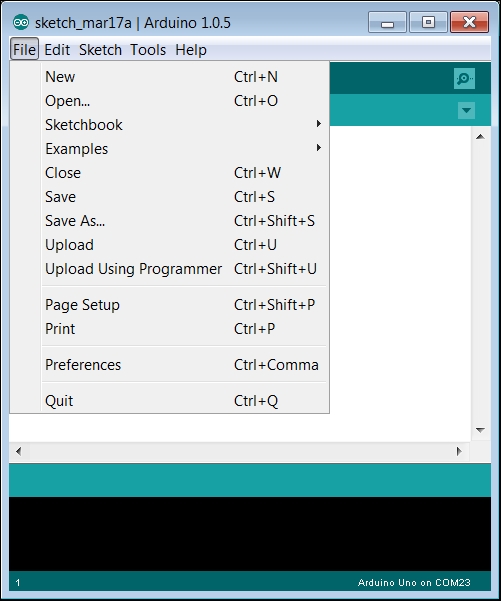
Note that at the top of the IDE, there are five topic menus: File, Edit, Sketch, Tools, and Help. Each of these tabs holds a set of functionalities that you'll need. If you select the File tab, you should see the following screenshot:

These selections let you create, open, upload, and print files in the Arduino IDE. Once you click on File, you will get the following options:

  • New: This is straightforward; you use this if you want to create a new file.

  • Open…: This is equally clear; select this if you want to open a file that you created earlier.

  • Sketchbook: This is probably a new term, one with which you are not familiar. Arduino programs are called sketches, and Sketchbook keeps track of sketches you have created. You'll also find sketches...

Basic C programming on Arduino


In this section, you'll learn about the C programming language, the language supported by the Arduino IDE. In this section, we are going to cover some basic concepts. If you are new to programming, there are a number of different websites that provide tutorials. If you'd like to practice some of the basic programming concepts in C, try www.cprogramming.com/tutorial.html or http://www.learn-c.org/.

In this section, we'll cover how to create a basic sketch. We'll also cover how to enter some C code, compile the code, and upload the code to your Arduino.

To open a new sketch from the IDE that contains the minimum basic code, navigate to File | Examples | 01.Basics | BareMinimum. You should now see this in your sketch as shown in the following screenshot:

This basic sketch provides two functions; a function is simply an organized set of instructions that Arduino will execute. When Arduino is powered on, it begins to execute a list of instructions one by one. These...

Basic programming constructs on Arduino


Now that you know how to enter and run a simple C program on Arduino, let's look at some additional programming constructs. Specifically, you'll see what to do when you want to decide between two instructions to execute and how to execute a set of instructions a number of times.

The if statement

As you have seen, your programs normally start with the first line of code and then continue executing the next line until your program runs out of code. This is fine, but what if you want to decide between two different courses of action? We can do this in C using an if statement. The following screenshot shows some example code:

You'll need to make several changes this time. The first is to add another global variable, int whichLED = 1; at the top of your program. Then, you'll need to add several statements to your loop() function. The line-by-line details are as follows:

  • if (whichLED == 1): This is the if statement. The if statement evaluates the expression...

Summary


In this chapter, you've learned how to interact with the Arduino IDE and create, edit, upload, and run programs on Arduino. You have also been exposed to the C programming language. If this is your first experience with programming, don't be surprised if you are still uneasy with programing in general and the if and for statements in particular. You probably felt just as uncomfortable with your first introduction to the English language; you just may not remember it.

It is always a bit difficult to try new things. However, I will try to give you explicit instructions on what to type so that you can be successful. There is one major challenge when working with computers. They always do exactly what you tell them to do and not necessarily what you want them to do. So, if you encounter problems, check several times to make sure that your code matches the example exactly. In the next chapter, you'll learn to access the GPIO pins to interface with the outside world.

lock icon
The rest of the chapter is locked
You have been reading a chapter from
Arduino Robotic Projects
Published in: Aug 2014Publisher: ISBN-13: 9781783989829
Register for a free Packt account to unlock a world of extra content!
A free Packt account unlocks extra newsletters, articles, discounted offers, and much more. Start advancing your knowledge today.
undefined
Unlock this book and the full library FREE for 7 days
Get unlimited access to 7000+ expert-authored eBooks and videos courses covering every tech area you can think of
Renews at $15.99/month. Cancel anytime

Author (1)

author image
Richard Grimmett

Richard Grimmett has more fun that should be allowed working on robotics projects while teaching Computer Science and Electrical Engineering at Brigham Young University Idaho. He has a Bachelors and Masters degree in Electrical Engineering and a PhD in Leadership Studies. He also has 26 years of experience in the Radar and Telecommunications industries, and even has one of the original brick phones. He has written books on the basics of using the BeagleBone Black for robotics projects, and another for the Raspberry PI and yet another for the Arduino.
Read more about Richard Grimmett