Chapter 2. Adding Bodies to the World
Bodies are what make Box2D games possible. Anything you can move or interact with, is a body
. Birds, pigs, and crates in Angry Birds are bodies, as well as the idol and the totem bricks in Totem Destroyer.
During this chapter, you will learn to create every kind of Box2D body, in addition to some other important features, including:
Creating circular bodies
Creating rectangular bodies
Creating any kind of polygon
Using debug draw to test your simulation
Defining body types: static, dynamic, or kinematic
Setting material attributes: density, friction, and restitution
Units of measurement
Creating compound objects
By the end of the chapter, you will have your first Totem Destroyer level ready to play with. This will be a long chapter, so let's drive straight to the point.
Your first simulation – a ball falling on the floor
We are starting with an easy task, the simplest of all physics simulations: a ball falling on the floor. Anyway, although it's just another falling ball, being your first simulation this will be quite an achievement.
Let's see what we have in our simulation:
A world with a gravity
A ball that should react to world forces (such as gravity)
A floor that shouldn't react to world forces
Some kind of materials, as we expect the ball to bounce on the floor
You are already able to configure a world with gravity, so we are going to start with the creation of the ball.
It doesn't matter if we are creating a sphere or a polygon, the first step to create a body is:
b2BodyDef
is the body definition, which will hold all data needed to create our rigid body.
Now it's time to place the body somewhere in the world. As we are working on a 640 x 480 size, we'll place the ball in the top-center position of the stage, let's say...
Creating a circular shape
A shape is a 2D geometrical object, such as a circle or a polygon, which in this case must be convex (every internal angle must be less than 180 degrees). Remember, Box2D can only handle convex shapes.
At the moment, we are starting with the ball, so we'll create the circle:
b2CircleShape
is used to create a circular shape, and its constructor wants the radius as an argument. With the previous lines, we are creating a circle whose radius is 25 pixels, thanks to our friend—the worldScale variable. From now on, every time you want to work with pixels, you'll have to divide them by worldScale. You can also define a function called, let's say, pixelsToMeters
, and call it every time you need to convert pixels to meters.
When we have a body definition and a shape, we can glue them together using a fixture.
A fixture
is used to bind the shape on a body, and to define its material setting density, friction, and restitution. Don't worry about materials at the moment, and let's focus on the fixture.
The first step is to create the fixture:
Once we have created the fixture with the constructor, we assign the previously created shape using the shape property.
Finally we are ready to add the ball to the world:
b2Body
is the body itself: the physical, concrete body that has been created using the bodyDef attribute.
To recap, use the following steps when you want to place a body in the world:
i. Create a body definition, which will hold body information such as its position.
ii. Create a shape, which is how the body will look.
iii. Create a fixture to attach the shape to the body definition.
iv. Create the body itself in the world...
Using debug draw to test your simulation
Luckily, Box2D comes with a feature, debug draw
, that will help us to see what's going on.
Debug draw will display what happens in the Box2D World, and we can enable it by calling world's DrawDebugData method right after the Step method, in the updateWorld function:
Once we've told the world to display the debug draw after each iteration, we need to define the visual settings used by debug draw. Add the following lines to your Main class:
Let's perform the following steps:
First, body and fixture definitions can be reassigned to define our new body. This way, we don't need to declare another bodyDef variable, but we just need to reuse the one we used for the creation of the sphere by changing its position:
Now the body definition is located in the horizontal center, and close to the bottom of the screen.
To create a polygon shape, we will use the b2PolygonShape class:
This way we create a polygon shape in the same way we created the circle shape earlier.
Polygon shapes must follow some restrictions, but at the moment because we only need an axis-aligned box, the SetAsBox method is all we need.
The method requires two arguments: the half-width and the half-height of the box. In the end, our new polygon shape will have its center at pixels (320, 470), and...
Different body types – static, dynamic, and kinematic
There are three types of Box2D bodies: static, dynamic, and kinematic.
A
static body does not react to any force, impulse, or collision and does not move. A static body can only be moved manually by the user. By default, every Box2D body is a static body, and that's why the ball does not move. A static body also does not collide with other static or kinematic bodies.
A
dynamic body reacts to forces, impulses, collisions, and any other world event. Dynamic bodies can also be moved manually, although I'd suggest to let them be moved by world forces, and collide with all body types.
A kinematic body is something hybrid between a static and a dynamic body. Kinematic bodies do not react to forces, but can be moved both manually and by setting their velocity. Kinematic bodies do not collide with other static or kinematic bodies.
Back to our simulation now. Which type of body would you assign to the ball and the floor?
The floor must be a static...
Density, friction, and restitution
As you already know how to add bodies to the world, I want to introduce you to three attributes that will affect bodies' behavior: density, friction, and restitution.
The
density
is used to set the mass of a body, measured in kilograms by square meter. Higher density means heavier bodies, and it can't be negative.
The
friction
comes into play when two bodies slide on each other, and it's defined by a coefficient, usually from 0 (no friction) to 1 (strong friction). It can't be negative.
The restitution
determines how much a body will bounce after a collision. Like density and friction, it can't be negative and it's defined by a coefficient usually from 0 to 1. A ball falling on the ground with restitution zero won't bounce (inelastic collision), whereas a value of one would have made the ball bounce with the same velocity it had at the moment of the collision (perfectly elastic collision).
Creating a Totem Destroyer level
Now you have the skills to create your first game prototype, and we are going to start with a Totem Destroyer level.
To show you we are doing things for real, we will take a real level of the popular Flash game Totem Destroyer, and reproduce an exactly similar one. Look at the following screenshot:
This is the first level of the original Totem Destroyer game, and if you look at it you will find bricks of a size which are multiples of 30. Can you figure out why? Yes, it's simple, because of the meters to pixels conversion.
The author probably created the game working directly with meters, but we are sticking to our guns and working with pixels.
At the moment we don't need to worry about brown and black pixels, we just want to reproduce the totem.
Before we start coding, for the sake of simplicity, I would suggest you create a couple of functions that will help us to reuse the code. Don't worry, there's nothing new...
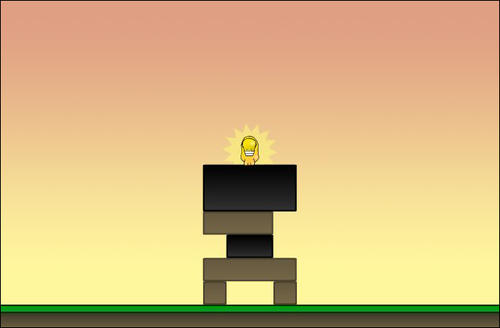
The idol is the main character in Totem Destroyer, we can't represent it with just a box, or the curse of the totem will persecute us forever.
I was thinking about something like the following figure:
This is what I call an idol, and this is what we are going to build with Box2D.
On the left-hand side, the outline of the bodies forming the idol, and on the right-hand side the finished idol silhouette.
The first thing you can see is that the idol is made by more than one body joined together to create a single, complex body. Remember Box2D only works with convex polygons. Unlike totem bricks, which are just single boxes stacked, we need to merge all the idol objects in some way.
Easy things first. We'll start with the vertical box that we already know how to build, and we are going to build it in the Main function just after building the last totem brick.
Creating an oriented box shape
To create an oriented box shape, we will use a b2PolygonShape method similar to SetAsBox, yet more advanced and called the SetAsOrientedBox method.
The arguments are the width and height of the box, the center of the box, also defined as a b2Vec2 object, and the rotation in radians.
Applying this concept, the idol function continues in the following way:
The first two lines are quite understandable as we are defining the size of the box, which is same as the box we just created.
Looking at the third line, where I define the position, you could have some doubts. The center of the body of the first idol box was (320,242) in pixels, so why am I placing the second idol box at (0,10)? Shouldn't it be placed near to the first idol box?
That's the magic of compound objects you are about to learn. Now we aren't defining the position as...
Creating any kind of convex polygons
Box2D allows you to create any kind of polygon shape, as long as the polygon is convex, which means it must have all interior angles less than 180 degrees, so all the vertices point away from the center, and you provide its vertices in clockwise order.
First, let's create a vector to store all vertices:
Then we will push all vertices in clockwise order, as b2Vec2 objects, specifying the relative position of the vertices to the center of the idol body.
The previous lines of code are the four vertices of idol's head. Now let's turn this vector into a polygon shape:
The SetAsVector method turns any vector of clockwise vertices into a polygon shape. The second...
This was one of the most important chapters of the book as you just learned how to create bodies and used them to design levels of successful games, such as Totem Destroyer.
To get used to Box2D bodies, I would suggest you create more Totem Destroyer levels or some Red Remover or Angry Birds levels. All in all, it's just a matter of shapes.