


Instancing a material
We started this chapter by setting up the material graph used by a small wooden toy tank prop in the previous recipe. This is something that we’ll be doing multiple times throughout the rest of the book, no matter whether we are working with big or small objects— after all, creating materials is what this book is all about! Having said that, there are occasions when we don’t need to recreate the entire material graph, especially when all we want to do is change certain parameters (such as the textures being used or the constant values that we’ve set). It is then that we can reach for the assets known as Material Instances.
This new type of asset allows us to quickly modify the appearance of the parent material by adjusting the parameters that we decide to expose. On top of that, instances remove the need for a shader to be compiled every time we make a change to it, as that responsibility falls to the parent material instead. This is great in terms of saving time when making small modifications, especially on those complex materials that take a while to finish compiling.
In this recipe, we will learn how to correctly set up a parent material so that we can use it to create Material Instances—doing things such as exposing certain values so that they can be edited later on. Let’s take a look at that.
Getting ready
We are going to continue working on the scene we adjusted in the previous recipe. This means that, as always, there won’t be a lot that you need in order to follow, as we’ll be taking a simple model with a material applied to it and tweaking it so that the new shader that we end up using is an instance of the original one. Without further ado, let’s get to it!
How to do it…
Let’s start by reviewing the asset we created in the previous recipe—it’s a pretty standard one, containing attributes that affect the base color, the roughness, and the metallic properties of the material. All those parts are very similar in terms of the nodes that we’ve used to create them, so let’s focus on the Metallic property once again:
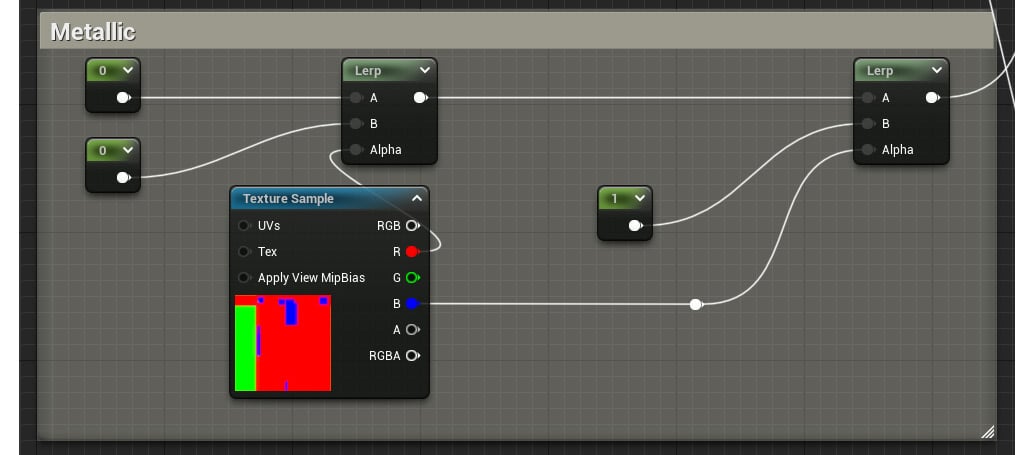
Figure 2.8 – A look at the different nodes that affect the Metallic attribute of the material
Upon reviewing the screenshot, we can see that there are basically two things happening in the graph—we are using Constant nodes to adjust the Metallic property of the shader, and we are also employing texture masks to determine the parts where the Constant values get used within our models. The same logic applies elsewhere in the material graph for those nodes that affect the Roughness and Base Color properties, as they are almost identical copies of the previous example.
Even though the previous set of nodes is quite standard when it comes to the way we create materials in Unreal, opening every material and adjusting each setting one at a time can prove a bit cumbersome and time-consuming—especially when we also have to click Compile and Save every single time we make a change. To alleviate this, we are going to start using parameters and Material Instances, elements that will allow us to more quickly modify a given asset. Let’s see how we can do this:
- Open the material that is currently being applied to the toy tank in the middle of the scene. It should be M_ ToyTank_ Parameterized_ Start (though feel free to use one similar to what we used in the previous recipe).
- Select the Constant nodes that live within the Metallic material expression comment (the ones seen in Figure 2.8), right-click with your mouse, and select the Convert to Parameter option. This will create a Scalar Parameter node, a type of node used to define a numerical value that can be later modified when we create a Material Instance.
Tip
You can also create scalar parameters by right-clicking anywhere within the material graph and searching for Scalar Parameter. Remember that you can also look for them in the Palette panel!
- With that done, it’s now time to give our new parameters a name. Judging from the way the mask is dividing the model, I’ve gone with the following criteria: Tire Metalness, Body Metalness, and Cannon Metalness. You can rename them by right-clicking on each of the nodes and selecting the Rename option.
- Convert the Constant nodes that can be found within the Roughness and Base Color sections into Scalar Parameter nodes and give them appropriate names, just as we did before. This is how the Base Color nodes look after doing that:
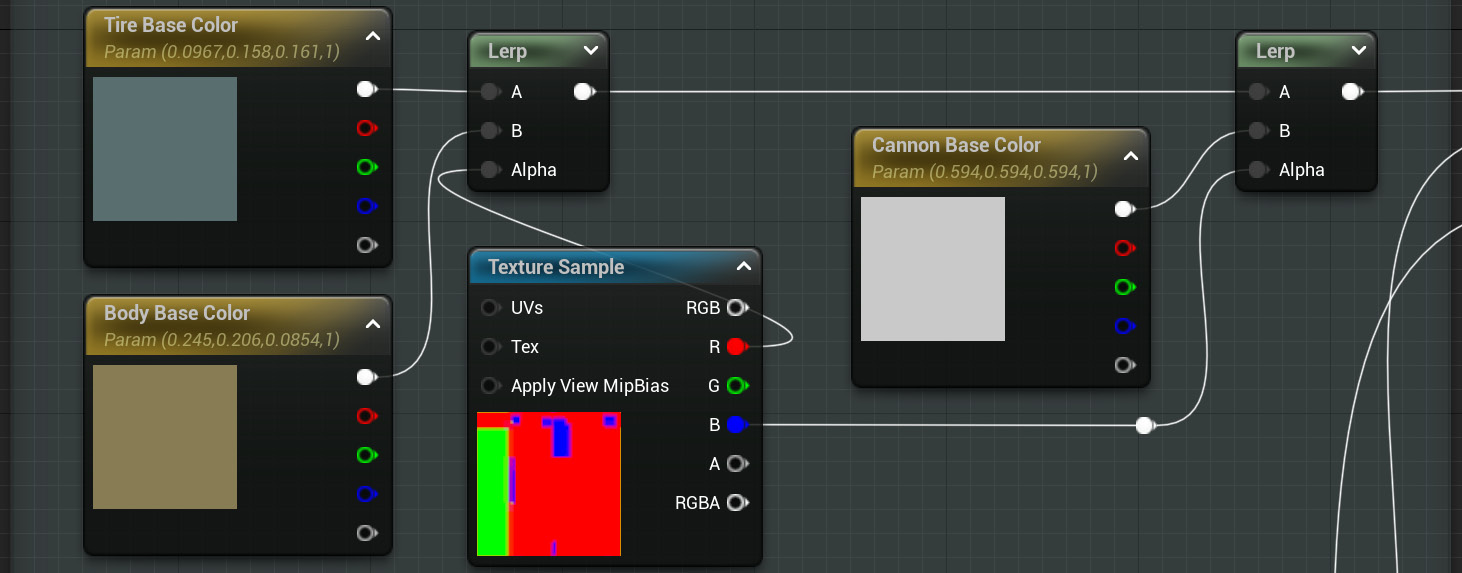
Figure 2.9 – The appearance of the Base Color section within the material graph on which we are working
Important note
The effects of the Convert to Parameter option are different depending on the type of variable that we want to change: simple Constant nodes (like the ones found in the Roughness and Metallic sections of the material) will be converted into the scalar parameters we’ve already seen, while the Constant3Vectors will get transformed into Vector Parameters. We’ll still be able to modify them in the same way, the only difference being the type of data that they demand.
Once all of this is done, we should be left with a material graph that looks like what we previously had, but one where we are using parameters instead of Constants. This is a key feature that will play a major role in the next steps, as we are about to see.
- Locate the material we’ve been operating on within the Content Browser and right-click on it. Select the Create Material Instance option and give it a name. I’ve gone with MI_ToyTank_Parameterized since “MI” is a common prefix for this type of asset.
- Double-click on the newly created Material Instance to adjust it. Unlike their parents, instances let us expose the parameters we previously created and adjust them—either before or during runtime, and without the need to recompile any shaders.
- Tweak the parameters that we have exposed to something different than their defaults. To do so, be sure to first check the boxes of those you want to change. As a reference, and just to see that we are on the same page, here is a reference screenshot of the settings I’ve chosen:
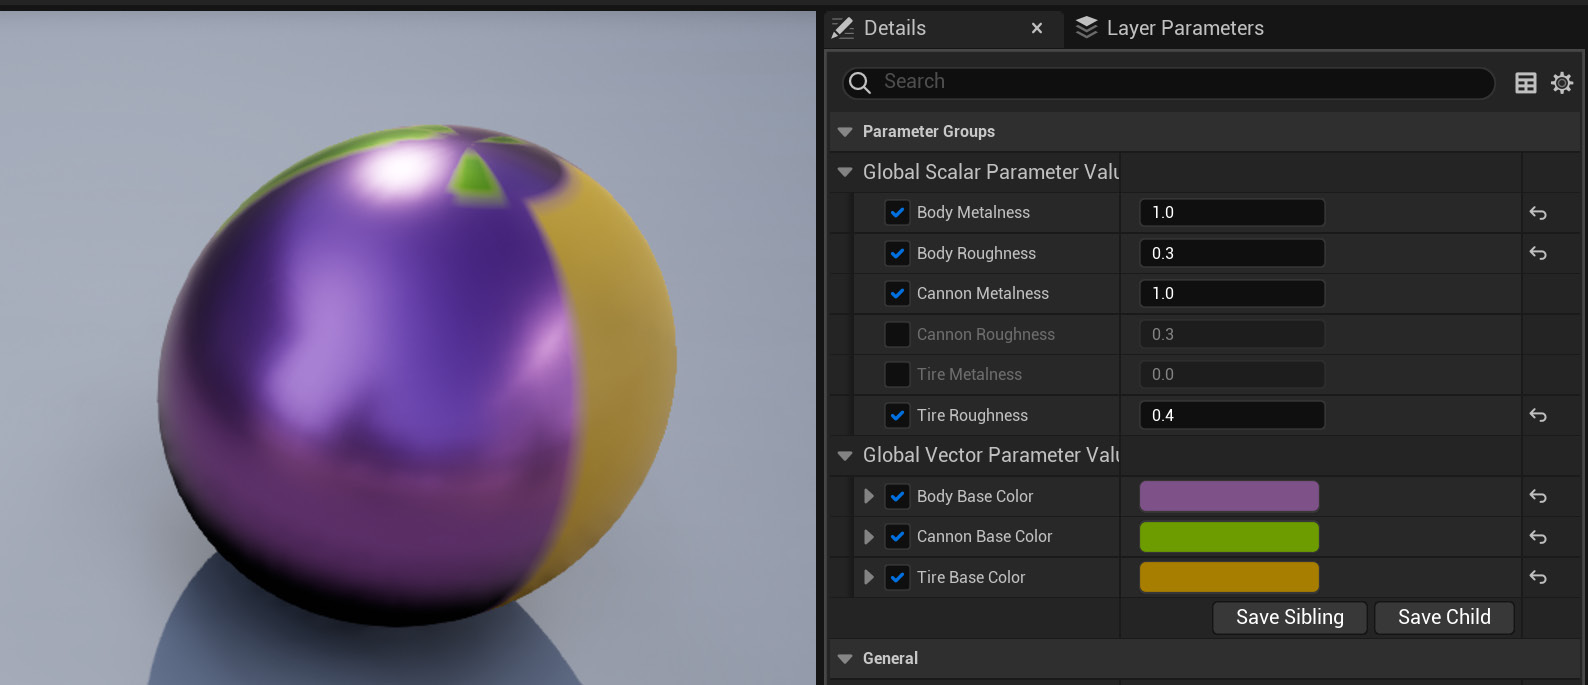
Figure 2.10 – A look at the editor view for Material Instances and the settings I’ve chosen
Tip
Take a look at the See also section to discover how to organize the previous parameters in a different way, beyond the standard Scalar Parameter and Vector Parameter categories that the engine has created for us.
- With your first Material Instance created, apply it to the model and look at the results!
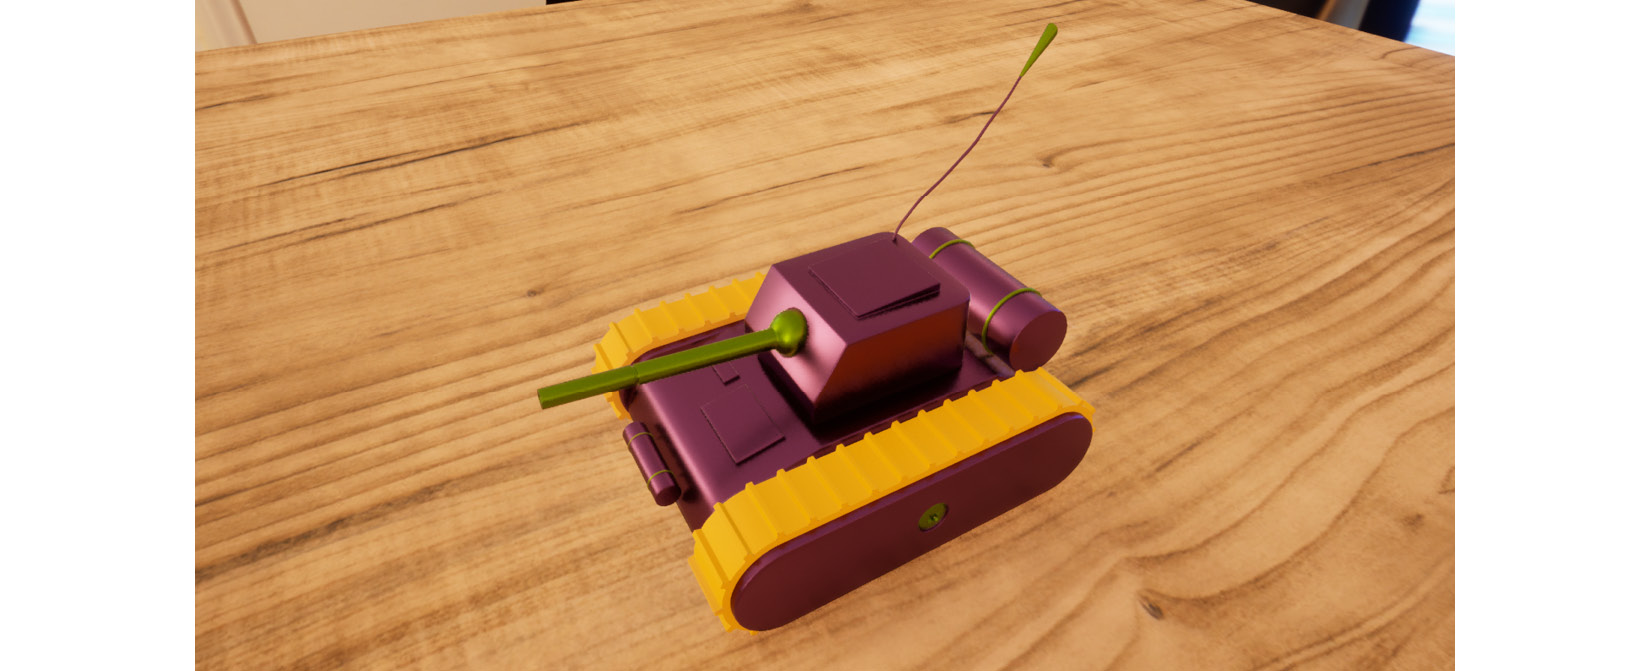
Figure 2.11 – The final look of the toy tank using the new Material Instance we have just created
How it works…
We set our sights on creating a Material Instance in this recipe, which we have done, but we haven’t covered the reasons why they can be beneficial to our workflow yet. Let’s take care of that now.
First and foremost, we have to understand how this type of asset falls within the material pipeline. If we think of a pyramid, a basic material will sit at the bottom layer—this is the basic building block on top of which the rest of what we are about to be talking about rests. Material Instances lie on top of that: once we have a basic parent material set up, we can create multiple instances if we only want to modify parameters that are already part of that first material. For example, if we have two toy tanks and we want to give them different colors, we could create a master material with that property exposed as a variable and two Material Instances that affect it, which we would then apply to each model. That is better in terms of performance compared to having two master materials applied to each toy.
There’s more…
Something else to note is that Material Instances can also be modified at runtime, which can’t be done using master materials. The properties that can be tweaked are the ones that we decide to expose in the parent material through the use of different types of parameters, such as the Scalar or Vector types that we have seen in this recipe. These materials that can be modified during gameplay receive the distinctive name of Material Instance Dynamic (MID), as even though they are also an instance of a master material, they are created differently (at runtime!). Let’s take a quick look at how to create one of these materials next:
- Create an Actor Blueprint.
- Add a Static Mesh component to it and assign the SM_ToyTank model as its default value (or the model that you want to use for this example!).
- In the Construction Script node, add the Create Dynamic Material Instance node and hook the Static Mesh node to its Target input pin. Select the parent material that you’d like to modify in the Source Material drop-down menu and store this material as a variable. You can see this sequence in the next screenshot:
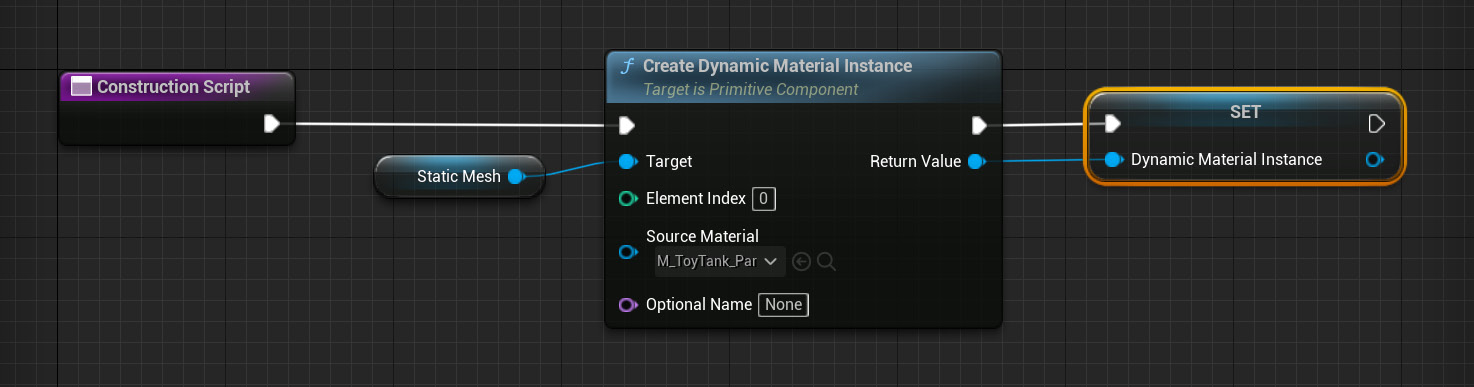
Figure 2.12 – The composition of the Construction Script node
- Head over to the Event Graph window and use a Set Vector Parameter Value node in conjunction with a Custom Event node to drive the changing of the material parameter that you’d like to affect. You can set the event to be called from the editor if you want to see its effects in action without having to hit Play. Also, remember to type the exact parameter you’d like to change and assign a value to it! Take a look at these instructions here:
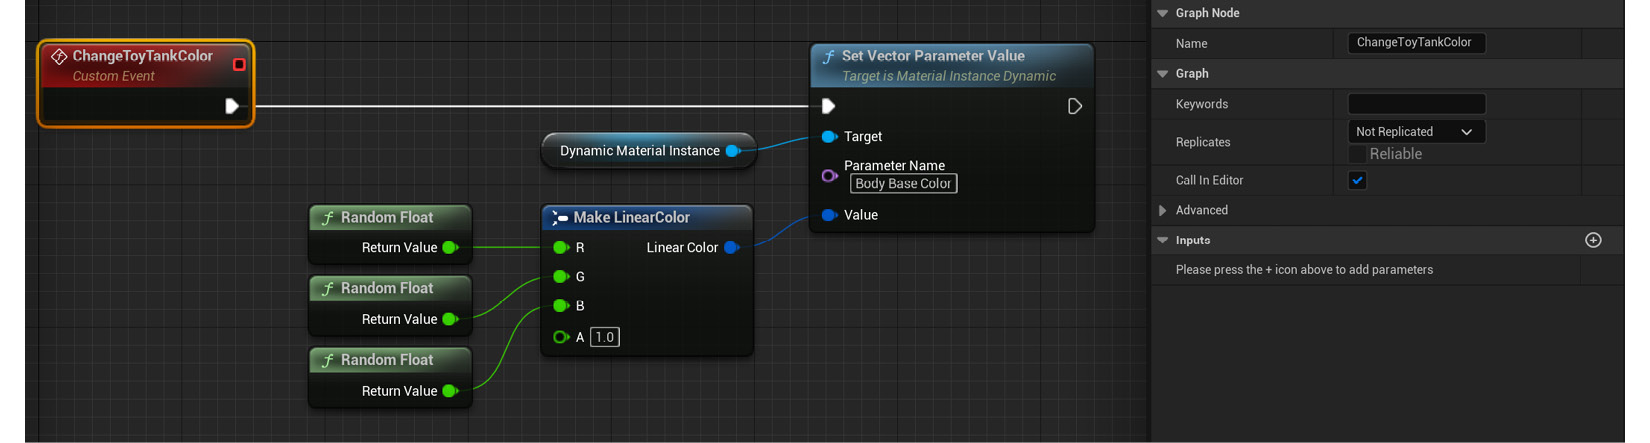
Figure 2.13 – Node sequence in the Event Graph
I’ll leave the previous set of steps as a challenge for you, as it includes certain topics that we haven’t covered yet, such as the creation of Blueprints. In spite of that, I’ve left a pre-made asset for you to explore within the Unreal Engine project included with this book. Look for the BP_Changing Color Tank Blueprint and open it up to see how it works in greater detail!
See also
Something that we didn’t do in this recipe was to group the different parameters we created. You might remember that the properties we tweaked when we worked on the Material Instances were automatically bundled into two different categories: vector parameter values and scalar parameter values. The names are only representative of the type they belong to, and not what they are affecting. That is something that we can, fortunately, modify by going back to the parent material, so let’s open its material graph to see how to do so.
Once in there, we can select each of the parameters we created and assign them to a group by simply typing the desired group name inside the Group Editable textbox within each of the parameters’ Details panels. Choosing a name different from the default None will automatically create a new group, which you can reuse across other variables by simply repeating the exact same word. This is a good way to keep things tidy, so be sure to give this technique a go!
On top of this, I also wanted to make you aware of other types of parameters available within Unreal. So far, we’ve only seen two different kinds: the Scalar and Vector categories. There are many more that cover other types of variables, such as the Texture Sample 2D parameter used to expose texture samples to the user. That one and others can help you create even more complex effects, and we’ll see some of them in future chapters.
Finally, let me leave you with the official documentation dedicated to Material Instances in case you want to take a further look at that:
- https://docs.unrealengine.com/5.0/en-US/instanced-materials-in-unreal-engine/
- https://docs.unrealengine.com/5.0/en-US/creating-and-using-material-instances-in-unreal-engine/
Reading the official docs is always a good way to learn the ins and outs of the engine, so make sure to go over said website in case you find any other topics that are of interest!


