Search icon
Arrow left icon
All Products
Best Sellers
New Releases
Books
Videos
Audiobooks
Learning Hub
Newsletters
Free Learning
Arrow right icon
Build Your Own Metaverse with Unity

You're reading from  Build Your Own Metaverse with Unity

Product type Book
Published in Sep 2023
Publisher Packt
ISBN-13 9781837631735
Pages 586 pages
Edition 1st Edition
Languages
Concepts
Author (1):
David Cantón Nadales David Cantón Nadales
Profile icon David Cantón Nadales

Table of Contents (20) Chapters

Preface 1. Part 1: Getting Started
2. Chapter 1: Getting Started with Unity and Firebase 3. Chapter 2: Preparing Our Player 4. Chapter 3: Preparing Our Home Sweet Home: Part 1 5. Chapter 4: Preparing Our Home Sweet Home: Part 2 6. Chapter 5: Preparing a New World for Travel 7. Part 2: And Now, Make It Metaverse!
8. Chapter 6: Adding a Registration and Login Form for Our Users 9. Chapter 7: Building an NPC That Allows Us to Travel 10. Chapter 8: Acquiring a House 11. Chapter 9: Turning Our World into a Multiplayer Room 12. Chapter 10: Adding Text and a Voice Chat to the Room 13. Part 3: Adding Fun Features Before Compiling
14. Chapter 11: Creating an NPC That Allows Us to Change Our Appearance 15. Chapter 12: Streaming Video Like a Cinema 16. Chapter 13: Adding Compatibility for the Meta Quest 2 17. Chapter 14: Distributing 18. Index 19. Other Books You May Enjoy

Adding a Registration and Login Form for Our Users

Access control to a system through credentials is a fundamental feature in any user-based project. In our metaverse, we will provide the user with a welcome screen where they can register or log in. To carry out this task, we will rely on the Firebase Authentication service SDK, which we previously learned about in Chapter 5, Preparing a New World for Travel.

When a user registers for the first time, we will store basic information, collected from the registration form. This data will be stored in a collection of users in Firebase Firestore for later use.

Throughout this chapter, we will learn about a new set of tools in Unity, called Unity UI. These tools will allow us to create graphical interface features with which the user can interact, such as buttons, inputs, and labels.

We will cover the following topics:

  • Creating a sign-up screen
  • Creating a sign-in screen
  • Placing the player

Technical requirements

This chapter does not have any special technical requirements, but we will be programming with scripts in C#. It would be advisable to have basic knowledge of this programming language. We need an internet connection to browse and download an asset from the Unity Asset Store.

We will continue with the project we created in Chapter 1. Remember that we have a GitHub repository, https://github.com/PacktPublishing/Build-Your-Own-Metaverse-with-Unity/tree/main/UnityProject, which contains the complete project that we will work on here.

You can also find the complete code for this chapter on GitHub at: https://github.com/PacktPublishing/Build-Your-Own-Metaverse-with-Unity/tree/main/Chapter06

Creating a sign-up screen

Unity UI is a new concept that you will read about often throughout these pages, but before we continue, we must establish new knowledge about this tool.

Unity UI is a set of tools and resources that facilitates the creation of UIs in the game. The most common elements we will work with will be the following:

  • Canvas: The canvas is the working area and the root that contains a set of UI elements. It can be configured to automatically fit and scale to any screen.
  • Button: A button can contain only text or include an image. With a button, we can activate functions of our scripts.
  • Text: This allows us to display text of any size, with multiple configurations that allow high customization.
  • Image: This is simply an image that can serve as a background or decorative element anywhere in our interface.
  • Panel: This serves as a parent element for grouping and organizing multiple UI elements.
  • Input Field: This allows the user to write text...

Creating a sign-in screen

We’ve learned a lot about creating UIs throughout this chapter. Now that you’ve successfully created a fully functional registration form, you’ll find it much easier to create a login form:

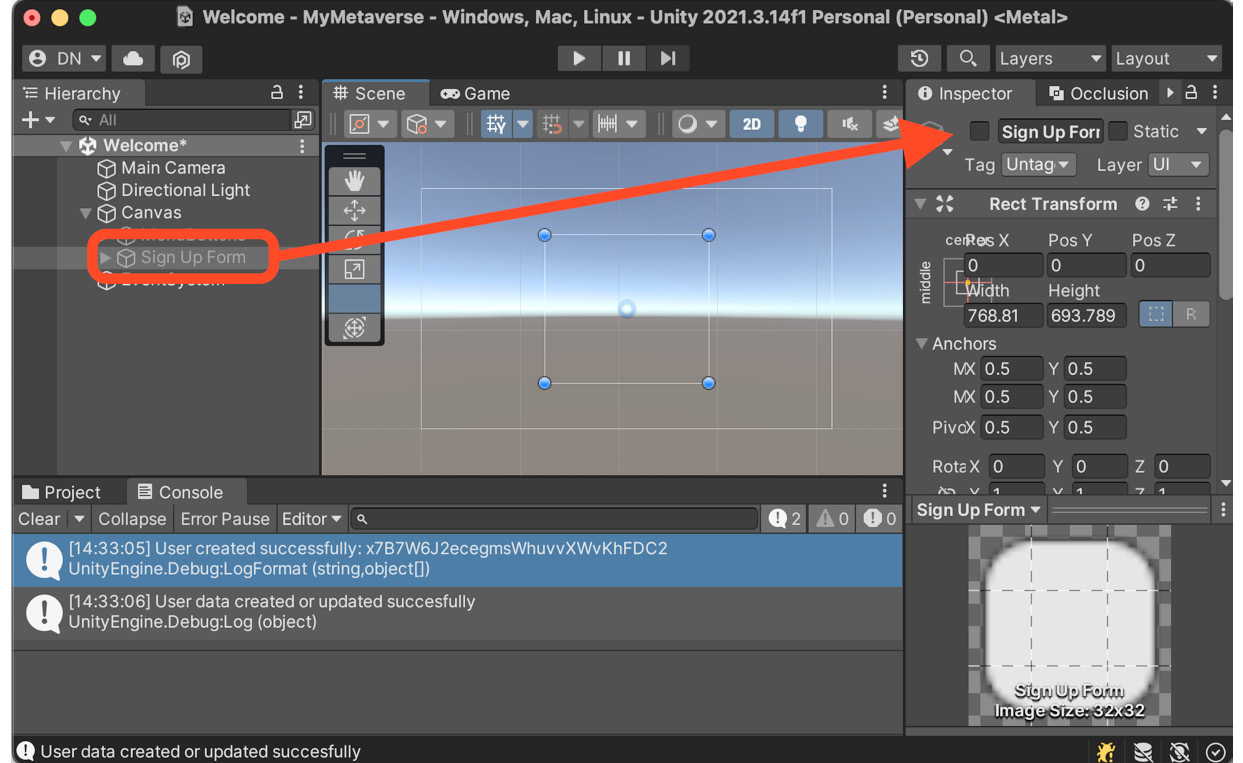
  1. Before we continue, as we did before, we’ll select the Sign Up Form panel and disable it so that it won’t get in the way when we create the new panel.
Figure 6.30 – Deactivating Sign Up Form

Figure 6.30 – Deactivating Sign Up Form

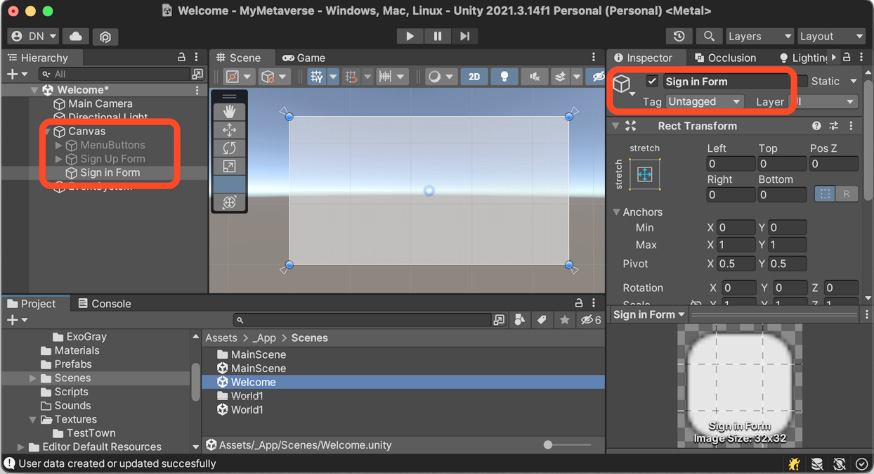
  1. OK, we are ready. Let’s start with the creation of our Sign In form. To do so, right-click on Canvas and select the UI | Panel option. Rename the new GameObject Sign in Form.
Figure 6.31 – Renaming panel

Figure 6.31 – Renaming panel

  1. We will apply the same settings as we did with the Sign Up Form panel to modify its appearance:
    • In the Inspector panel, select the center alignment.
    • With the Rect Transform tool, we will resize the panel until it looks as in the following screenshot...

Placing the player

If you remember when we designed the initial scene in Chapter 4, Preparing Our Home Sweet Home: Part 2, we placed the Prefab with the player in the scene, and when we pressed Play, we took the perspective of the player so we could move around.

Our project will become multiplayer from Chapter 9, Turning Our World into a Multiplayer Room, onward, so we will progressively make adjustments to the current configuration to reach that goal. The way in which we currently instantiate the player would not be useful in the future in a multiplayer project, as there is only one instance of the Prefab player in the scene; it is fixed, and everyone who connects will use the same player. Crazy, right?

That’s why in this final section, we will create a dynamic instancing system. Every time a player logs in and appears in the main scene, they will do so with a new Prefab player clone:

  1. First of all, save the current changes. Then, we need to go back to MainScene...

Summary

Throughout this chapter, we learned about the new tools offered by Unity UI, and we now know how to create UIs that allow the player to interact with our metaverse. In addition, we delved deeper into the Firebase SDK and our project now has a welcome screen, with scripts that allow the user to create a new account or log in. Finally, we took another step toward a multiplayer metaverse, creating a player Prefab that we can instantiate via code when the scene is started.

In the next chapter, we will learn how to create our first NPC. We will create a fun, animated character that will allow the player to travel to other worlds. For this, we will program a script that detects the presence of the player and shows a window to select the destination world.

lock icon The rest of the chapter is locked
You have been reading a chapter from
Build Your Own Metaverse with Unity
Published in: Sep 2023 Publisher: Packt ISBN-13: 9781837631735
Register for a free Packt account to unlock a world of extra content!
A free Packt account unlocks extra newsletters, articles, discounted offers, and much more. Start advancing your knowledge today.
Unlock this book and the full library FREE for 7 days
Get unlimited access to 7000+ expert-authored eBooks and videos courses covering every tech area you can think of
Renews at ₹800/month. Cancel anytime}