Reader small image

You're reading from  Enhancing Virtual Reality Experiences with Unity 2022

Product typeBook
Published inNov 2023
Reading LevelBeginner
PublisherPackt
ISBN-139781804619537
Edition1st Edition
Languages
Tools
Right arrow
Author (1)
Steven Antonio Christian
author image
Steven Antonio Christian

Steven Christian is an Augmented Reality Developer, Animator, and Medical Student Student. He's also the Owner of Iltopia Studios where he creates comics and cartoons that explore the Black experience in America. He is Unity Certified 3D Artist and Instructor and his goal is to improve equity in arts and technology through content creation and community-focused education.
Read more about Steven Antonio Christian

Right arrow

Building VR Scenes in Unity

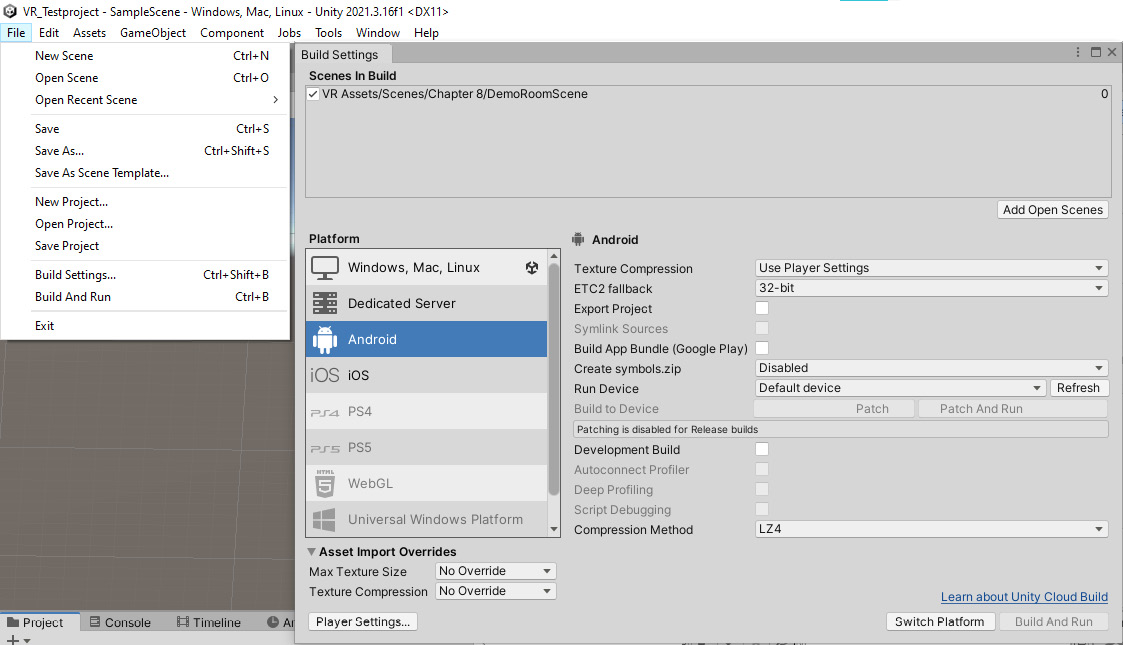
In this chapter, we will learn how to navigate the Unity game engine and build a template scene of key components that we will use for future projects. We will create a new project, set up all the necessary packages and settings for building VR experiences, navigate the Package Manager, Inspector, and Editor, and lastly test our first Unity VR scene on a device. After the test is complete, we will build a template of this scene we can use for future projects.

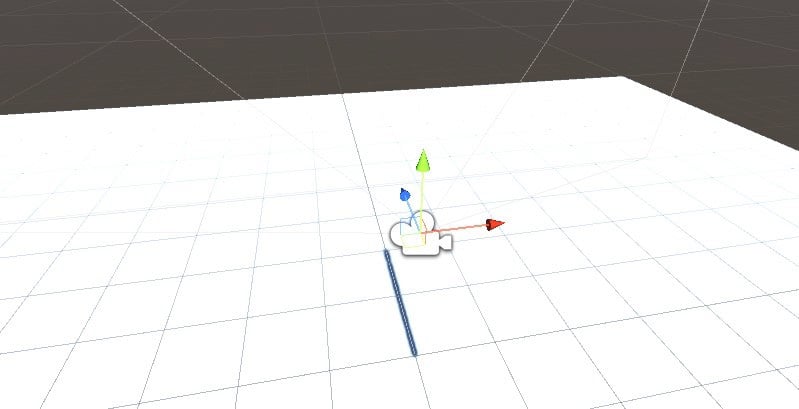
By the end of this chapter, you will have an understanding of how to convert a blank Unity scene or premade template into a functional VR development environment. This will include importing the required developer kit packages, creating an empty scene, placing a VR rig and plane in the scene, and testing out the experience. After this chapter, you will feel confident in the basics of VR scene components to where you can continue to add to the scenes and incorporate whatever preexisting Unity knowledge...

Setting up a Unity project

To begin creating VR projects, we first need to install the Unity Editor. This is the most crucial part of the development process because, without the Editor, we would be stuck trying to figure out how to connect hardware and sensors with the experiences we hope to build manually. Using the foundation Unity has built for developing games, we can harness its power to build experiences tailored to our needs.

Installation

The first thing we need to do is visit the Unity website. Open a web browser and navigate to https://unity.com/. On the web page, you will want to select Plans and Pricing in the top-right corner. Clicking this link will take you to the license selection page (Figure 2.1):

Figure 2.1 – The Plans and Pricing section

Figure 2.1 – The Plans and Pricing section

If you represent a business or corporation that meets the minimum earning threshold, you will need to choose a license option from the Enterprise tab. If you represent a small to medium...

VR setup

Before we begin setting up our project, we want to make sure we have specific modules installed to run our experiences:

  • Android build support for standalone headsets
  • Windows build support for PC-based headsets

With those modules installed, you can create a new project (Unity Hub | Projects | Create New). Name it VR_Basics_001, Select the folder where you wish to save it, and select the right Editor. For the template, select 3D Core (shown in Figure 2.6). Then, select Create project:

Figure 2.7 – The XR Plugin Management pre-installation window

Figure 2.7 – The XR Plugin Management pre-installation window

Once the project has been created and the Unity Editor is open, we will want to open Project Settings (File | Build Settings | Project Settings). Go to the XR Plugin Management tab and select Install XR Plugin Management (Figure 2.7). This will do all the heavy lifting for you when you are trying to build VR experiences and interacting with those experiences in the Unity Editor...

Headset setup

In our demos, we will be using the Oculus Quest to test our experiences. To set up your Oculus Quest, we must enable unknown sources for the device. Open the Oculus app and select Settings. Go to the General tab, select Unknown sources, and check Allow. This will let you use your Oculus Quest outside of the Oculus Store and directly within the Unity Editor. This will allow you to bypass the build process if you have a PC. If you are using a Mac for development, your only option for testing on the Oculus is building to the device.

Setting up developer mode

If you have an Oculus Quest 2, it is best to set up developer mode. Developer mode allows you to run, debug, and test applications directly on your headset. To put your headset in developer mode, follow these steps:

  1. Put on the headset and sign in with an account.
  2. Go to Settings | System | Developer and turn on USB connection.
  3. Connect the headset to a computer using the provided USB-C cable.
  4. ...

VR scene setup

Now, it is time to build a VR scene. This scene will allow us to test our VR interactions using our headset directly in the Editor. To set up our scene, we will create a new scene in the Project window (right-click | Create | Scene) and name it VR_Basics_000. Within the scene we created, add a plane (right-click | 3D Object | Plane) and label it Ground. Add an action-based XR rig (right-click | XR | XR Origin (VR) [formerly Action-Based]). With the rig GameObject selected, you will see three arrows (Figure 2.15). The blue arrow is pointing forward, the green arrow is pointing upward, and the red arrow is pointing right. These coordinates are important because when you set up your rig, you need to make sure you know which way you will be facing and whether the left and right-hand sides are configured correctly:

Figure 2.15 – XR Origin (VR) GameObject displaying three directional arrows

Figure 2.15 – XR Origin (VR) GameObject displaying three directional arrows

Under the rig, you will see the camera offset...

Testing in the Editor

Testing your experiences is an important part of the development process because it allows you to try the experience as a user and see firsthand what works and what doesn’t. In this section, we will discuss how to test our VR experience within the Unity Editor. This process is only available for Windows OS. If you are developing on Mac or Linux, you can only test experiences on the device, not in the Editor.

You can test in the Editor by connecting your headset (Oculus Quest 2) directly to your computer. When you connect your device, a popup will appear. Select Allow. You will be asked to set up your floor height and VR boundaries. If you have not already, enable Oculus Link:

Figure 2.17 – Final VR_Basics_000 scene running in play mode

Figure 2.17 – Final VR_Basics_000 scene running in play mode

Press play to run the scene in VR (Figure 2.17), and put on your headset. You should be in the scene you built in Unity at this point. Both hands should appear as rods when you move...

Testing on a device

As mentioned in the previous section, Linux and Mac do not support testing VR experiences in the Unity Editor. As an alternative, you can test them on your device. Similar to building applications for mobile phones, you can build directly to the headset. First, go to Build Settings in the File menu (Figure 2.18) and add the VR scene you want to test to the Scenes In Build list by selecting Add Open Scenes. Switch the platform to Android. The Unity icon will appear next to the selected platform. Select Build And Run to test the scene on your device. Before you select Build And Run, you will want to make sure that the headset is connected to the computer. After you build it to the device, you will be able to see the experience in action:

Figure 2.18 – The Build Settings screen

Figure 2.18 – The Build Settings screen

Summary

VR experiences are very powerful and lend to great experiences. Using the Unity Editor to build these experiences unlocks heaps of creative potential for developers and consumers alike.

So far, we’ve covered the basics of Unity Hub and how to create a new project with a default template. If you want to explore all the other templates, you can. With our new project created, we installed the XR Interaction Toolkit and Interaction profiles for our desired device. We then created a VR scene with a ground plane and VR rig that can communicate with our headset.

With our simple scene, we can look around with our headsets on. We can’t move around in VR yet, but we took a big step in our VR development journey, and that is creating a VR scene that will run on a device. We can officially say we are a VR developer now because we achieved such a crucial milestone. Moving forward, we will be building off what we learned in this chapter to further enhance the VR scenes...

lock icon
The rest of the chapter is locked
You have been reading a chapter from
Enhancing Virtual Reality Experiences with Unity 2022
Published in: Nov 2023Publisher: PacktISBN-13: 9781804619537
Register for a free Packt account to unlock a world of extra content!
A free Packt account unlocks extra newsletters, articles, discounted offers, and much more. Start advancing your knowledge today.
undefined
Unlock this book and the full library FREE for 7 days
Get unlimited access to 7000+ expert-authored eBooks and videos courses covering every tech area you can think of
Renews at €14.99/month. Cancel anytime

Author (1)

author image
Steven Antonio Christian

Steven Christian is an Augmented Reality Developer, Animator, and Medical Student Student. He's also the Owner of Iltopia Studios where he creates comics and cartoons that explore the Black experience in America. He is Unity Certified 3D Artist and Instructor and his goal is to improve equity in arts and technology through content creation and community-focused education.
Read more about Steven Antonio Christian