Reader small image

You're reading from  Smart Robotics with LEGO MINDSTORMS Robot Inventor

Product typeBook
Published inMay 2021
PublisherPackt
ISBN-139781800568402
Edition1st Edition
Concepts
Right arrow
Author (1)
Aaron Maurer
Aaron Maurer
author image
Aaron Maurer

Aaron Maurer, also known as “Coffeechug” is the STEM lead for 21 school districts in Iowa helping to expand STEM, Computer Science, Makerspace, and Purposeful Play into classrooms K-12. Aaron is also a former FIRST LEGO League coach for 8 years with much success working with phenomenal kids. He has a Master Educator License with endorsements in 5-12 Psychology – 163; 5-12 World History – 166; 5-12 American History – 158; 5-12 Computer Science – 278; PK-12 Talented and Gifted – 107; 5-8 Middle School Generalist – 182; and K-8 Computer Science – 277. Currently, Aaron is a member of ISTE Making It Happen Award; Lego Education Ambassador and Master Educator; PBS Digital Innovator and All-Star; PITSCO Tag Committee; Microsoft Innovator Educator Expert; Microsoft Innovative Educator Fellow; Global Learning Mentor (formerly Skype Master Teacher); Minecraft Global Mentor; and Makey Makey Ambassador. Finally, Aaron was a finalist for the Iowa Teacher of the Year in 2014.
Read more about Aaron Maurer

Right arrow

Chapter 5: Building a Scorpion

Biomimicry is the study and application of creating products, systems, mechanisms, and solutions to problems based on biological processes and functions found in nature. It is incredible what we can learn from plants and animals to find solutions to our own problems.

One of the many fascinating animals on our planet is the scorpion, a creature that has some features perfect for robot building. In this chapter, you are going to build a scorpion robot designed around the famous features of this creature. In particular, you will be building the stinger and a body style similar to that of a scorpion, along with some additional features that the kit provides.

Here's what your build will look like by the end of this chapter:

Figure 5.1 – Completed Build

In this chapter, we will break down the build and program into the following sections:

  • Building the scorpion body
  • Building the tail
  • Adding the color...

Technical requirements

For the building of the robot, all you will need is the Robot Inventor kit. For programming, you will need the LEGO MINDSTORMS app/software.

Access to the code for this chapter can be found here:

App code:

https://github.com/PacktPublishing/Smart-Robotics-with-LEGO-MINDSTORMS-Robot-Inventor/blob/main/Chapter%205%20Scorpion%20Controller%20Code.lms

Sensor code:

https://github.com/PacktPublishing/Smart-Robotics-with-LEGO-MINDSTORMS-Robot-Inventor/blob/main/Chapter%205%20Scorpion%20Sensor%20Code.lms

If you would like a more detailed photo-by-photo build process of the robot, please head here to view the images: https://bit.ly/3rNjwkY.

Building the scorpion body

The beauty of this robotics kit is that you can easily get started with any type of build because of the new pieces that are included. You are going to use the large LEGO 11x19 teal base plate as the main frame of the scorpion. This will be a vital piece where you will add motors to the wheels for movement, along with adding the entire top build of the scorpion. As with many builds in this book, you are utilizing this element to provide a base plate to hold everything together in a solid structure and format.

You can see what the base plate looks like in the following image:

Figure 5.2 – Starting with teal base plate

One of the LEGO pieces not found in this kit is a LEGO Technic Steel Ball Caster ball, or even the plastic version found in the SPIKE Prime kit. You will have to design a new way to operate your robot. What a wonderful design challenge! While there are plenty of wheels to use, a scorpion does not look like...

Building the tail

Our next step is to add motors three and four to the sides. You are going to use two motors for an equal balance of the body. This will also allow the tail to be strongly held to the body of the robot.

To get started, you will need the following pieces:

  • Two motors
  • Four black connector pins
  • Two white perpendicular connector pins
  • Four wire clips
  • Two blue connector pins
  • Two black 11L beams
  • One distance sensor
  • Two black round elbow connectors
  • Four blue axle pins

Using two black connector pins for each motor, attach the motors to the sides of the teal base plate, as follows:

Figure 5.16 – Side motors for the tail

Next, insert a white perpendicular connector pin to each of the motors on the top of each motor on the edge, as follows:

Figure 5.17 – White connector pin added to top of each motor

This is also a great time to use the wire clips to organize your...

Adding the color sensor detection triggers

Now that you have installed the sensors, you have to find a way to activate the scorpion as it would act and behave when feeling threatened. In this build, you will use red and yellow 3L beams to create a trigger in our code so that when something bumps into the scorpion from the front, it will go into attack mode by lunging its tail forward toward the enemy. Through the use of pins and rubber bands, you can create a trigger mechanism that will push the red and yellow pieces forward to activate the color sensor.

When nothing is pressing on these elements, the rubber bands will pull them back to their original starting position.

You will need the following pieces:

  • Two yellow 3L beams
  • Two red 3L beams
  • Two black 3x7 angular beams
  • Two blue connector pins
  • Two tan axle pins
  • Two gray axle pins
  • Two gray bush stops
  • Two gray connector pins with bush stops

In the following screenshot, you can see how...

Building the scorpion claws

You will need the following pieces:

  • Two black double-bent beams
  • Two black round elbow connectors
  • Four blue axle pins

Start with the two black round elbow connectors. Add a blue axle pin to both sides of each of the black round elbow connectors. Add one of each to the black double-bent beams on the second hole of the long part of the beam, as illustrated in the following image:

Figure 5.42 – Building out the first part of the claws

Each of these will then connect to the 11L black beam on the sides of the robot using the fourth pin hole.

Next, locate the following parts:

  • Two black double-bent beams
  • Six blue axle connector pins
  • Two white axle connectors
  • Two black 90-degree axle pins
  • Two black connector pins
  • Two black 3L beams

Again, you will build two of the same parts for each side of the robot. Begin by adding a blue connector pin to the pin hole right before the...

Building the scorpion's exoskeleton

You will now use many of the white elements typically used for vehicles and robot body designs to create the look of a scorpion. Additionally, these pieces help secure the build and hide wires underneath to give the build a sleeker look. You will notice there are some wire clips used on the sides of the Intelligent Hub, so be sure to use these as you build to hide as much of the wire as you can.

You will now finish up the frame of the robot by adding the head and some structural elements before moving into the final details of the build.

You will need the following pieces:

  • One white 13L beam
  • Eight black connector pins
  • Two white panels
  • Four white pins with friction ridges
  • One curved white panel
  • One small curved white panel
  • Two gray connector pins with bush stops
  • Two red axle pins
  • Two teal round axle connectors

Begin by adding a black connector pin to each end of the 13L beam. Attach this...

Designing the tail

To design the tail, we will have to build a frame first around the distance sensor. This frame will help stabilize the tail that you are about to build. As your scorpion attacks, moves, swings, and seeks out prey, you need to make sure the tail does not drop low and trigger your distance sensor, or else you will have one strange-acting animal!

Adding this frame is a perfect fit that still does not take away from the body while providing support and helping the tail stay in place.

To build the frame, you will need the following pieces:

  • One black 7x11 open frame
  • Four black connector pins
  • Two teal 3x5 L beams
  • 2 gray connector pins with bush stops

Begin this build component by adding the 3x5 teal beams to the inside of the open frame using the black connector pins, as illustrated in the following image:

Figure 5.58 – Open frame with teal L beams

Add this piece by connecting the 3x5 L beams to the pin hole...

Writing the code

You will be writing two programs for this build. The first program will allow the robot to move autonomously without any help from its human companion. The second program will be a program that will allow you to control the robot using the remote-control feature of the app.

Connecting sensors and motors to the ports

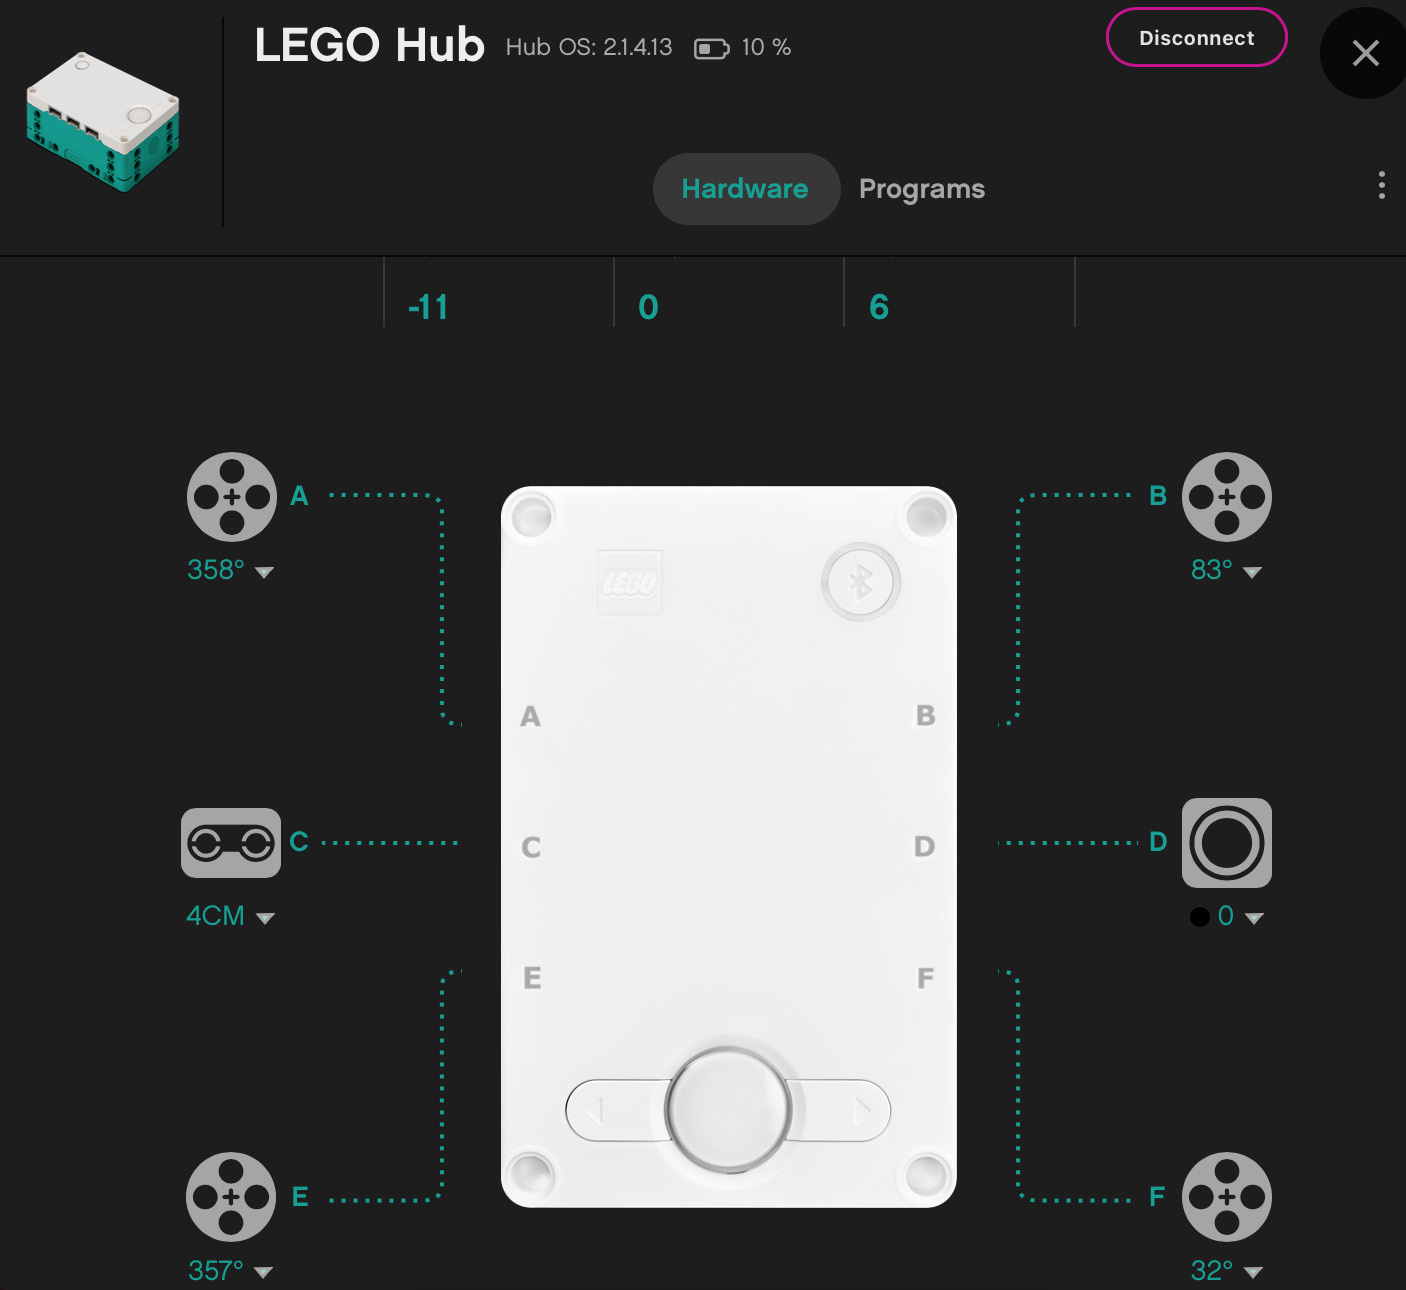
Before we get into the programming, let's make sure all motors and sensors are properly plugged into the Intelligent Hub. The two motors for the tail should be plugged into ports A and E. The two-wheel motors will be plugged into ports B and F. The left wheel will be in port B and the right wheel will be plugged into port F.

For the sensors, you will plug the distance sensor into port C. Finally, the color sensor will plug into port D.

Check all connections using the Port View in the software.

This view is reproduced here:

Figure 5.74 – Port View in the MINDSTORMS software

Figure 5.74 – Port View in the MINDSTORMS software

Now that you have all your...

Making it your own

You have been given the framework of an awesome scorpion. How could you add some unique features to make this build even better? How could you possibly combine this with another set of animal features for a super-hybrid creature?

More importantly, how will you tweak the code to have the robot behave differently? What more could be done? You have been given some starter code to have initial success, but your challenge is to take things to the next level! What will you do in a pinch? (Pun intended.)

Here are some ideas to think about to expand on this scorpion build:

  • Could you use the color or distance sensor in different ways?
  • For movement of the scorpion, could you use the gyro sensor built within the Intelligent Hub?
  • Could you explore a scissor mechanism for the tail or limbs?

Summary

In summary, you explored the concept of biomimicry, understanding how incredible animals are by building a scorpion. Aspects of a scorpion have been used in numerous robot builds and designs, from start-up companies to the National Aeronautics and Space Administration (NASA). Understanding how to use sensors to detect motion and movement to activate a strike is a great aspect to your learning. Additionally, showcasing two ways to operate the robot within the software is another nice touch to this kit as you can now think of many new ways to use this robot.

In the next chapter, you will explore a similar type of thinking and design but for a different purpose. You will enter the world of sumobots, making a robot that will battle the best of the best in sumo arenas. Let's go!

lock icon
The rest of the chapter is locked
You have been reading a chapter from
Smart Robotics with LEGO MINDSTORMS Robot Inventor
Published in: May 2021Publisher: PacktISBN-13: 9781800568402
Register for a free Packt account to unlock a world of extra content!
A free Packt account unlocks extra newsletters, articles, discounted offers, and much more. Start advancing your knowledge today.
undefined
Unlock this book and the full library FREE for 7 days
Get unlimited access to 7000+ expert-authored eBooks and videos courses covering every tech area you can think of
Renews at $15.99/month. Cancel anytime

Author (1)

author image
Aaron Maurer

Aaron Maurer, also known as “Coffeechug” is the STEM lead for 21 school districts in Iowa helping to expand STEM, Computer Science, Makerspace, and Purposeful Play into classrooms K-12. Aaron is also a former FIRST LEGO League coach for 8 years with much success working with phenomenal kids. He has a Master Educator License with endorsements in 5-12 Psychology – 163; 5-12 World History – 166; 5-12 American History – 158; 5-12 Computer Science – 278; PK-12 Talented and Gifted – 107; 5-8 Middle School Generalist – 182; and K-8 Computer Science – 277. Currently, Aaron is a member of ISTE Making It Happen Award; Lego Education Ambassador and Master Educator; PBS Digital Innovator and All-Star; PITSCO Tag Committee; Microsoft Innovator Educator Expert; Microsoft Innovative Educator Fellow; Global Learning Mentor (formerly Skype Master Teacher); Minecraft Global Mentor; and Makey Makey Ambassador. Finally, Aaron was a finalist for the Iowa Teacher of the Year in 2014.
Read more about Aaron Maurer