Reader small image

You're reading from  OpenCV with Python By Example

Product typeBook
Published inSep 2015
Reading LevelIntermediate
PublisherPackt
ISBN-139781785283932
Edition1st Edition
Languages
Tools
Right arrow
Author (1)
Prateek Joshi
Prateek Joshi
author image
Prateek Joshi

Prateek Joshi is the founder of Plutoshift and a published author of 9 books on Artificial Intelligence. He has been featured on Forbes 30 Under 30, NBC, Bloomberg, CNBC, TechCrunch, and The Business Journals. He has been an invited speaker at conferences such as TEDx, Global Big Data Conference, Machine Learning Developers Conference, and Silicon Valley Deep Learning. Apart from Artificial Intelligence, some of the topics that excite him are number theory, cryptography, and quantum computing. His greater goal is to make Artificial Intelligence accessible to everyone so that it can impact billions of people around the world.
Read more about Prateek Joshi

Right arrow

Chapter 12. Augmented Reality

In this chapter, you are going to learn about augmented reality and how you can use it to build cool applications. We will discuss pose estimation and plane tracking. You will learn how to map the coordinates from 2D to 3D, and how we can overlay graphics on top of a live video.

By the end of this chapter, you will know:

  • What is the premise of augmented reality

  • What is pose estimation

  • How to track a planar object

  • How to map coordinates from 3D to 2D

  • How to overlay graphics on top of a video in real time

What is the premise of augmented reality?


Before we jump into all the fun stuff, let's understand what augmented reality means. You would have probably seen the term "augmented reality" being used in a variety of contexts. So, we should understand the premise of augmented reality before we start discussing the implementation details. Augmented Reality refers to the superposition of computer-generated input such as imagery, sounds, graphics, and text on top of the real world.

Augmented reality tries to blur the line between what's real and what's computer-generated by seamlessly merging the information and enhancing what we see and feel. It is actually closely related to a concept called mediated reality where a computer modifies our view of the reality. As a result of this, the technology works by enhancing our current perception of reality. Now the challenge here is to make it look seamless to the user. It's easy to just overlay something on top of the input video, but we need to make it...

What does an augmented reality system look like?


Let's consider the following figure:

As we can see here, the camera captures the real world video to get the reference point. The graphics system generates the virtual objects that need to be overlaid on top of the video. Now the video-merging block is where all the magic happens. This block should be smart enough to understand how to overlay the virtual objects on top of the real world in the best way possible.

Geometric transformations for augmented reality


The outcome of augmented reality is amazing, but there are a lot of mathematical things going on underneath. Augmented reality utilizes a lot of geometric transformations and the associated mathematical functions to make sure everything looks seamless. When talking about a live video for augmented reality, we need to precisely register the virtual objects on top of the real world. To understand it better, let's think of it as an alignment of two cameras—the real one through which we see the world, and the virtual one that projects the computer generated graphical objects.

In order to build an augmented reality system, the following geometric transformations need to be established:

  • Object-to-scene: This transformation refers to transforming the 3D coordinates of a virtual object and expressing them in the coordinate frame of our real-world scene. This ensures that we are positioning the virtual object in the right location.

  • Scene-to-camera: This...

What is pose estimation?


Before we proceed, we need to understand how to estimate the camera pose. This is a very critical step in an augmented reality system and we need to get it right if we want our experience to be seamless. In the world of augmented reality, we overlay graphics on top of an object in real time. In order to do that, we need to know the location and orientation of the camera, and we need to do it quickly. This is where pose estimation becomes very important. If you don't track the pose correctly, the overlaid graphics will not look natural.

Consider the following image:

The arrow line represents that the surface is normal. Let's say the object changes its orientation:

Now even though the location is the same, the orientation has changed. We need to have this information so that the overlaid graphics looks natural. We need to make sure that it's aligned to this orientation as well as position.

How to track planar objects?


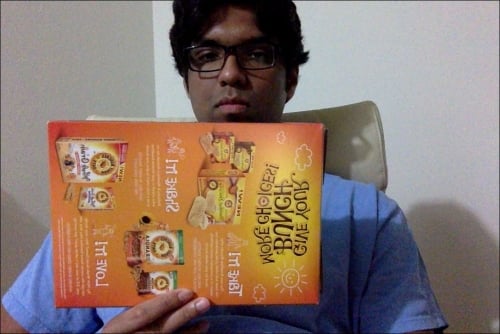
Now that you understand what pose estimation is, let's see how you can use it to track planar objects. Let's consider the following planar object:

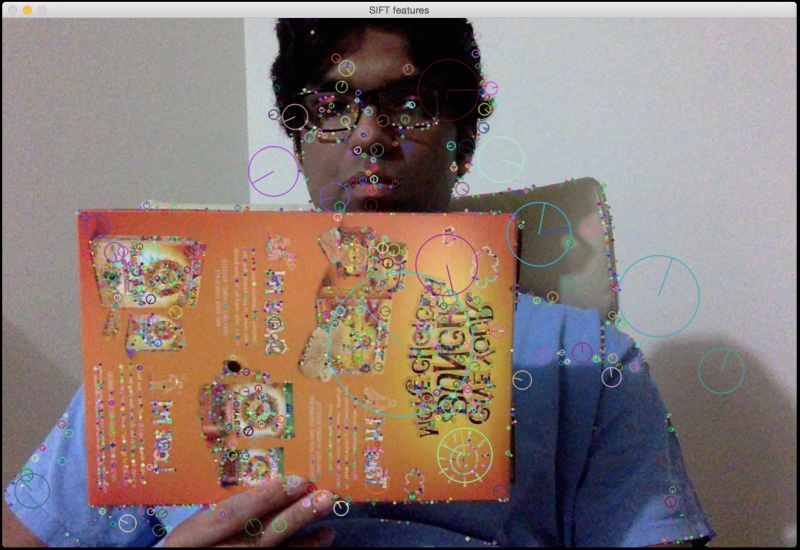
Now if we extract feature points from this image, we will see something like this:

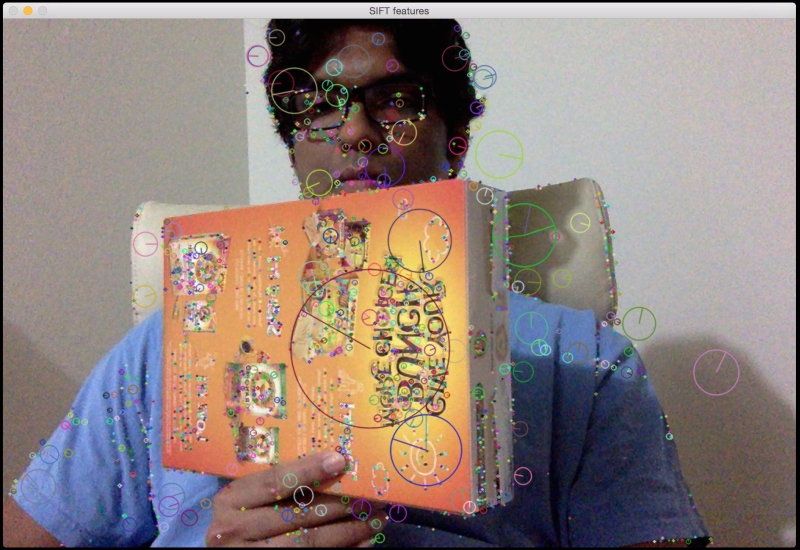
Let's tilt the cardboard:

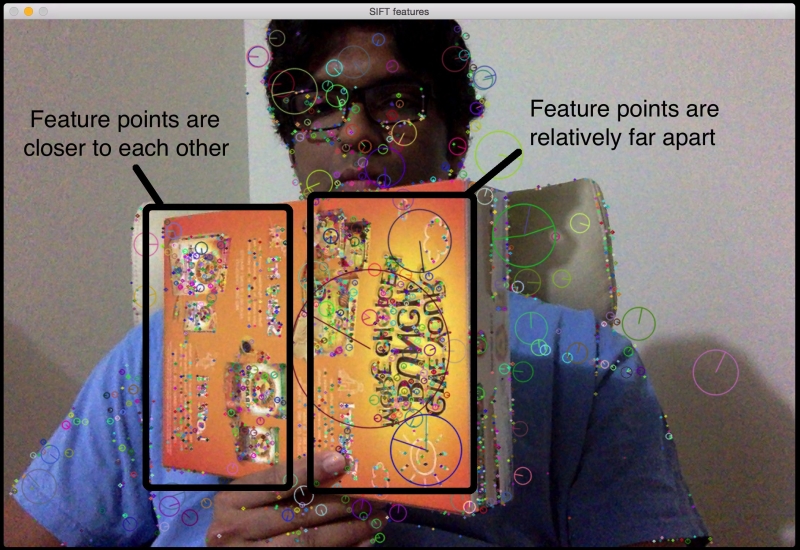
As we can see, the cardboard is tilted in this image. Now if we want to make sure our virtual object is overlaid on top of this surface, we need to gather this planar tilt information. One way to do this is by using the relative positions of those feature points. If we extract the feature points from the preceding image, it will look like this:

As you can see, the feature points got closer horizontally on the far end of the plane as compared to the ones on the near end.

So we can utilize this information to extract the orientation information from the image. If you remember, we discussed perspective transformation in detail when we were discussing geometric transformations as well as panoramic imaging. All we need...

How to augment our reality?


Now that we know how to track planar objects, let's see how to overlay 3D objects on top of the real world. The objects are 3D but the video on our screen is 2D. So the first step here is to understand how to map those 3D objects to 2D surfaces so that it looks realistic. We just need to project those 3D points onto planar surfaces.

Mapping coordinates from 3D to 2D

Once we estimate the pose, we project the points from the 3D to the 2D. Consider the following image:

As we can see here, the TV remote control is a 3D object but we are seeing it on a 2D plane. Now if we move it around, it will look like this:

This 3D object is still on a 2D plane. The object has moved to a different location and the distance from the camera has changed as well. How do we compute these coordinates? We need a mechanism to map this 3D object onto the 2D surface. This is where the 3D to 2D projection becomes really important.

We just need to estimate the initial camera pose to start with...

Let's add some movements


Now that we know how to add a virtual pyramid, let's see if we can add some movements. Let's see how we can dynamically change the height of the pyramid. When you start, the pyramid will look like this:

If you wait for some time, the pyramid gets taller and it will look like this:

Let's see how to do it in OpenCV Python. Inside the augmented reality code that we just discussed, add the following snippet at the end of the __init__ method in the Tracker class:

self.overlay_vertices = np.float32([[0, 0, 0], [0, 1, 0], [1, 1, 0], [1, 0, 0], [0.5, 0.5, 4]])
self.overlay_edges = [(0, 1), (1, 2), (2, 3), (3, 0),
            (0,4), (1,4), (2,4), (3,4)]
self.color_base = (0, 255, 0)
self.color_lines = (0, 0, 0)

self.graphics_counter = 0
self.time_counter = 0

Now that we have the structure, we need to add the code to dynamically change the height. Replace the overlay_graphics() method with the following method:

def overlay_graphics(self, img, tracked):
    x_start, y_start, x_end...

Summary


In this chapter, you learned about the premise of augmented reality and understood what an augmented reality system looks like. We discussed the geometric transformations required for augmented reality. You learned how to use those transformations to estimate the camera pose. You learned how to track planar objects. We discussed how we can add virtual objects on top of the real world. You learned how to modify the virtual objects in different ways to add cool effects. Remember that the world of computer vision is filled with endless possibilities! This book is designed to teach you the necessary skills to get started on a wide variety of projects. Now it's up to you and your imagination to use the skills you have acquired here to build something unique and interesting.

lock icon
The rest of the chapter is locked
You have been reading a chapter from
OpenCV with Python By Example
Published in: Sep 2015Publisher: PacktISBN-13: 9781785283932
Register for a free Packt account to unlock a world of extra content!
A free Packt account unlocks extra newsletters, articles, discounted offers, and much more. Start advancing your knowledge today.
undefined
Unlock this book and the full library FREE for 7 days
Get unlimited access to 7000+ expert-authored eBooks and videos courses covering every tech area you can think of
Renews at $15.99/month. Cancel anytime

Author (1)

author image
Prateek Joshi

Prateek Joshi is the founder of Plutoshift and a published author of 9 books on Artificial Intelligence. He has been featured on Forbes 30 Under 30, NBC, Bloomberg, CNBC, TechCrunch, and The Business Journals. He has been an invited speaker at conferences such as TEDx, Global Big Data Conference, Machine Learning Developers Conference, and Silicon Valley Deep Learning. Apart from Artificial Intelligence, some of the topics that excite him are number theory, cryptography, and quantum computing. His greater goal is to make Artificial Intelligence accessible to everyone so that it can impact billions of people around the world.
Read more about Prateek Joshi