


To build a strong foundational understanding of how feedforward propagation works, we'll go through a toy example of training a neural network where the input to the neural network is (1, 1) and the corresponding (expected) output is 0. Here, we are going to find the optimal weights of the neural network based on this single input-output pair. However, you should note that in reality, there will be thousands of data points on which an ANN is trained.
Our neural network architecture for this example contains one hidden layer with three nodes in it, as follows:
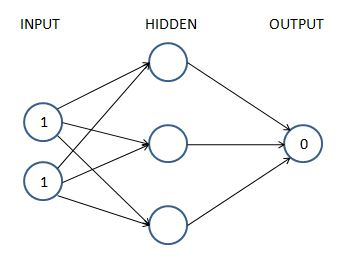
Every arrow in the preceding diagram contains exactly one float value (weight) that is adjustable. There are 9 (6 in the first hidden layer and 3 in the second) floats that we need to find, so that when the input is (1,1), the output is as close to (0) as possible. This is what we mean by training the neural network. We have not introduced a bias value yet, for simplicity purposes only – the underlying logic remains the same.
In the subsequent sections, we will learn the following about the preceding network:
- Calculating hidden layer values
- Performing non-linear activations
- Estimating the output layer value
- Calculating the loss value corresponding to the expected value
Calculating the hidden layer unit values
We'll now assign weights to all of the connections. In the first step, we assign weights randomly across all the connections. And in general, neural networks are initialized with random weights before the training starts. Again, for simplicity, while introducing the topic, we will not include the bias value while learning about feedforward propagation and backpropagation. But we will have it while implementing both feedforward propagation and backpropagation from scratch.
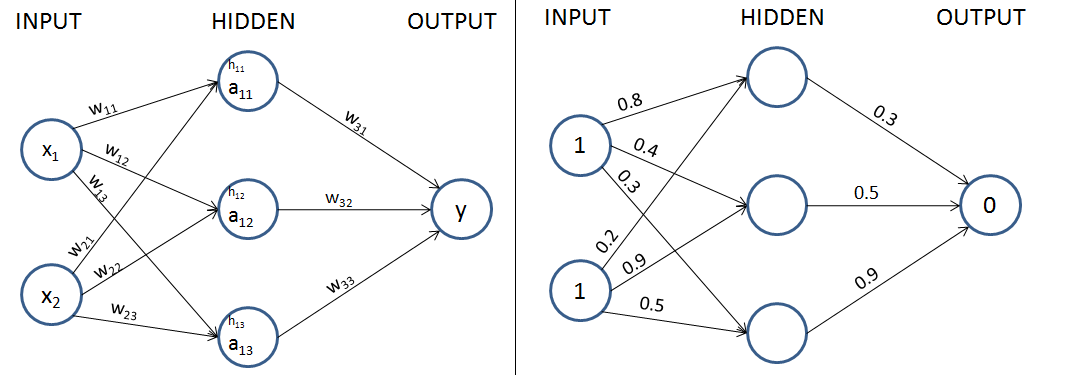
Let's start with initial weights that are randomly initialized between 0 and 1, but note that the final weights after the training process of a neural network don't need to be between a specific set of values. A formal representation of weights and values in the network is provided in the following diagram (left half) and the randomly initialized weights are provided in the network in the right half.
In the next step, we perform the multiplication of the input with weights to calculate the values of hidden units in the hidden layer.
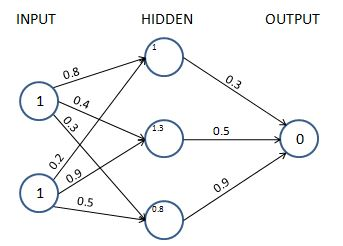
The hidden layer's unit values before activation are obtained as follows:


The hidden layer's unit values (before activation) that are calculated here are also shown in the following diagram:
Now, we will pass the hidden layer values through a non-linearity activation. Note that, if we do not apply a non-linear activation function in the hidden layer, the neural network becomes a giant linear connection from input to output, no matter how many hidden layers exist.
Applying the activation function
Activation functions help in modeling complex relations between the input and the output.
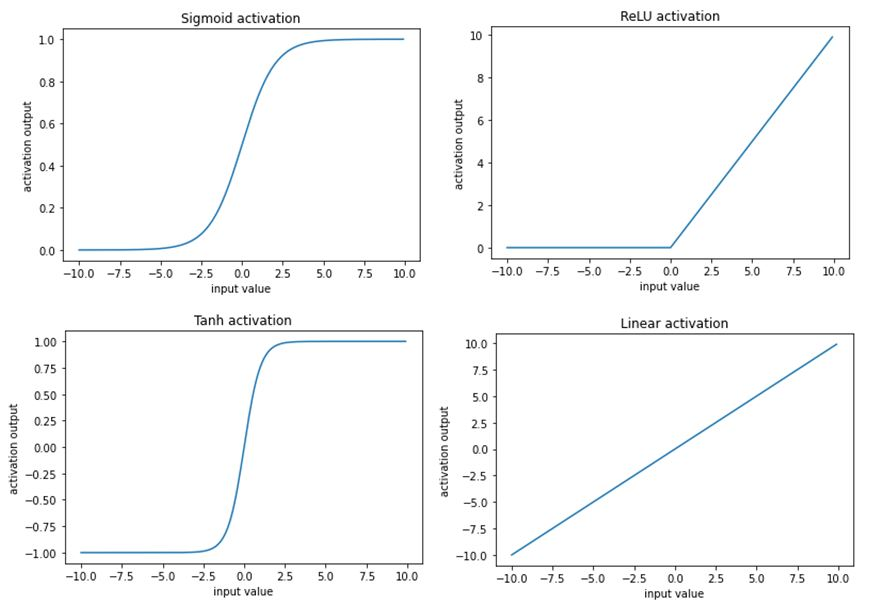
Some of the frequently used activation functions are calculated as follows (where x is the input):


Visualizations of each of the preceding activations for various input values are as follows:
For our example, let’s use the sigmoid (logistic) function for activation.
By applying sigmoid (logistic) activation, S(x), to the three hidden layer sums, we get the following values after sigmoid activation:


Now that we have obtained the hidden layer values after activation, in the next section, we will obtain the output layer values.
Calculating the output layer values
So far, we have calculated the final hidden layer values after applying the sigmoid activation. Using the hidden layer values after activation, and the weight values (which are randomly initialized in the first iteration), we will calculate the output value for our network:
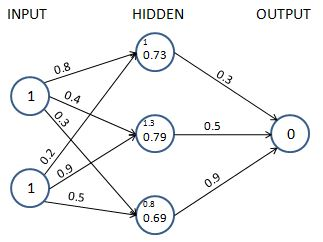
We perform the sum of products of the hidden layer values and weight values to calculate the output value. Another reminder: we excluded the bias terms that need to be added at each unit(node), only to simplify our understanding of the working details of feedforward propagation and backpropagation for now and will include it while coding up feedforward propagation and backpropagation:

Because we started with a random set of weights, the value of the output node is very different from the target. In this case, the difference is 1.235 (remember, the target is 0). In the next section, we will learn about calculating the loss value associated with the network in its current state.
Calculating loss values
Loss values (alternatively called cost functions) are the values that we optimize for in a neural network. To understand how loss values get calculated, let's look at two scenarios:
- Categorical variable prediction
- Continuous variable prediction
Calculating loss during continuous variable prediction
Typically, when the variable is continuous, the loss value is calculated as the mean of the square of the difference in actual values and predictions, that is, we try to minimize the mean squared error by varying the weight values associated with the neural network. The mean squared error value is calculated as follows:


In the preceding equation,  is the actual output.
  is the prediction computed by the neural network
  (whose weights are stored in the form of
  ), where its input is
  , and m is the number of rows in the dataset.
In our example, let's assume that the outcome that we are predicting is continuous. In that case, the loss function value is the mean squared error, which is calculated as follows:

Now that we understand how to calculate the loss value for a continuous variable, in the next section, we will learn about calculating the loss value for a categorical variable.
Calculating loss during categorical variable prediction
When the variable to predict is discrete (that is, there are only a few categories in the variable), we typically use a categorical cross-entropy loss function. When the variable to predict has two distinct values within it, the loss function is binary cross-entropy.
Binary cross-entropy is calculated as follows:

y is the actual value of the output, p is the predicted value of the output, and m is the total number of data points.
Categorical cross-entropy is calculated as follows:

y is the actual value of the output, p is the predicted value of the output, m is the total number of data points, and C is the total number of classes.
A simple way of visualizing cross-entropy loss is to look at the prediction matrix itself. Say you are predicting five classes – Dog, Cat, Rat, Cow, and Hen – in an image recognition problem. The neural network would necessarily have five neurons in the last layer with softmax activation (more on softmax in the next section). It will be thus forced to predict a probability for every class, for every data point. Say there are five images and the prediction probabilities look like so (the highlighted cell in each row corresponds to the target class):
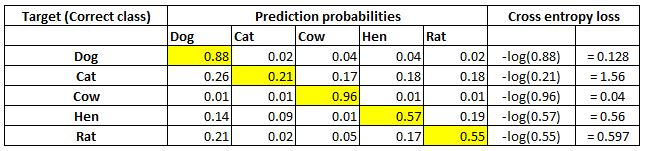
Note that each row sums to 1. In the first row, when the target is Dog and the prediction probability is 0.88, the corresponding loss is 0.128 (which is the negative of the log of 0.88). Similarly, other losses are computed. As you can see, the loss value is less when the probability of the correct class is high. As you know, the probabilities range between 0 and 1. So, the minimum possible loss can be 0 (when the probability is 1) and the maximum loss can be infinity when the probability is 0.
The final loss within a dataset is the mean of all individual losses across all rows.
Now that we have a solid understanding of calculating mean squared error loss and cross-entropy loss, let's get back to our toy example. Assuming our output is a continuous variable, we will learn how to minimize the loss value using backpropagation in a later section. We will update the weight values  (which were initialized randomly earlier) to minimize the loss (
 ). But, before that, let's first code feedforward propagation in Python using NumPy arrays to solidify our understanding of its working details.
Feedforward propagation in code
A high-level strategy of coding feedforward propagation is as follows:
- Perform a sum product at each neuron.
- Compute activation.
- Repeat the first two steps at each neuron until the output layer.
- Compute the loss by comparing the prediction with the actual output.
It is going to be a function that takes in input data, current neural network weights, and output data as the inputs to the function and returns the loss of the current network state.
The feedforward function to calculate the mean squared error loss values across all data points is as follows:
We strongly encourage you to execute the code notebooks by clicking the Open in Colab button in each notebook. A sample screenshot is as follows:
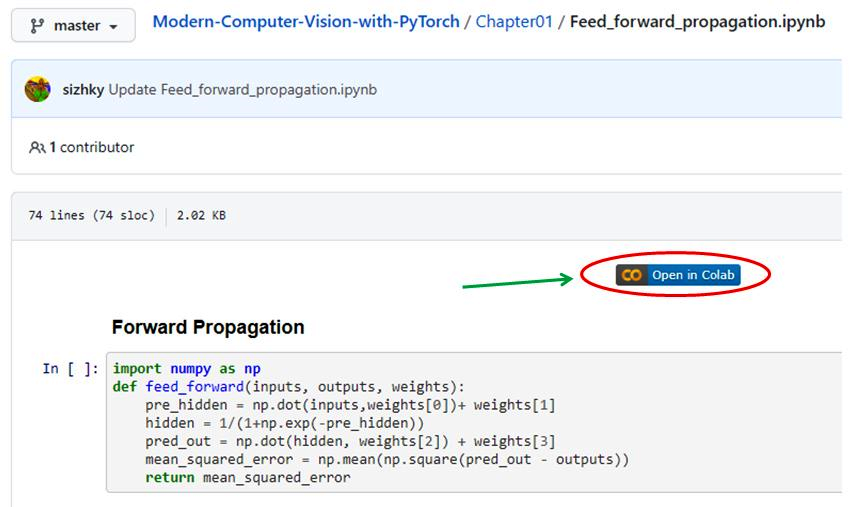
Once you click on Open in Colab (highlighted in the preceding screenshot), you will be able to execute all the code without any hassle and should be able to replicate the results shown in this book.
With the way to execute code in place, let's go ahead and code feedforward propagation:
- Take the input variable values (inputs), weights (randomly initialized if this is the first iteration), and the actual outputs in the provided dataset as the parameters of the feed_forward function:
import numpy as np
def feed_forward(inputs, outputs, weights):
To make this exercise a little more realistic, we will have bias associated with each node. Thus the weights array will contain not only the weights connecting different nodes but also the bias associated with nodes in hidden/ output layers.
- Calculate hidden layer values by performing the matrix multiplication (np.dot) of inputs and weight values (weights[0]) connecting the input layer to the hidden layer and add the bias terms (weights[1]) associated with the hidden layer's nodes:
pre_hidden = np.dot(inputs,weights[0])+ weights[1]
- Apply the sigmoid activation function on top of the hidden layer values obtained in the previous step – pre_hidden:
hidden = 1/(1+np.exp(-pre_hidden))
- Calculate the output layer values by performing the matrix multiplication (np.dot) of hidden layer activation values (hidden) and weights connecting the hidden layer to the output layer (weights[2]) and summing the output with bias associated with the node in the output layer – weights[3]:
pred_out = np.dot(hidden, weights[2]) + weights[3]
- Calculate the mean squared error value across the dataset and return the mean squared error:
    mean_squared_error = np.mean(np.square(pred_out \
                                           - outputs))
    return mean_squared_error
We are now in a position to get the mean squared error value as we forward-pass through the network.
Before we learn about backpropagation, let's learn about some constituents of the feedforward network that we built previously – the activation functions and loss value calculation – by implementing them in NumPy so that we have a detailed understanding of how they work.
Activation functions in code
While we applied the sigmoid activation on top of the hidden layer values in the preceding code, let's examine other activation functions that are commonly used:
- Tanh: The tanh activation of a value (the hidden layer unit value) is calculated as follows:
def tanh(x):
    return (np.exp(x)-np.exp(-x))/(np.exp(x)+np.exp(-x))
- ReLU: The Rectified Linear Unit (ReLU) of a value (the hidden layer unit value) is calculated as follows:
def relu(x):
    return np.where(x>0,x,0)
- Linear: The linear activation of a value is the value itself. This is represented as follows:
def linear(x):
    return x
- Softmax: Unlike other activations, softmax is performed on top of an array of values. This is generally done to determine the probability of an input belonging to one of the m number of possible output classes in a given scenario. Let's say we are trying to classify an image of a digit into one of the possible 10 classes (numbers from 0 to 9). In this case, there are 10 output values, where each output value should represent the probability of an input image belonging to one of the 10 classes.
Softmax activation is used to provide a probability value for each class in the output and is calculated as follows:
def softmax(x):
    return np.exp(x)/np.sum(np.exp(x))
Notice the two operations on top of input x – np.exp will make all values positive, and the division by np.sum(np.exp(x)) of all such exponents will force all the values to be in between 0 and 1. This range coincides with the probability of an event. And this is what we mean by returning a probability vector.
Now that we have learned about various activation functions, next, we will learn about the different loss functions.
Loss functions in code
Loss values (which are minimized during a neural network training process) are minimized by updating weight values. Defining the proper loss function is the key to building a working and reliable neural network model. The loss functions that are generally used while building a neural network are as follows:
- Mean squared error: The mean squared error is the squared difference between the actual and the predicted values of the output. We take a square of the error, as the error can be positive or negative (when the predicted value is greater than the actual value and vice versa). Squaring ensures that positive and negative errors do not offset each other. We calculate the mean of the squared error so that the error over two different datasets is comparable when the datasets are not of the same size.
The mean squared error between an array of predicted output values (p) and an array of actual output values (y) is calculated as follows:
def mse(p, y):
    return np.mean(np.square(p - y))
The mean squared error is typically used when trying to predict a value that is continuous in nature.
- Mean absolute error: The mean absolute error works in a manner that is very similar to the mean squared error. The mean absolute error ensures that positive and negative errors do not offset each other by taking an average of the absolute difference between the actual and predicted values across all data points.
The mean absolute error between an array of predicted output values (p) and an array of actual output values (y) is implemented as follows:
def mae(p, y):
    return np.mean(np.abs(p-y))
Similar to the mean squared error, the mean absolute error is generally employed on continuous variables. Further, in general, it is preferable to have a mean absolute error as a loss function when the outputs to predict have a value less than 1, as the mean squared error would reduce the magnitude of loss considerably (the square of a number between 1 and -1 is an even smaller number) when the expected output is less than 1.
- Binary cross-entropy: Cross-entropy is a measure of the difference between two different distributions: actual and predicted. Binary cross-entropy is applied to binary output data, unlike the previous two loss functions that we discussed (which are applied during continuous variable prediction).
Binary cross-entropy between an array of predicted values (p) and an array of actual values (y) is implemented as follows:
def binary_cross_entropy(p, y):
    return -np.mean(np.sum((y*np.log(p)+(1-y)*np.log(1-p))))
Note that binary cross-entropy loss has a high value when the predicted value is far away from the actual value and a low value when the predicted and actual values are close.
- Categorical cross-entropy: Categorical cross-entropy between an array of predicted values (p) and an array of actual values (y) is implemented as follows:
def categorical_cross_entropy(p, y):
    return -np.mean(np.sum(y*np.log(p)))
So far, we have learned about feedforward propagation, and various components, such as weight initialization, bias associated with nodes, activation, and loss functions, that constitute it. In the next section, we will learn about backpropagation, a technique to adjust weights so that they will result in a loss that is as small as possible.