Reader small image

You're reading from  Getting Started with Talend Open Studio for Data Integration

Product typeBook
Published inNov 2012
Reading LevelIntermediate
PublisherPackt
ISBN-139781849514729
Edition1st Edition
Languages
Tools
Right arrow
Author (1)
Jonathan Bowen
Jonathan Bowen
author image
Jonathan Bowen

Jonathan Bowen is an E-commerce and Retail Systems Consultant and has worked in and around the retail industry for the past 20 years. His early career was in retail operations, then in the late 1990s he switched to the back office and has been integrating and implementing retail systems ever since. Since 2006, he has worked for one of the UKs largest e-commerce platform vendors as Head of Projects and, later, Head of Product Strategy. In that time he has worked on over 30 major e-commerce implementations. Outside of work, Jonathan, like many parents, has a busy schedule of sporting events, music lessons, and parties to take his kids to, and any downtime is often spent catching up with the latest tech news or trying to record electronic music in his home studio. You can get in touch with Jonathan at his website: www.learnintegration.com.
Read more about Jonathan Bowen

Right arrow

Chapter 2. Working with Talend Open Studio

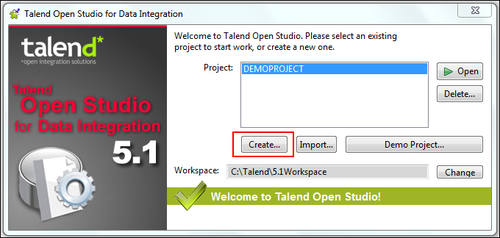
Now that we have the Studio installed, we can start to build integration jobs. However, before we dive straight in with some complex developments, let's get familiar with the working environment, get ourselves organized, and start with something simple.

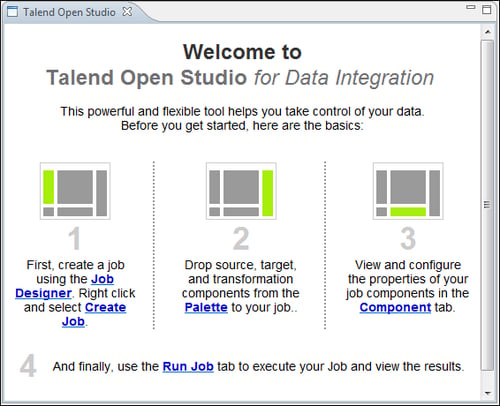
In this chapter, we will:

  • Learn how to log on to the Studio

  • Get a tour of the Studio's environment and find out the different elements that make up the Studio tool

  • Learn how to create a new project and a new job

  • Learn about metadata—what it is and how it is used in the Studio

Studio definitions


Let's start with a few definitions to make everything clear:

  • A workspace is a directory on your computer that contains one or more projects

  • A project is a logical grouping of one or more jobs

  • A job is a group or one or more components that, when executed, implement a data flow or integration process

We will create each of these as we work through the chapter.

Starting the Studio


The Studio is a cross-platform development tool and supports Windows, Linux, and Mac OS in both 32-bit and 64-bit versions. To start the Studio, go to the directory where the Studio was installed, and double-click on the executable appropriate for your operating system.

  1. When you start the Studio for the first time, you will be presented with a license notification. Click on Accept to proceed. We will then see the first-time start up screen and we are presented with a few options at this point. We can:

    • Import a demo project

    • Create a new project

    • Change some basic settings

  2. We will start by amending some settings. Click on Advanced. You will see the following screen:

  3. The first thing we will do is change the workspace location. You can leave it with the default value if you want, but the path is a little convoluted, so it is worth changing it. Click on the Change button and select an appropriate path, such as C:\Talend\Workspace.

  4. You will then see a prompt to restart the Studio...

Tour of the Studio


Let's look at the Studio environment. To help illustrate the different windows and views of the Studio tool, we will open a job from the demo project.

In the left-hand column of the Studio tool, we will see the Repository window. The Repository contains all of the artifacts associated with a project—Job Designs, Business Models, Metadata, and so on—as shown in the following screenshot:

Expand the Job Designs section of the Repository and double-click on the job named priorTest 0.1. This will open the priorTest job as shown in the following screenshot:

The Repository

As noted earlier, the Repository window, shown in the top-left of the Studio, contains all of the artifacts associated with a project. This will typically include:

  • One or more job definitions

  • Metadata items such as database connection details, FTP connection details, and file schema definitions

  • Reusable code snippets

  • Business Models that describe the non-technical workflows of a data integration job

  • Contexts—global...

Creating a new project


Let's now create a new project, which we will use as a container for all of the example jobs illustrated in later chapters of the book.

Start the Studio (or if it is already open, go to File | Switch Project) and wait for the logon screen to appear. We will see our demo project in the list of projects but we won't open this project; instead, we'll create a new one. Click on the Create button as shown in the following screenshot:

You will be prompted to enter a project name. Enter BEGINNERSGUIDE, optionally adding a project description if you wish, and click on the Finish button. You'll now see the new project in the project list. Highlight the BEGINNERSGUIDE project and click on the Open button.

Once the Studio is open, we will see the standard Studio layout as described previously. Let's create a simple job to illustrate the development process and give you some hands-on experience with the Studio.

Creating an example job


The Studio helpfully describes the development process for you on the default design workspace window.

The basic process is as follows:

  1. Create a job in the Repository.

  2. Drop components from the Palette onto the design workspace of your job.

  3. Configure the properties of the components.

  4. Run the job and view the results.

Simple, right?

In the time-honored tradition of programming books, our first job will be a simple "hello world" job. Follow the given steps:

  1. In the Repository, right-click on Job Designs and select Create Job.

  2. We will be presented with the New Job window as shown in the following screenshot:

  3. Enter HelloWorld into the Name field and click on Finish. Our new job will open, showing the design workspace window.

  4. In the Palette, search for message. In the Misc folder, we have a component named tMsgBox. Drag this onto the design workspace.

  5. Click on the message box component and click on the Component tab of the configuration area below the design workspace. We will see...

Metadata


For the final part of this chapter, let's look at how the Studio uses "metadata". Metadata is defined as "data about data". It describes the data, but isn't the data itself. In the Studio context, metadata refers to reusable configurations that describe the data, its attributes, or its containers. For example, we could define metadata in the Studio that describes an XML schema, a web service definition, or an FTP connection. Once defined, these configurations can be used across multiple Studio jobs.

The benefit of metadata components is that they save developers time as they are defined once and used many times. They also provide a single place to update configurations for many jobs. For example, if the password to an FTP account changes and this FTP connection is used in 10 different jobs, the details would have to be updated 10 times. However, if you store this configuration in a single metadata component, it only needs to be updated once.

Let's work through an example of metadata...

Summary


In this chapter, we looked at the Studio working environment and introduced some of the standard tasks you will undertake as a developer, such as creating projects, jobs, and metadata. We created a "Hello World" job that illustrated a simple development process and executed the job to see how the Studio presents its results.

In the next chapter, we will get truly hands on with the Studio and create some jobs that transform data files.

lock icon
The rest of the chapter is locked
You have been reading a chapter from
Getting Started with Talend Open Studio for Data Integration
Published in: Nov 2012Publisher: PacktISBN-13: 9781849514729
Register for a free Packt account to unlock a world of extra content!
A free Packt account unlocks extra newsletters, articles, discounted offers, and much more. Start advancing your knowledge today.
undefined
Unlock this book and the full library FREE for 7 days
Get unlimited access to 7000+ expert-authored eBooks and videos courses covering every tech area you can think of
Renews at $15.99/month. Cancel anytime

Author (1)

author image
Jonathan Bowen

Jonathan Bowen is an E-commerce and Retail Systems Consultant and has worked in and around the retail industry for the past 20 years. His early career was in retail operations, then in the late 1990s he switched to the back office and has been integrating and implementing retail systems ever since. Since 2006, he has worked for one of the UKs largest e-commerce platform vendors as Head of Projects and, later, Head of Product Strategy. In that time he has worked on over 30 major e-commerce implementations. Outside of work, Jonathan, like many parents, has a busy schedule of sporting events, music lessons, and parties to take his kids to, and any downtime is often spent catching up with the latest tech news or trying to record electronic music in his home studio. You can get in touch with Jonathan at his website: www.learnintegration.com.
Read more about Jonathan Bowen