Search icon
Arrow left icon
All Products
Best Sellers
New Releases
Books
Videos
Audiobooks
Learning Hub
Newsletters
Free Learning
Arrow right icon
3D Printing Blueprints

You're reading from  3D Printing Blueprints

Product type Book
Published in Aug 2013
Publisher Packt
ISBN-13 9781849697088
Pages 310 pages
Edition 1st Edition
Languages
Concepts
Author (1):
Joe Larson Joe Larson
Profile icon Joe Larson

Table of Contents (17) Chapters

3D Printing Blueprints
Credits
About the Author
About the Reviewers
www.PacktPub.com
Preface
1. Design Tools and Basics 2. Mini Mug 3. Face Illusion Vase 4. SD Card Holder Ring 5. Modular Robot Toy 6. D6 Spinner 7. Teddy Bear Figurine 8. Repairing Bad Models 9. Stretchy Bracelet 10. Measuring – Tips and Tricks Index

Chapter 7. Teddy Bear Figurine

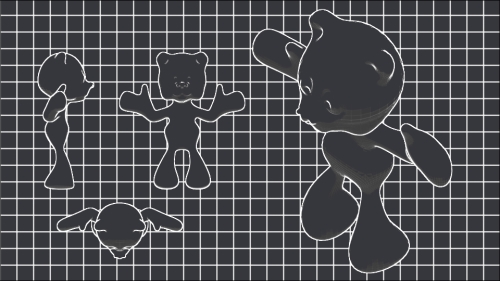
Basic shapes, vector manipulation, and Boolean modifiers aren't the only way to model in Blender. One of Blender's strengths is the eclectic blend of tools that it offers. In this project a simple organic shape will be modeled and posed for printing. Starting with a basic stick figure, then fleshing the stick figure out and giving it proper form and shape. And that shape will be of a Teddy bear!

The rules of 3D modeling like overhang and bridges are still important, even if the tools that were used have changed. But for the most part, those rules can wait until the end where they will be applied, with a little finesse.

Making a stick figure


Begin this project like all the rest. Clear the scene and save it in a new directory under MakerbotBlueprints called Ch 7 Teddy Bear and name the file Teddybear.Blend.

In the beginning all that is needed is a single point. Unfortunately Blender doesn't have an object that is just a single vertex. Fortunately it does have many basic shapes from where a single point can be taken.

  1. Begin by adding (Shift + A) a Plane.

  2. Rename this plane Bearskin.

  3. Enter Edit Mode (Tab).

  4. Select all but one vertex and Delete (X) them so there is only one left.

  5. Select and Move (G) the one remaining vertex to the origin.

    Tip

    It is important that this point ends up exactly at the origin for the next step to work. With a plane whatever point is left is exactly 1 unit in two axes away from the origin, so the best way to ensure it is at the exact origin; this is where we should type the commands and not use the mouse. For the earlier illustration, typing the following keys will center the point perfectly...

Putting the skin on the bones


This stick figure will be the bones of the figure. Blender has a very cool modifier that will thicken any stick mesh into a full bodied mesh. It is called, appropriately enough, Skin.

  • Add the Skin modifier to the mesh

It might not be immediately apparent, but now every stick has a 3-dimensional shape wrapped around it. To make the effect more apparent, use the Skin Resize (Ctrl + A) operator. This will be a temporary step to see the effect first:

  1. Select all points (A).

  2. Move the mouse pointer to a point closer to the center of the skeleton.

  3. Press Ctrl + A to begin the Skin Resize operation.

  4. Move the mouse pointer away from the skeleton until the mesh thickens up.

  5. Left-click to complete the operation.

The skin resize operator can alter each point independently so the shape does not have to be uniform.

  1. Undo (Ctrl + Z) the previous operation back to a thin sticks all around.

  2. Select (right-click) the vertex where the legs meet and Skin Resize (Ctrl + A) to make a nice big...

Adjusting for the third dimension


As it is so far this is a fine gingerbread man with its stance so flat. To add some life to this model, simply adjust it in all three dimensions. And to aid in this a new view will be introduced; Quad View.

  • In the menu at the bottom of the 3D View panel select View | Toggle Quad View or press Ctrl + Alt + Q.

The utility of this view is to simultaneously view the model from many different angles. The disadvantage is that each of the views is a quarter the screen size making details hard to see.

In quad view the location of the pointer when using hot keys is more important than ever:

  1. As long as the mouse pointer is over any of the 3D views the number pad keys will only adjust the upper-right User Persp view.

  2. Using the middle-click will only free rotate the view point if the mouse pointer starts over the upper-right view and will do nothing in the other views.

  3. Zooming with the mouse wheel or the Numpad + and Numpad - keys only zooms the view that the mouse pointer...

Making an armature


An armature is used generally in 3D animation to move the model in natural ways. The idea and name comes from Claymation where a metal frame, sometimes with hinges sometimes just made from bendable material, would be built into the clay model like a skeleton to hold it upright and maintain poses, while the animation is accomplished frame-by-frame. In computer modeling the armature is used in a similar way to define the pose of a complex model by manipulating just a few skeleton lines.

Normally when modeling characters the process of building an armature is a complicated one involving many steps that would be outside the scope of this work. However, by using the skin modifier the process is simplified significantly.

This marks the beginning of another major section so this is a reminder about saving (Ctrl + S) and incremental saves.

  1. Exit Edit Mode (Tab).

  2. Open the modifiers panel and Apply the Mirror modifier.

  3. On the Skin modifier click on the Create Armature button.

Now the original...

Drawing the details


Blender's sculpting tools allow for organic modeling of objects with simple motions. As of version 2.66 those tools were updated with Dynamic Topology, making them nearly as good as commercial sculpting tools. In the past sculpt mode worked best with very high resolution models, but now the resolution can be automatically and dynamically changed in local areas keeping the rest of the mesh a more manageable resolution.

Tip

Slow down with this part. The tools and techniques taught in this section are very much like drawing, only in 3D. Some users may find this more suited to their tastes. While there may not be as many steps shown expect to take a little extra time doing each step until it looks right. Just like with pen and paper good drawing takes time. Slow down, take it easy, and enjoy the process.

Another tip for drawing is zooming out frequently. Staying zoomed in all the time it becomes difficult to see the whole for the details sometimes. It's best to zoom in, do some...

Simplifying the model


One of the problems with Dynamic Topology is that meshes can quickly gain a lot of polygons making a more complex shape. With high polygon models even powerful computers can slow down. Fortunately, it is easy to reduce the number of polygons in a model often without making any visible difference in the model, while reducing how hard the computer has to work.

  • In the modifier tab on the Properties panel on the right press the Add Modifier button and select the Decimate modifier.

Decimate works by entering a ratio between 0 and 1 and reducing the polygons in the model until they match the ratio. So to reduce the polygons to 1/10 of their original count a ratio of 0.1 would be entered. Decimate attempts to remove polygons that won't be noticed, but if the count is reduced too much it becomes very apparent. The following illustration is the teddy bear model at about 100 polygons, 200 polygons, 500 polygons, 900, and 9000, and 90,000 polygons:

There comes a point of diminishing...

Fixing the armature weights


Sculpting the model added geometry. Decimate took some away. Even if the weights attached to the armature were correct to start with it's very unlikely that they would still be. In order to make the armature useful again the weights need to be repainted.

  1. Switch the BearSkin to Weight Paint mode (Ctrl + Tab).

  2. In the Outliner panel unhide the Armature.

  3. Select the Armature in the Outliner panel and insure that it is in Pose Mode.

  4. Insure that the Pose Position button is selected in the armature object data tab.

With the BearSkin in Weight Paint mode and the Armature in Pose mode/Pose Position, it is time to fix the weights.

Similar to sculpt mode, the weight paint mode has a set of brush tools, but really there is only one brush necessary. The draw brush has a blend option that duplicates all the other brushes and is considerably easier to find the tool desired.

  1. Select (right-click) the BearSkin.

  2. Verify the Weight and Strength are 1.

The procedure is as follows:

  1. Select a bone...

Posing the bear


This bear is a great looking model, but it's not printable the way it is. Keeping in mind the overhang and bridging rules from Chapter 1, Design Tools and Basics, the bear needs to be put in a pose that will print. The legs are a clear problem so the bear will be made to sit on a box.

Use the combo box at the bottom of the 3D View panel to switch from BearSkin to Object Mode.

  1. Add (Shift + A) a cube to the scene.

  2. Scale (S) and position (G) it so it is under the bear's hips.

  3. Select (right-click) the hip bone in the armature.

  4. Rotate (R) the hip bone around the x axis (X) to make the bear sit.

  5. Select (right-click) the calf bone.

  6. Rotate it (R) around the x axis (X) to bend the knee.

  7. Repeat with the other leg.

  8. Select (right-click) and Rotate (R) the cube around the z axis (Z).

  9. Position (G) the cube in the xy plane (Shift + Z) to put it properly under the bear.

  10. Select (right-click) the bone through the body.

  11. Rotate (R) it slightly around the x axis (X) to get the bear to lean back a little...

Inspecting before print


  1. Select (right-click) the cube.

  2. Duplicate (Shift + D) it.

  3. Hide all but the duplicated cube (Shift + H).

  4. Boolean Union it with the BearSkin.

  5. Name this cube Finalfigure.

    Inspect the FinalFigure from all angles, particularly the side views, looking for unprintable areas that violate the 45 degree rule badly. In this case there is at least one area that stands out. The back of the head juts out like a shelf. That's going to cause problems. The tools to fix this part are already known.

  6. Before fixing this Apply the Boolean modifier.

  7. Enter Sculpt Mode using the combo box at the bottom of the 3D View panel.

  8. Use a wide brush (F) and a combination of the SculptDraw brush on subtract and smooth brush to reduce the back of the head until it is a better angle for printing.

Quad View (Ctrl + Alt + Q) may help here to quickly ensure the changes made here are as desired. The feet may also need to be sculpted for print.

While in sculpt mode the Smooth brush can be used to fix any other problem...

Extra credit


These tools have application beyond making Teddy Bear figurines. The technique in this chapter can be extended to custom game mini-figurines. Also the skin tool can be used alone to make a wireframe model suitable for miniatures like a trellis bridge for a train set or a half constructed building or a bird cage. Many artistic projects have been made using the skin tool over a mathematically interesting mesh that can be used as conversation pieces or plant holders.

Summary


There's more than one way to create a 3D model. The different tools available allow for all kinds of modeling, not just blocky technical parts but clever organic objects that are interesting to look at as well:

  • Using the skin modifier to create a basic body shape

  • Using the skin modifier to create an armature

  • Painting weights and posing the model with an armature

  • Using the sculpt tool to make a model with tools similar to drawing

  • Using the decimate modifier to reduce the polygon count of a model

At this point all the most common and powerful techniques for creating models from scratch in Blender have been introduced. The next chapter will focus on how Blender can be used to clean up an existing model to make it ready for print.

lock icon The rest of the chapter is locked
You have been reading a chapter from
3D Printing Blueprints
Published in: Aug 2013 Publisher: Packt ISBN-13: 9781849697088
Register for a free Packt account to unlock a world of extra content!
A free Packt account unlocks extra newsletters, articles, discounted offers, and much more. Start advancing your knowledge today.
Unlock this book and the full library FREE for 7 days
Get unlimited access to 7000+ expert-authored eBooks and videos courses covering every tech area you can think of
Renews at $15.99/month. Cancel anytime}