


Exploring Azure Storage
Azure has multiple storage options that can suit a wide range of applications and domains. We will explore the most common ones here.
Azure Blob storage
Blob storage is the most common storage type in Azure. It can be used to store unstructured data such as videos, audio, metadata, log files, text, and binary. It is a highly scalable and a very cost-effective storage solution. It provides support for tiered storage, so the data can be stored at different tiers based on their access pattern and usage frequency. Highly used data can be kept at hot tiers, the not-so-used data in cold tiers, and historical data can be archived. The data in Blob storage can be easily accessed via REST endpoints, as well as client libraries available in a wide set of languages, such as .NET, Java, Python, Ruby, PHP, Node.js, and more.
Blob Storage
You can access your Blob Storage at https://<storage-account>.blob.core.windows.net.
The following screenshot shows the creation of a storage account from the Azure portal:
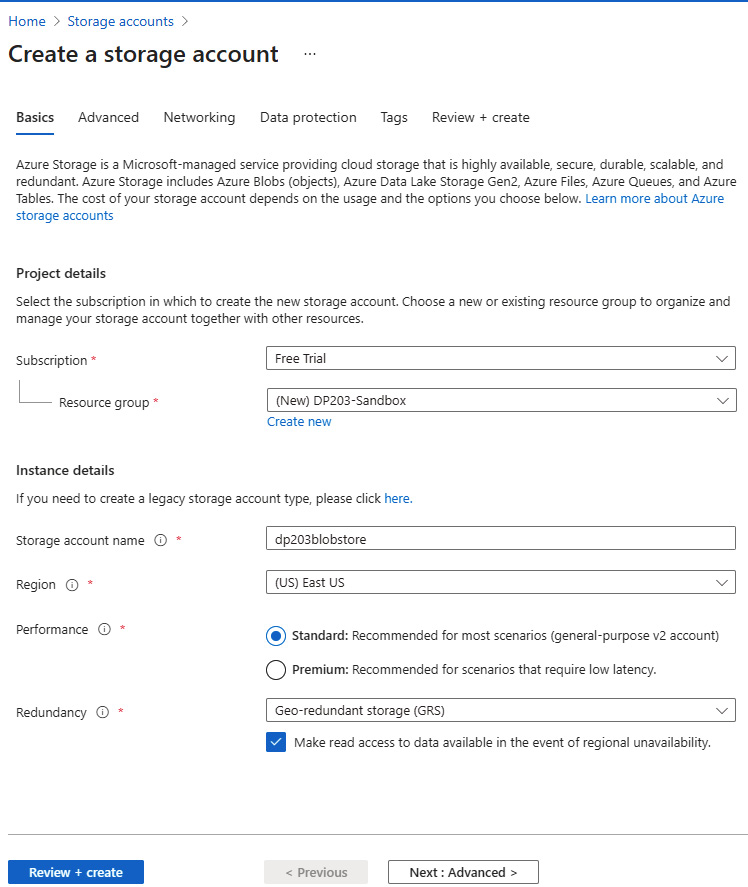
Figure 1.6 – Creating a storage account using the Azure portal
Go ahead and create a storage account now, if you don't already have one. You will need this storage account throughout this book to store all the sample data, scripts, and more.
Now, let's look at another important storage option provided by Azure that will be used extensively for data lakes: Azure Data Lake Gen2.
Azure Data Lake Gen 2
Azure Data Lake Gen2 or Azure Data Lake Storage Gen 2 (ADLS Gen2) is a superset of Blob storage that is optimized for big data analytics. ADLS Gen2 is the preferred option for data lake solutions in Azure. It provides hierarchical namespace support on top of Blob storage. Hierarchical namespace support just means that directories are supported. Unlike Blob storage, which provides pseudo directory operations via namespaces, ADLS Gen2 provides real support for directories with POSIX compliance and Access Control List (ACL) support. This makes operations such as renaming and deleting directories atomic and quick. For example, if you have 100 files under a directory in Blob storage, renaming that directory would require hundred metadata operations. But, in ADLS Gen2, just one metadata operation will need to be performed at the directory level. ADLS Gen2 also supports role-based access controls (RBACs), just like Blob storage does.
Another important feature of ADL Gen2 is that it is a Hadoop-compatible filesystem. So, building any open source analytics pipeline on top of ADL Gen2 is a breeze.
Since we are talking about ADL Gen2, you might be curious to learn about what happened to ADL Gen1.
ADL Gen1, as its name suggests, was the first generation of highly scalable and high-performing data lake storage that was built for data analytics. It is still available but will be deprecated in February 2024. ADLS Gen1 is optimized for large files, so it works best for file sizes of 256 MB and above. The features of Gen1 are available in Gen2 now. Gen2 also has some additional advantages, such as better regional availability, meaning that it is available in all Azure regions, compared to a select few regions where Gen1 is available. Gen2 also supports Locally Redundant Storage (LRS), Zone Redundant Storage (ZRD), and Geo Redundant Storage (GRS) for data redundancy and recovery, while Gen1 only supports LRS.
ADLS Gen2
You can access ADLS Gen2 at https://<storage-account>.dfs.core.windows.net.
To create an ADLS Gen2 account, you need to select the Enable hierarchical namespace checkbox on the Create a storage account screen:
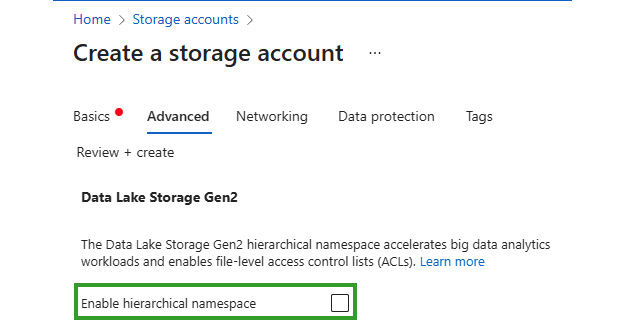
Figure 1.7 – Selecting Data Lake Storage Gen2 (Enable hierarchical namespace) while creating an Azure Storage instance
Next, let's learn about another Azure storage technology called Azure Files.
Azure Files
Azure Files provides remote file shares that can be mounted using Server Message Block (SMB) or Network File Share (NFS) protocols. These are great storage options for anyone planning to migrate on-premises workloads to the cloud with a lift and shift model, for instance, without having to invest in redevelopment for the cloud-based model. Azure files can easily be mounted both from cloud servers and on-premises servers. Azure Files is particularly useful for cases that need shared data, shared configurations, shared applications, and more across multiple users, teams, or regions. Let's look at some example commands for how to create file shares in Azure.
Creating Azure file shares with the Azure CLI
As we have already seen a few prior examples of using the Azure portal, let's explore this one using the Azure CLI so that we become familiar with the command-line options too. We will continue to use the IAC example here so that you get a good understanding of how to use the CLI with real examples. You can just glance through these examples to get an idea of how the Azure File commands are structured.
For the following examples, we will need a resource group and a storage account to be created. We can reuse the resource group IACRG, that we created in the "Creating a VM using CLI" section. For storage account, we can easily create one as shown here.
az storage account create --resource-group IACRG --name iacstorage --location eastus --kind StorageV2 --sku Standard_LRS.
This will create a storage account named iacstorage. The storage account names have to be unique, so you might have to find a name that is not already used. Once we have the storage account created, you can visit the storage account page in Azure portal. From under the Access Keys tab, you can copy the Primary Key (Key1), which will be required to perform any activity on this storage account. Once copied, export the following two variables from your CLI screen as shown:
export AZURE_STORAGE_ACCOUNT=<your storage account name>
export AZURE_STORAGE_KEY=<your storage primary key>
If you are using a Windows machine, please refer to this book's GitHub link to find examples of exporting variables in Windows.
Note:
Using the primary key is an easy way to access the storage but not a recommended option to use in production systems. The book will discuss more secure options later in the chapters.
Let's get started:
- You can create a new Azure file share for IAC using the
share-rm createoption. The following command will create a file share namediacfileshareunder theiacstorage.az storage share-rm create --resource-group IACRG --storage-account iacstorage --name iacfileshare
- You can list the file shares using the
share listoption:az storage share list --account-name iacstorage
- You can put a file into our file share using the
file uploadoption:az storage file upload --share-name iacfileshare --source ./testfile.txt
- You can view the files in your file share using
file list:az storage file list --share-name iacfileshare
- Finally, you can download the file that we previously uploaded using the
file downloadoption:az storage file download --share-name iacfileshare -p testfile.txt --dest ./testfile.txt
As you can see, Azure provides a very easy and intuitive set of commands for interfacing with the various Azure services that are available.
Let us next look at Azure Queues.
Azure Queues
Azure queues are used to store a large number of messages that can be accessed asynchronously between the source and the destination. This helps in decoupling applications so that they can scale independently. Azure queues can be used across applications that are running in the cloud, on-premises, on mobile devices, and more. There are two types of queues: Storage queues and Service Bus.
Storage queues can be used for simple asynchronous message processing. They can store up to 500 TB of data (per storage account) and each message can be up to 64 KB in size. If your application needs more than a simple async queue and needs advanced features such as pub-sub models, strict ordering of messages, and blocking and non-blocking APIs, then Service Bus is a better option. With Service Bus, the message sizes can be up to 1 MB but the overall size is capped at 80 GB.
Azure Queues
Azure queues URL: https://<storage account>.queue.core.windows.net/<queue>.
Now, let's look at some example commands for creating queues in Azure.
Creating Azure Queues using the CLI
Let's look at some sample CLI commands for creating and using an Azure Queue. Again, we will assume that the AZURE_STORAGE_ACCOUNT and AZURE_STORAGE_KEY environment variables have already been set:
- You can create a new Azure queue using the
storage queue createcommand. The following command will create a queue namediacqueueunder theiacstorage.az storage queue create --name iacqueue --account-name iacstorage
- You can easily list the queues under a storage account using the
storage queue listterm:az storage queue list --account-name iacstorage
- You can add a new message to the newly created queue using the
storage message putoption:az storage message put --queue-name iacqueue --content "test"
- Finally, use the
storage message peekcommand to view the message. This command retrieves one or more messages from the front of the queue but does not alter the visibility of the message:az storage message peek --queue-name iacqueue
Now that you understand the basics of Azure queues, let's look at Azure tables.
Azure tables
Azure tables are key-value stores provided by Azure. They are good for storing structured non-relational data. There are two solutions available in Azure for Table stores: Azure Table Storage and Cosmos DB.
Both these features provide the same table model and Create, Read, Update, and Delete (CRUD) features, but the difference lies in their scale, SLAs, and availability. Cosmos DB is the premium version of Table store and can provide more than 10 million operations per second, whereas Azure Table storage has a scaling limit of 20K operations per second.
Cosmos DB also provides several additional advantages, such as five flexible levels of consistency, up to 99.999% read availability on multi-region databases, serverless mode, global presence, and more. CosmosDB deserves a complete chapter on its own. We will explore CosmosDB in more detail later in this book.
Azure Table
Azure Table URL: http://<storage account>.table.core.windows.net/<table>.
Like the other storage options we looked at, let's look at some example CLI commands to become familiar with this technology. You can just glance through these examples for now. We will provide detailed steps for implementing the examples required for the certification later in this book.
Creating Azure tables using the CLI
Let's learn how to use the Azure CLI to create and use an Azure Table:
- We can create a new Azure Table for our example company, IAC, by using the
storage table createoption. The following command will create a table namediactableunder theiacstoragestorage account. Here again, we will have to export the two env variables (AZURE_STORAGE_ACCOUNTandAZURE_STORAGE_KEY), before running the following commands..az storage table create --name iactable --account-name iacstorage
- We can easily list the Tables under a storage account using the
storage table listoption:az storage table list --account-name iacstorage
- We can insert an entity into the newly created Table using the
storage entity insertoption:az storage entity insert --table-name iactable --entity PartitionKey=testPartKey RowKey=testRowKey Content=testContent
- Finally, we can use the
storage entity showcommand to view the entry:az storage entity show --table-name iactable --partition-key testPartKey --row-key testRowKey
With that, we have covered the core storage options provided by Azure. Next, we'll look at Azure Managed Disks, which are required for managing disk/SSD storage for VMs.
Azure Managed disks
Azure managed disks are the virtual hard disks that are mounted to an Azure VM. As the name suggests, these disks are completely managed by Azure. So, you don't need to worry about OS upgrades, security patches, and so on. Unlike physical disks, Azure Managed Disks offer 99.999% availability. They achieve such a high availability score by storing three different replicas of the data on different servers. Managed VMs can also be allocated to availability sets and availability zones (distributed across racks and data centers) to increase their survivability in cases of server, rack (stamp), or data center outages. The managed disks also provide options for data encryption at rest and disk-level encryptions. There are different types of managed disks available, such as standard HDD, standard SSD, premium SSD, and ultra disks.
Creating and attaching Managed Disks to a VM using the CLI
Let's learn how to use the CLI to create and attach Managed Disks to sampleVM, which we created earlier:
az vm disk attach --resource-group IACRG --vm-name sampleVM --name IACmgdisk --size-gb 64 –new
This is a simple one-line command for creating a new disk and attaching it to an existing VM. Please do remember that you also have the option to specify more advanced configuration parameters as part of the CLI command itself that, when not specified, would assume default values.
You can learn more about Azure storage technologies here: https://docs.microsoft.com/en-us/azure/storage/common/storage-introduction.
Now, let's explore another core Azure technology, known as Azure Networking.