

You now know that GIS data includes more than just what you may see in a map. Each layer has additional information linked to it which is stored in an Attribute Table. Also, not all data you display in a map is stored in a traditional GIS format. Some may be stored in standalone tables or even spreadsheets. These can also be displayed in a map if they include an address or x and y coordinates.
However, there is a lot data out there in various databases which may not have x and y coordinates, or an address, or even be part of our GIS, but we need to be able to use that information to perform queries, display information, or conduct analysis in the GIS. This data may come from other systems, such as tax appraisal, permitting, inspections, work order, and asset management systems. If we want to use data stored in these systems we must be able to link it to our GIS data. ArcGIS Pro provides a couple of methods to do this, Join and Relate.
At other times, we may need to transfer...
Join is one of two basic methods which can be used to link data in ArcGIS Pro. Joins link two datasets together to create a single virtual dataset within a single map in a project. This allows you to use the joined data to query, label, and symbolize using the information from both joined datasets.
In this recipe, you will join the Parcel layer to a table which contains a list of owner names. You will learn the requirements needed to join two tables and how to complete the join.
For this recipe, you will need to ensure that you have installed the book data and have ArcGIS Pro installed. An ArcGIS Pro Basic license level will be sufficient for this recipe.
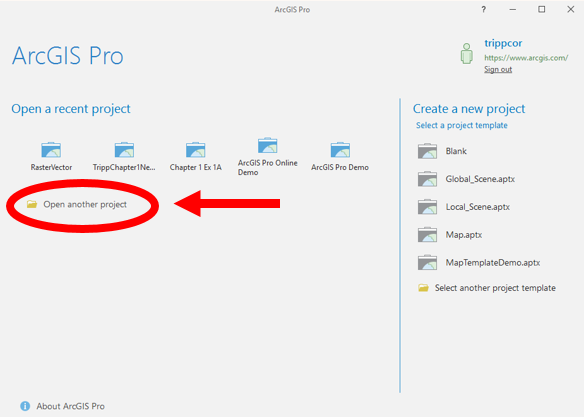
- To begin, you will need to start ArcGIS Pro.
- In the
ArcGIS Prostart window, click onOpen another project. - Select
Computerfrom theOpenwindow and then clickBrowsein the area on the right:
- Navigate to
C:\Student\ArcGISProCookbook\Chapter3\Joining Databy clicking onC:\in the area on the left...
Now that you have learned how to join tables, and seen how it links them to provide more information, what can you do with that information? In short, you can do anything with the joined information that you can do with the normal attributes in the layers Attribute Table.
In this recipe, you will learn how you label features using the data from the joined table. You will label each parcel with its PIN and Owner Name. You will use the new Arcade language to do this. You will learn more about Arcade in Chapter 11, Introducing Arcade.
- If you closed ArcGIS Pro after completing the previous recipe, open the
Joining Data.aprxproject by following the same instructions as shown in the beginning of the previous recipe. - Click on
Bookmarkson theMaptab in the ribbon. Select theLabelingbookmark. This will zoom you in to an area located in the...
Labeling is not the only thing you can do with a joined table. You can also use the joined information to perform queries and analysis. In this recipe, you will perform a query to locate all the parcels owned by the City of Thomaston. You will then export that information to a spreadsheet using a geoprocessing tool.
You must have completed the recipe titled Joining two tables from this chapter before you can perform this recipe. You will also need to have Microsoft Excel or a similar application installed which will open a spreadsheet.
- If you closed ArcGIS Pro after completing the previous recipe, open the
Joining Data.aprxproject by following the same instructions as shown in the beginning of the previous recipe. Otherwise continue with this recipe. - Click on the
Maptab in the ribbon. - Click on the Full Extent button in the
Navigategroup on theMaptab. It looks like a small globe. - Click on the
Select by Attributestool in theSelection...
A Join is just one of the basic methods you can use in ArcGIS Pro to link data together. Another method is a Relate. A Relate links two tables together, but unlike a Join, which adds information to the primary table, the two tables remain separate when related. This allows you to see all the related records in the linked table.
A Relate works best when you have one record in your primary table which matches to multiple records in the linked table, or when you have multiple records in the primary that match multiple records in the linked table. In these situations, a Join would not work as well because it would have multiple records which match.
In this recipe, you will create a Relate between the Parcels and a land sales table. The land sales table contains all parcels sales which have occurred over the last several years. This table also comes from the County’s CAMA system, like the Owners table did. Once you relate the two tables, you will see how you can view...
So in the previous recipes, you have seen how you can link external data to layers or other tables using a Join or a Relate. However, what if you want to transfer data from one layer to another but there is no key field to use to link the data. Maybe the two layers in question overlap one another, or are next to one another, or share some other spatial relationship, surely there should be some way to link or join the two layers together based on a spatial relationship.
You can join two layers together based on a spatial relationship. This is called a Spatial Join. A Spatial Join creates a new feature class which adds the attributes from the joined feature class to the target feature class based on a spatial relationship you define when you run the tool. It is not required that the target and joined feature classes be the same type. You can spatially join lines with polygons, or points with lines, or points with polygons, as well as those of the same feature type...
You have now seen how to link data together based on a common key field using a Join or Relate, based on a spatial relationship. These methods are extremely useful. However, they do have limitations. Joins and Relates only exist in a single map and do not transfer easily to other maps or projects. Spatial Joins create new feature classes or tables while still leaving the original data unaltered. So, is there a way to permanently link two tables or two feature classes together?
The answer is yes, if the data is all in the same geodatabase. In a geodatabase, you can create a relationship class. A relationship class permanently links data together and the link carries over into any map, scene, or project you use the data in. You can create a relationship class between two feature classes, two standalone tables, or a feature class and a standalone table.
Relationship classes provide greater flexibility than the other methods we have looked at in previous recipes...
You have seen the power of a relationship class in the previous recipe. You saw how linking two feature classes together allowed you to not only access information about the linked features but also control some behavior. However, this was all automatically set up by the Convert to Annotation tool. In many cases, the data you wish to link together already exists. So how do you create a relationship class which would link that existing data together?
In this recipe, you will create a relationship class between a feature class and a standalone table. This will be between the same parcel layer and sales table you related in the Creating and using a Relate recipe earlier in this chapter. However, once you establish the relationship class, the link becomes permanent, unlike the relate which is limited to the map in which it was created.