Reader small image

You're reading from  Mastering Ubuntu Server - Fourth Edition

Product typeBook
Published inSep 2022
PublisherPackt
ISBN-139781803234243
Edition4th Edition
Concepts
Right arrow
Author (1)
Jay LaCroix
Jay LaCroix
author image
Jay LaCroix

Jeremy "Jay" LaCroix is a technologist and open-source enthusiast, specializing in Linux. He has a net field experience of 20 years across different firms as a Solutions Architect and holds a master's degree in Information Systems Technology Management from Capella University. In addition, Jay also has an active Linux-focused YouTube channel with over 250K followers and over 20M views, available at LearnLinuxTV, where he posts instructional tutorial videos and other Linux-related content. He has also written Linux Mint Essentials and Mastering Linux Network Administration, published by Packt Publishing.
Read more about Jay LaCroix

Right arrow

Managing Storage Volumes

When it comes to storage on our servers, it seems as though we can never get enough. While hard disks are growing in capacity every year, and high-capacity disks are cheaper than ever, our servers gobble up available space quickly. As administrators of servers, we always do our best to order servers with ample storage, but business needs evolve over time, and no matter how well we plan, a successful business will always need more. While managing your servers, you’ll likely find yourself adding additional storage at some point. But managing storage is more than just adding new disks every time your current one gets full. Planning ahead is also important, and technologies such as Logical Volume Manager (LVM) will make your job much easier as long as you start using it as early as you possibly can.

LVM itself is just one of the concepts we’ll go over in this chapter that will give you more flexibility with how you handle servers. I’ll...

Adding additional storage volumes

At some point or another, you’ll reach a situation where you’ll need to add additional storage to your server. On physical servers, we can add additional hard disks, and on virtual or cloud servers, we can add additional virtual disks. Either way, in order to take advantage of the extra storage, we’ll need to determine the name of the device, format it, and mount it.

In the case of LVM (which we’ll discuss later in this chapter), we’ll have the opportunity to expand an existing volume, often without a server reboot being necessary. There’s an overall process to follow when adding a new device, though. When adding additional storage to your system, you should ask yourself the following questions:

How much storage do you need? If you’re adding a virtual disk, you can usually make it any size you want, as long as you have enough space remaining in the pool of your hypervisor.

After you attached...

Formatting and partitioning storage devices

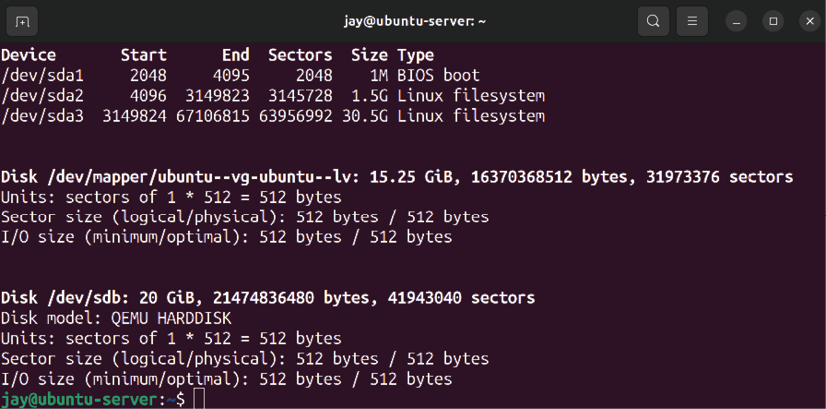
Once you’ve installed a physical or virtual disk, you’re well on your way to benefiting from additional storage. But in order to utilize a disk, it must first be formatted. In order to ensure we’re formatting the correct disk, we need to find the name the device was given. As you already know from the previous section, there’s a specific naming scheme that is used in Linux distributions to name disks. So you should already know the device name of the new disk. As explained earlier, you can use the sudo fdisk -l command to see details regarding the storage devices attached to your server:

sudo fdisk –l

This will produce an output that looks similar to the following:

Figure 9.3: Using fdisk -l to view a list of storage devices on the server

In my case, the device /dev/sdb is brand-new—I just added it to the server. Since I’m using a virtual machine for the examples in this...

Mounting and unmounting volumes

Now that you’ve added a new storage volume to your server and formatted it, you can mount the new device so that you can start using it. To do this, we use the mount command. This command allows you to attach a storage device (or even a network share) to a local directory on your server. Before mounting, the directory must be empty. The mount command, which we’ll get to practice with an example very shortly, basically just requires you to designate a place (directory) for the device to be mounted to. But where should you mount the volume?

Normally, there are two directories, created by default, in your Ubuntu Server installation that exist for the purposes of mounting volumes: /mnt and /media. While there is no hard rule as far as where media needs to be mounted, these two directories exist as part of the Filesystem Hierarchy Standard (FHS) that was mentioned in Chapter 4, Navigating and Essential Commands. The purposes of the /mnt...

Understanding the /etc/fstab file

The /etc/fstab file is a very critical file on your Linux system. You can edit this file to call out additional volumes you would like to automatically mount at boot time. However, the main purpose of this file is to also mount your main filesystem, so if you make a mistake while editing it, your server will not boot (at all). Definitely be careful here.

Analyzing the contents of /etc/fstab

When your system boots, it looks at the /etc/fstab file to determine where the root filesystem is. In addition, the location of your swap area is read from this file and mounted at boot time as well. Your system will also read any other mount points listed in this file, one per line, and mount them. Basically, just about any kind of storage you can think of can be added to this file and automatically mounted. Even network shares from Windows servers can be added here. It won’t judge you (unless you make a typo).

As an example, here are the contents...

Backing up and restoring volumes

Since we’re dealing with servers, the data that’s being stored on our storage devices is no doubt going to be extremely important. While it’s normal to have a few test servers for use as test subjects in a typical environment, our servers usually exist to carry out a very important task. I can tell you from first-hand experience, never put too much trust in storage devices. In fact, I recommend not trusting them at all. I consider all storage to be temporary, as hard drives can and do break. If your important data is only stored on one device, it’s not safe. In this section, I’m going to discuss some very important topics around backups.

First, consider RAID volumes. We haven’t discussed them in this chapter because while the technology can still be beneficial, it’s not as popular as it once was. Don’t get me wrong, there’s still a place for RAID, but it’s just not as popular...

Utilizing LVM

The needs of your organization will change with time. While we as server administrators always do our best to configure resources with long-term growth in mind, budgets and changes in policy always seem to get in our way. LVM is something that I’m sure you’ll come to appreciate. In fact, technologies such as LVM are those things that make Linux the champion when it comes to scalability and cloud deployments. With LVM, you are able to resize your filesystems online, without needing to reboot your server.

Take the following scenario for example. Say you have an application running on a virtualized production server—a server that’s so important that downtime would cost your organization serious money. When the server was first set up, perhaps you gave the application’s storage directory a 100 GB partition, thinking it would never need more than that. Now, with your business growing, it’s not only using a lot of space, but you...

Summary

Efficiently managing the storage of your servers will ensure that things continue to run smoothly, as a full filesystem can definitely cause your server to grind to a halt. Thankfully, Linux servers feature a very expansive toolset for managing your storage, some of which are a source of envy for other platforms. As Linux server administrators, we benefit from technologies such as LVM and utilities such as ncdu, as well as many others. In this chapter, we explored these tools and how to manage our storage. We covered how to format, partition, mount, and unmount volumes, as well as manage the fstab file, LVM, monitor disk usage, and more.

In the next episode of our Ubuntu Server saga, we’ll work through connecting to networks. We’ll configure our server’s hostname, work through examples of connecting to other servers via OpenSSH, and take a look at IP addressing.

Relevant videos

Further reading

Join our community on Discord

Join our community’s Discord space for discussions with the author and other readers:

https://packt.link/LWaZ0

lock icon
The rest of the chapter is locked
You have been reading a chapter from
Mastering Ubuntu Server - Fourth Edition
Published in: Sep 2022Publisher: PacktISBN-13: 9781803234243
Register for a free Packt account to unlock a world of extra content!
A free Packt account unlocks extra newsletters, articles, discounted offers, and much more. Start advancing your knowledge today.
undefined
Unlock this book and the full library FREE for 7 days
Get unlimited access to 7000+ expert-authored eBooks and videos courses covering every tech area you can think of
Renews at $15.99/month. Cancel anytime

Author (1)

author image
Jay LaCroix

Jeremy "Jay" LaCroix is a technologist and open-source enthusiast, specializing in Linux. He has a net field experience of 20 years across different firms as a Solutions Architect and holds a master's degree in Information Systems Technology Management from Capella University. In addition, Jay also has an active Linux-focused YouTube channel with over 250K followers and over 20M views, available at LearnLinuxTV, where he posts instructional tutorial videos and other Linux-related content. He has also written Linux Mint Essentials and Mastering Linux Network Administration, published by Packt Publishing.
Read more about Jay LaCroix