

Creating the blog data models
Remember that a Python object is a collection of data and methods. Classes are the blueprint for bundling data and functionality together. Creating a new class creates a new type of object, allowing you to create instances of that type.
A Django model is a source of information about the behaviors of your data. It consists of a Python class that subclasses django.db.models.Model. Each model maps to a single database table, where each attribute of the class represents a database field.
When you create a model, Django will provide you with a practical API to query objects in the database easily.
We will define the database models for our blog application. Then, we will generate the database migrations for the models to create the corresponding database tables. When applying the migrations, Django will create a table for each model defined in the models.py file of the application.
Creating the Post model
First, we will define a Post model that will allow us to store blog posts in the database.
Add the following lines to the models.py file of the blog application. The new lines are highlighted in bold:
from django.db import models
class Post(models.Model):
    title = models.CharField(max_length=250)
    slug = models.SlugField(max_length=250)
    body = models.TextField()
    def __str__(self):
        return self.title
This is the data model for blog posts. Posts will have a title, a short label called slug, and a body. Let’s take a look at the fields of this model:
title: This is the field for the post title. This is aCharFieldfield that translates into aVARCHARcolumn in the SQL database.slug: This is aSlugFieldfield that translates into aVARCHARcolumn in the SQL database. A slug is a short label that contains only letters, numbers, underscores, or hyphens. A post with the title Django Reinhardt: A legend of Jazz could have a slug like django-reinhardt-legend-jazz. We will use theslugfield to build beautiful, SEO-friendly URLs for blog posts in Chapter 2, Enhancing Your Blog with Advanced Features.body: This is the field for storing the body of the post. This is aTextFieldfield that translates into aTEXTcolumn in the SQL database.
We have also added a __str__() method to the model class. This is the default Python method to return a string with the human-readable representation of the object. Django will use this method to display the name of the object in many places, such as the Django administration site.
Let’s take a look at how the model and its fields will be translated into a database table and columns. The following diagram shows the Post model and the corresponding database table that Django will create when we synchronize the model to the database:
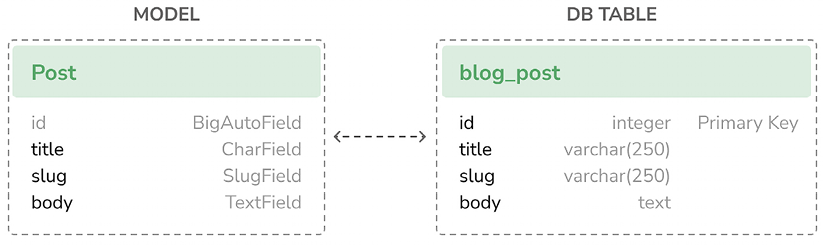
Figure 1.5: Initial Post model and database table correspondence
Django will create a database column for each of the model fields: title, slug, and body. You can see how each field type corresponds to a database data type.
By default, Django adds an auto-incrementing primary key field to each model. The field type for this field is specified in each application configuration or globally in the DEFAULT_AUTO_FIELD setting. When creating an application with the startapp command, the default value for DEFAULT_AUTO_FIELD is BigAutoField. This is a 64-bit integer that automatically increments according to available IDs. If you don’t specify a primary key for your model, Django adds this field automatically. You can also define one of the model fields to be the primary key by setting primary_key=True on it.
We will expand the Post model with additional fields and behaviors. Once complete, we will synchronize it to the database by creating a database migration and applying it.
Adding datetime fields
We will continue by adding different datetime fields to the Post model. Each post will be published at a specific date and time. Therefore, we need a field to store the publication date and time. We also want to store the date and time when the Post object was created and when it was last modified.
Edit the models.py file of the blog application to make it look like this; the new lines are highlighted in bold:
from django.db import models
from django.utils import timezone
class Post(models.Model):
    title = models.CharField(max_length=250)
    slug = models.SlugField(max_length=250)
    body = models.TextField()
    publish = models.DateTimeField(default=timezone.now)
    def __str__(self):
        return self.title
We have added a publish field to the Post model. This is a DateTimeField field that translates into a DATETIME column in the SQL database. We will use it to store the date and time when the post was published. We use Django’s timezone.now method as the default value for the field. Note that we imported the timezone module to use this method. timezone.now returns the current datetime in a timezone-aware format. You can think of it as a timezone-aware version of the standard Python datetime.now method.
Another method to define default values for model fields is using database-computed default values. Introduced in Django 5, this feature allows you to use underlaying database functions to generate default values. For instance, the following code uses the database server’s current date and time as the default for the publish field:
from django.db import models
from django.db.models.functions import Now
class Post(models.Model):
    # ...
    publish = models.DateTimeField(db_default=Now())
To use database-generated default values, we use the db_default attribute instead of default. In this example, we use the Now database function. It serves a similar purpose to default=timezone.now, but instead of a Python-generated datetime, it uses the NOW() database function to produce the initial value. You can read more about the db_default attribute at https://docs.djangoproject.com/en/5.0/ref/models/fields/#django.db.models.Field.db_default. You can find all available database functions at https://docs.djangoproject.com/en/5.0/ref/models/database-functions/.
Let’s continue with the previous version of the field:
class Post(models.Model):
    # ...
    publish = models.DateTimeField(default=timezone.now)
Edit the models.py file of the blog application and add the following lines highlighted in bold:
from django.db import models
from django.utils import timezone
class Post(models.Model):
    title = models.CharField(max_length=250)
    slug = models.SlugField(max_length=250)
    body = models.TextField()
    publish = models.DateTimeField(default=timezone.now)
    created = models.DateTimeField(auto_now_add=True)
    updated = models.DateTimeField(auto_now=True)
    def __str__(self):
        return self.title
We have added the following fields to the Post model:
created: This is aDateTimeFieldfield. We will use it to store the date and time when the post was created. By usingauto_now_add, the date will be saved automatically when creating an object.updated: This is aDateTimeFieldfield. We will use it to store the last date and time when the post was updated. By usingauto_now, the date will be updated automatically when saving an object.
Utilizing the auto_now_add and auto_now datetime fields in your Django models is highly beneficial for tracking the creation and last modification times of objects.
Defining a default sort order
Blog posts are typically presented in reverse chronological order, showing the newest posts first. For our model, we will define a default ordering. This ordering takes effect when retrieving objects from the database unless a specific order is indicated in the query.
Edit the models.py file of the blog application as shown below. The new lines are highlighted in bold:
from django.db import models
from django.utils import timezone
class Post(models.Model):
    title = models.CharField(max_length=250)
    slug = models.SlugField(max_length=250)
    body = models.TextField()
    publish = models.DateTimeField(default=timezone.now)
    created = models.DateTimeField(auto_now_add=True)
    updated = models.DateTimeField(auto_now=True)
    class Meta:
        ordering = ['-publish']
    def __str__(self):
        return self.title
We have added a Meta class inside the model. This class defines metadata for the model. We use the ordering attribute to tell Django that it should sort results by the publish field. This ordering will apply by default for database queries when no specific order is provided in the query. We indicate descending order by using a hyphen before the field name, -publish. Posts will be returned in reverse chronological order by default.
Adding a database index
Let’s define a database index for the publish field. This will improve performance for query filtering or ordering results by this field. We expect many queries to take advantage of this index since we are using the publish field to order results by default.
Edit the models.py file of the blog application and make it look like this; the new lines are highlighted in bold:
from django.db import models
from django.utils import timezone
class Post(models.Model):
    title = models.CharField(max_length=250)
    slug = models.SlugField(max_length=250)
    body = models.TextField()
    publish = models.DateTimeField(default=timezone.now)
    created = models.DateTimeField(auto_now_add=True)
    updated = models.DateTimeField(auto_now=True)
    class Meta:
        ordering = ['-publish']
        indexes = [
            models.Index(fields=['-publish']),
        ]
    def __str__(self):
        return self.title
We have added the indexes option to the model’s Meta class. This option allows you to define database indexes for your model, which could comprise one or multiple fields, in ascending or descending order, or functional expressions and database functions. We have added an index for the publish field. We use a hyphen before the field name to define the index specifically in descending order. The creation of this index will be included in the database migrations that we will generate later for our blog models.
Index ordering is not supported on MySQL. If you use MySQL for the database, a descending index will be created as a normal index.
You can find more information about how to define indexes for models at https://docs.djangoproject.com/en/5.0/ref/models/indexes/.
Activating the application
We need to activate the blog application in the project for Django to keep track of the application and be able to create database tables for its models.
Edit the settings.py file and add blog.apps.BlogConfig to the INSTALLED_APPS setting. It should look like this; the new lines are highlighted in bold:
INSTALLED_APPS = [
    'django.contrib.admin',
    'django.contrib.auth',
    'django.contrib.contenttypes',
    'django.contrib.sessions',
    'django.contrib.messages',
    'django.contrib.staticfiles',
    'blog.apps.BlogConfig',
]
The BlogConfig class is the application configuration. Now Django knows that the application is active for this project and will be able to load the application models.
Adding a status field
A common functionality for blogs is to save posts as a draft until ready for publication. We will add a status field to our model that will allow us to manage the status of blog posts. We will be using the Draft and Published statuses for posts.
Edit the models.py file of the blog application to make it look as follows. The new lines are highlighted in bold:
from django.db import models
from django.utils import timezone
class Post(models.Model):
    class Status(models.TextChoices):
        DRAFT = 'DF', 'Draft'
        PUBLISHED = 'PB', 'Published'
    title = models.CharField(max_length=250)
    slug = models.SlugField(max_length=250)
    body = models.TextField()
    publish = models.DateTimeField(default=timezone.now)
    created = models.DateTimeField(auto_now_add=True)
    updated = models.DateTimeField(auto_now=True)
    status = models.CharField(
        max_length=2,
        choices=Status,
        default=Status.DRAFT
    )
    class Meta:
        ordering = ['-publish']
        indexes = [
            models.Index(fields=['-publish']),
        ]
    def __str__(self):
        return self.title
We have defined the enumeration class Status by subclassing models.TextChoices. The available choices for the post status are DRAFT and PUBLISHED. Their respective values are DF and PB, and their labels or readable names are Draft and Published.
Django provides enumeration types that you can subclass to define choices simply. These are based on the enum object of Python’s standard library. You can read more about enum at https://docs.python.org/3/library/enum.html.
Django enumeration types present some modifications over enum. You can learn about those differences at https://docs.djangoproject.com/en/5.0/ref/models/fields/#enumeration-types.
We can access Post.Status.choices to obtain the available choices, Post.Status.names to obtain the names of the choices, Post.Status.labels to obtain the human-readable names, and Post.Status.values to obtain the actual values of the choices.
We have also added a new status field to the model that is an instance of CharField. It includes a choices parameter to limit the value of the field to the choices in Status. We have also set a default value for the field using the default parameter. We use DRAFT as the default choice for this field.
It’s a good practice to define choices inside the model class and use the enumeration types. This will allow you to easily reference choice labels, values, or names from anywhere in your code. You can import the Post model and use Post.Status.DRAFT as a reference for the Draft status anywhere in your code.
Let’s take a look at how to interact with status choices.
Run the following command in the shell prompt to open the Python shell:
python manage.py shell
Then, type the following lines:
>>> from blog.models import Post
>>> Post.Status.choices
You will obtain the enum choices with value-label pairs, like this:
[('DF', 'Draft'), ('PB', 'Published')]
Type the following line:
>>> Post.Status.labels
You will get the human-readable names of the enum members, as follows:
['Draft', 'Published']
Type the following line:
>>> Post.Status.values
You will get the values of the enum members, as follows. These are the values that can be stored in the database for the status field:
['DF', 'PB']
Type the following line:
>>> Post.Status.names
You will get the names of the choices, like this:
['DRAFT', 'PUBLISHED']
You can access a specific lookup enumeration member with Post.Status.PUBLISHED and you can access its .name and .value properties as well.
Adding a many-to-one relationship
Posts are always written by an author. We will create a relationship between users and posts that will indicate which user wrote which posts. Django comes with an authentication framework that handles user accounts. The Django authentication framework comes in the django.contrib.auth package and contains a User model. To define the relationship between users and posts, we will use the AUTH_USER_MODEL setting, which points to auth.User by default. This setting allows you to specify a different user model for your project.
Edit the models.py file of the blog application to make it look as follows. The new lines are highlighted in bold:
from django.conf import settings
from django.db import models
from django.utils import timezone
class Post(models.Model):
    class Status(models.TextChoices):
        DRAFT = 'DF', 'Draft'
        PUBLISHED = 'PB', 'Published'
    title = models.CharField(max_length=250)
    slug = models.SlugField(max_length=250)
    author = models.ForeignKey(
        settings.AUTH_USER_MODEL,
        on_delete=models.CASCADE,
        related_name='blog_posts'
    )
    body = models.TextField()
    publish = models.DateTimeField(default=timezone.now)
    created = models.DateTimeField(auto_now_add=True)
    updated = models.DateTimeField(auto_now=True)
    status = models.CharField(
        max_length=2,
        choices=Status,
        default=Status.DRAFT
    )
    class Meta:
        ordering = ['-publish']
        indexes = [
            models.Index(fields=['-publish']),
        ]
    def __str__(self):
        return self.title
We have imported the project’s settings and we have added an author field to the Post model. This field defines a many-to-one relationship with the default user model, meaning that each post is written by a user, and a user can write any number of posts. For this field, Django will create a foreign key in the database using the primary key of the related model.
The on_delete parameter specifies the behavior to adopt when the referenced object is deleted. This is not specific to Django; it is a SQL standard. Using CASCADE, you specify that when the referenced user is deleted, the database will also delete all related blog posts. You can take a look at all the possible options at https://docs.djangoproject.com/en/5.0/ref/models/fields/#django.db.models.ForeignKey.on_delete.
We use related_name to specify the name of the reverse relationship, from User to Post. This will allow us to access related objects easily from a user object by using the user.blog_posts notation. We will learn more about this later.
Django comes with different types of fields that you can use to define your models. You can find all field types at https://docs.djangoproject.com/en/5.0/ref/models/fields/.
The Post model is now complete, and we can now synchronize it to the database.
Creating and applying migrations
Now that we have a data model for blog posts, we need to create the corresponding database table. Django comes with a migration system that tracks the changes made to models and enables them to propagate into the database.
The migrate command applies migrations for all applications listed in INSTALLED_APPS. It synchronizes the database with the current models and existing migrations.
First, we will need to create an initial migration for our Post model.
Run the following command in the shell prompt from the root directory of your project:
python manage.py makemigrations blog
You should get an output similar to the following one:
Migrations for 'blog':
    blog/migrations/0001_initial.py
        - Create model Post
        - Create index blog_post_publish_bb7600_idx on field(s)
          -publish of model post
Django just created the 0001_initial.py file inside the migrations directory of the blog application. This migration contains the SQL statements to create the database table for the Post model and the definition of the database index for the publish field.
You can take a look at the file contents to see how the migration is defined. A migration specifies dependencies on other migrations and operations to perform in the database to synchronize it with model changes.
Let’s take a look at the SQL code that Django will execute in the database to create the table for your model. The sqlmigrate command takes the migration names and returns their SQL without executing it.
Run the following command from the shell prompt to inspect the SQL output of your first migration:
python manage.py sqlmigrate blog 0001
The output should look as follows:
BEGIN;
--
-- Create model Post
--
CREATE TABLE "blog_post" (
  "id" integer NOT NULL PRIMARY KEY AUTOINCREMENT,
  "title" varchar(250) NOT NULL,
  "slug" varchar(250) NOT NULL,
  "body" text NOT NULL,
  "publish" datetime NOT NULL,
  "created" datetime NOT NULL,
  "updated" datetime NOT NULL,
  "status" varchar(10) NOT NULL,
  "author_id" integer NOT NULL REFERENCES "auth_user" ("id") DEFERRABLE INITIALLY DEFERRED);
--
-- Create blog_post_publish_bb7600_idx on field(s) -publish of model post
--
CREATE INDEX "blog_post_publish_bb7600_idx" ON "blog_post" ("publish" DESC);
CREATE INDEX "blog_post_slug_b95473f2" ON "blog_post" ("slug");
CREATE INDEX "blog_post_author_id_dd7a8485" ON "blog_post" ("author_id");
COMMIT;
The exact output depends on the database you are using. The preceding output is generated for SQLite. As you can see in the output, Django generates the table names by combining the application name and the lowercase name of the model (blog_post), but you can also specify a custom database name for your model in the Meta class of the model using the db_table attribute.
Django creates an auto-incremental id column that is used as the primary key for each model, but you can also override this by specifying primary_key=True on one of your model fields. The default id column consists of an integer that is incremented automatically. This column corresponds to the id field that is automatically added to your model.
The following three database indexes are created:
- An index in descending order on the
publishcolumn. This is the index we explicitly defined with theindexesoption of the model’sMetaclass. - An index on the
slugcolumn becauseSlugFieldfields imply an index by default. - An index on the
author_idcolumn becauseForeignKeyfields imply an index by default.
Let’s compare the Post model with its corresponding database blog_post table:
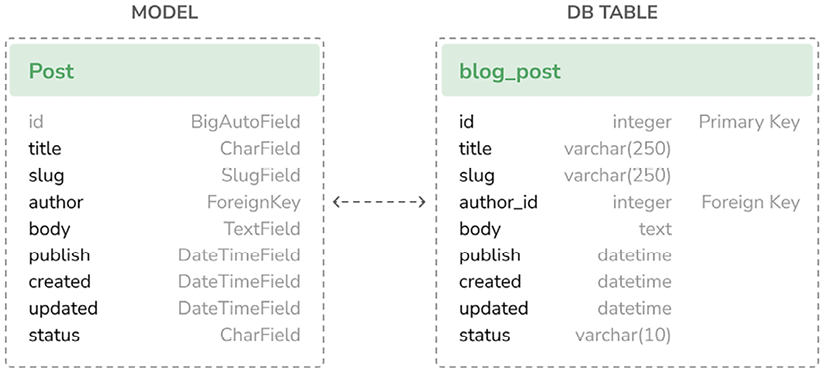
Figure 1.6: Complete Post model and database table correspondence
Figure 1.6 shows how the model fields correspond to database table columns.
Let’s sync the database with the new model.
Execute the following command in the shell prompt to apply the existing migrations:
python manage.py migrate
You will get an output that ends with the following line:
Applying blog.0001_initial... OK
We just applied migrations for the applications listed in INSTALLED_APPS, including the blog application. After applying the migrations, the database reflects the current status of the models.
If you edit the models.py file in order to add, remove, or change the fields of existing models, or if you add new models, you will have to create a new migration using the makemigrations command. Each migration allows Django to keep track of model changes. Then, you will have to apply the migration using the migrate command to keep the database in sync with your models.