Reader small image

You're reading from  Django 5 By Example - Fifth Edition

Product typeBook
Published inApr 2024
PublisherPackt
ISBN-139781805125457
Edition5th Edition
Right arrow
Author (1)
Antonio Melé
Antonio Melé
author image
Antonio Melé

Antonio Melé has been crafting Django projects since 2006, for clients spanning multiple industries. He is Engineering Director at Backbase, a leading global fintech firm dedicated to facilitating the digital transformation of financial institutions. He co-founded Nucoro, a digital wealth management platform. In 2009 Antonio founded Zenx IT, a company specialized in developing digital products. He has been working as CTO and consultant for several tech-centric startups. He has also managed development teams building projects for large enterprise clients. He has an MSc in Computer Science from Universidad Pontificia Comillas and completed the Advanced Management Program at MIT Sloan. His father inspired his passion for computers and coding.
Read more about Antonio Melé

Right arrow

The request/response cycle

Let’s review the request/response cycle of Django with the application we built. The following schema shows a simplified example of how Django processes HTTP requests and generates HTTP responses:
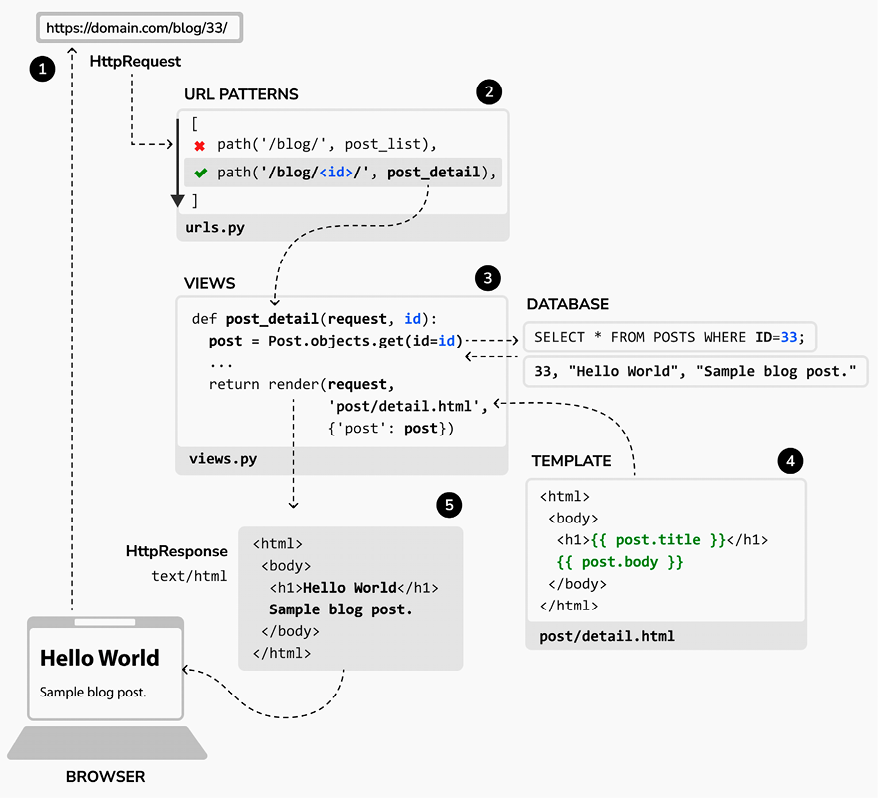
Figure 1.19: The Django request/response cycle

Let’s review the Django request/response process:

  1. A web browser requests a page by its URL, for example, https://domain.com/blog/33/. The web server receives the HTTP request and passes it over to Django.
  2. Django runs through each URL pattern defined in the URL patterns configuration. The framework checks each pattern against the given URL path, in order of appearance, and stops at the first one that matches the requested URL. In this case, the pattern /blog/<id>/ matches the path /blog/33/.
  3. Django imports the view of the matching URL pattern and executes it, passing an instance of the HttpRequest class and the keyword or positional arguments. The view uses the models to retrieve information from...

Management commands used in this chapter

In this chapter we have introduced a variety of Django management commands. You need to get familiar with them, as they will be used often throughout the book. Let’s revisit the commands we have covered in this chapter.

To create the file structure for a new Django project named mysite we have used the following command:

django-admin startproject mysite

To create the file structure for a new Django application named blog:

python manage.py startapp blog

To apply all database migrations:

python manage.py migrate

To create migrations for the models of the blog application:

python manage.py makemigrations blog

To view the SQL statements that will be executed with the first migration of the blog application:

python manage.py sqlmigrate blog 0001

To run the Django development server:

python manage.py runserver

To run the development server specifying host/port and settings file:

python manage.py runserver 127.0.0.1:8001 --settings...

Summary

In this chapter, you learned the basics of the Django web framework by creating a simple blog application. You designed the data models and applied migrations to the database. You also created the views, templates, and URLs for your blog.

In the next chapter, you will learn how to create canonical URLs for models and how to build SEO-friendly URLs for blog posts. You will also learn how to implement object pagination and how to build class-based views. You will also implement Django forms to let your users recommend posts by email and comment on posts.

Additional resources

The following resources provide additional information related to the topics covered in this chapter:

Adding pagination

When you start adding content to your blog, you can easily store tens or hundreds of posts in your database. Instead of displaying all the posts on a single page, you may want to split the list of posts across several pages and include navigation links to the different pages. This functionality is called pagination, and you can find it in almost every web application that displays long lists of items.

For example, Google uses pagination to divide search results across multiple pages. Figure 2.3 shows Google’s pagination links for search result pages:

Figure 2.3: Google pagination links for search result pages

Django has a built-in pagination class that allows you to manage paginated data easily. You can define the number of objects you want to be returned per page and you can retrieve the posts that correspond to the page requested by the user.

Adding pagination to the post list view

We will add pagination to the list of posts so that...

Building class-based views

We have built the blog application using function-based views. Function-based views are simple and powerful, but Django also allows you to build views using classes.

Class-based views are an alternative way to implement views as Python objects instead of functions. Since a view is a function that takes a web request and returns a web response, you can also define your views as class methods. Django provides base view classes that you can use to implement your own views. All of them inherit from the View class, which handles HTTP method dispatching and other common functionalities.

Why use class-based views

Class-based views offer some advantages over function-based views that are useful for specific use cases. Class-based views allow you to:

  • Organize code related to HTTP methods, such as GET, POST, or PUT, in separate methods, instead of using conditional branching
  • Use multiple inheritance to create reusable view classes (also...

Recommending posts by email

We will allow users to share blog posts with others by sending post recommendations via email. You will learn how to create forms in Django, handle data submission, and send emails with Django, enhancing your blog with a personal touch.

Take a minute to think about how you could use views, URLs, and templates to create this functionality using what you learned in the preceding chapter.

To allow users to share posts via email, we will need to:

  1. Create a form for users to fill in their name, their email address, the recipient’s email address, and optional comments
  2. Create a view in the views.py file that handles the posted data and sends the email
  3. Add a URL pattern for the new view in the urls.py file of the blog application
  4. Create a template to display the form

Creating forms with Django

Let’s start by building the form to share posts. Django has a built-in forms framework that allows you to create...

Creating a comment system

We will continue extending our blog application with a comment system that will allow users to comment on posts. To build the comment system, we will need the following:

  • A comment model to store user comments on posts
  • A Django form that allows users to submit comments and manages the data validation
  • A view that processes the form and saves a new comment to the database
  • A list of comments and the HTML form to add a new comment that can be included in the post detail template

Creating a model for comments

Let’s start by building a model to store user comments on posts.

Open the models.py file of your blog application and add the following code:

class Comment(models.Model):
    post = models.ForeignKey(
        Post,
        on_delete=models.CASCADE,
        related_name='comments'
    )
    name = models.CharField(max_length=80)
    email = models.EmailField()
    body = models.TextField()
...

Summary

In this chapter, you learned how to define canonical URLs for models. You created SEO-friendly URLs for blog posts, and you implemented object pagination for your post list. You also learned how to work with Django forms and model forms. You created a system to recommend posts by email and created a comment system for your blog.

In the next chapter, you will create a tagging system for the blog. You will learn how to build complex QuerySets to retrieve objects by similarity. You will learn how to create custom template tags and filters. You will also build a custom sitemap and feed for your blog posts and implement full-text search functionality for your posts.

Additional resources

The following resources provide additional information related to the topics covered in this chapter:

lock icon
The rest of the chapter is locked
You have been reading a chapter from
Django 5 By Example - Fifth Edition
Published in: Apr 2024Publisher: PacktISBN-13: 9781805125457
Register for a free Packt account to unlock a world of extra content!
A free Packt account unlocks extra newsletters, articles, discounted offers, and much more. Start advancing your knowledge today.
undefined
Unlock this book and the full library FREE for 7 days
Get unlimited access to 7000+ expert-authored eBooks and videos courses covering every tech area you can think of
Renews at €14.99/month. Cancel anytime

Author (1)

author image
Antonio Melé

Antonio Melé has been crafting Django projects since 2006, for clients spanning multiple industries. He is Engineering Director at Backbase, a leading global fintech firm dedicated to facilitating the digital transformation of financial institutions. He co-founded Nucoro, a digital wealth management platform. In 2009 Antonio founded Zenx IT, a company specialized in developing digital products. He has been working as CTO and consultant for several tech-centric startups. He has also managed development teams building projects for large enterprise clients. He has an MSc in Computer Science from Universidad Pontificia Comillas and completed the Advanced Management Program at MIT Sloan. His father inspired his passion for computers and coding.
Read more about Antonio Melé