Reader small image

You're reading from  Tkinter GUI Application Development Blueprints

Product typeBook
Published inNov 2015
Reading LevelExpert
PublisherPackt
ISBN-139781785889738
Edition1st Edition
Languages
Right arrow
Author (1)
Bhaskar Chaudhary
Bhaskar Chaudhary
author image
Bhaskar Chaudhary

Bhaskar Chaudhary is a professional programmer and information architect. He has a decade of experience in consulting, contracting, and educating in the field of software development. He has worked with a large set of programming languages on various platforms over the years. He is an electronics hobbyist and a musician in his free time.
Read more about Bhaskar Chaudhary

Right arrow

Chapter 2. Making a Text Editor

We got a fairly high-level overview of Tkinter in Chapter 1, Meet Tkinter. Now that we know some things about Tkinter's core widgets, geometry management, and the binding of commands and events to callbacks, let's use our skills in this project to create a text editor.

Objectives of the chapter


We will, in the process of creating a text editor, take a closer look at some widgets and learn how to tweak them to meet our specific needs.

The following are the key objectives for this project:

  • Delving into some commonly used widgets, such as the Menu, Menubutton, Text, Entry, Checkbutton, and Button widgets

  • Exploring the filedialog and messagebox modules of Tkinter

  • Learning the vital concepts of indexing and tagging, as applied to Tkinter

  • Identifying the different types of Toplevel windows

An overview of the chapter


The goal here is to build a text editor with some cool nifty features. Let's call it the Footprint Editor.

We intend to include the following features in the text editor:

  • Creating new documents, opening and editing the existing documents, and saving documents

  • Implementing common editing options such as cut, copy, paste, undo, and redo

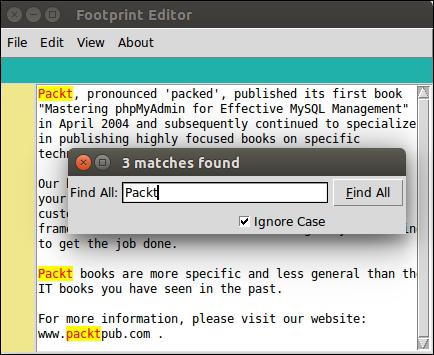
  • Searching within a file for a given search term

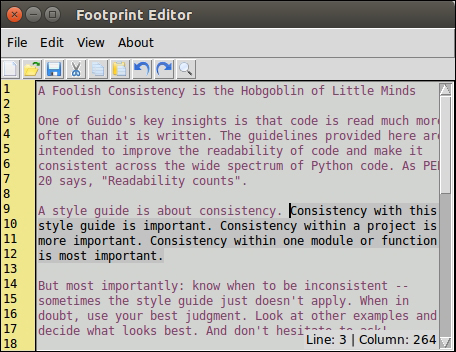
  • Implementing line numbering and the ability to show/hide line numbers

  • Implementing theme selection to let a user choose custom color themes for the editor

  • Implementing the about and help windows

Setting up the editor skeleton


Our first goal is to implement the broad visual elements of the text editor. As programmers, we have all used text editors to edit code. We are mostly aware of the common GUI elements of a text editor. So, without much of an introduction, let's get started.

The first phase implements the Menu, Menubutton, Label, Button, Text and Scrollbar widgets. Although we'll cover all of these in detail, you might find it helpful to look at the widget-specific options in the documentation of Tkinter maintained by its author Frederick Lundh at http://effbot.org/tkinterbook/. You can also use the interactive shell, as discussed in Chapter 1, Meet Tkinter.

You might also want to bookmark the official documentation page of Tcl/Tk at http://www.tcl.tk/man/tcl8.6/TkCmd/contents.htm. This site includes the original Tcl/Tk reference. While it does not relate to Python, it provides a detailed overview of each widget and is a useful reference. Remember that Tkinter is just a wrapper...

Adding a menu and menu items


Menus offer a very compact way of presenting a large number of choices to the user without cluttering the interface. Tkinter offers the following two widgets to handle menus:

  • The Menu widget: This appears at the top of applications, which is always visible to end users

  • The menu Items: This shows up when a user clicks on a menu

We will use the following code to add Toplevel menu buttons:

my_menu = Menu(parent, **options)

For example, to add a File menu, we will use the following code:

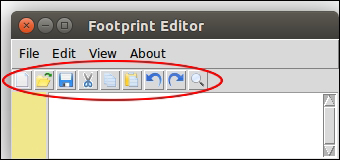
# Adding Menubar in the widget
menu_bar = Menu(root)

file_menu = Menu(menu_bar, tearoff=0)
# all file menu-items will be added here next
menu_bar.add_cascade(label='File', menu=file_menu)
root.config(menu=menu_bar)

The following screenshot is the result of the preceding code:

Similarly, we will add the Edit, View, and About menus. See 2.01.py.

We will also define a constant, as follows:

PROGRAM_NAME = " Footprint Editor "

Then, we'll set the root window tile as follows:

root.title(PROGRAM_NAME...

Implementing the View menu


Tkinter offers the following three varieties of menu items:

  • Checkbutton menu items: These let you make a yes/no choice by checking/unchecking the menu item

  • Radiobutton menu items: These let you choose an option from many different options

  • Cascade menu items: These menu items only opens up to show another list of choices

The following View menu shows all of these three types of menu items in action:

The first three menu items in the View menu let users make a definite yes or no choice by checking or unchecking them. These are examples of the Checkbutton menu.

The Themes menu item in the preceding screenshot is an example of a Cascade menu. Hovering over this cascade menu simply opens another list of menu items. However, we can also bind a menu item by using the postcommand=callback option. This can be used to manage something just before bringing up the cascading menu item's contents and is often used for dynamic list creation.

Within the cascade menu, you are presented...

Adding a built-in functionality


Tkinter's Text widget comes with some handy built-in functionality to handle common text-related functions. Let's leverage these functionalities to implement some common features in the text editor.

Let's start by implementing the cut, copy, and paste features. We now have the editor GUI ready. If you open the program and play with the Text widget, you will see that you can perform basic functions such as cut, copy, and paste in the text area by using Ctrl + X, Ctrl + C, and Ctrl + V respectively. All of these functions exist without us having to add a single line of code toward these functionalities.

The text widget clearly comes with these built-in events. Now, we simply want to connect these events to their respective menu items.

The documentation of Tcl/Tk Universal widget methods tells us that we can trigger events without an external stimulus by using the following command:

widget.event_generate(sequence, **kw)

To trigger the cut event, all we need is the...

Indexing and tagging


Though we managed to leverage some built-in functionality to gain a quick advantage, we need more control over the text area so that we can bend it to our will. This will require the ability to target each character or location of the text with precision.

We will need to know the exact position of each character, the cursor, or the selected area in order to do anything with the contents of the editor.

The Text widget offers us the ability to manipulate its content using index, tags, and mark, which let us target a position or place within the text area for manipulation.

Index

Indexing helps you target a particular place within a piece of text. For example, if you want to mark a particular word in bold, red, or in a different font size, you can do so if you know the index of the starting point and the index of the end point that needs to be targeted.

The index must be specified in one of the following formats:

Implementing the Select All feature


We know that Tkinter has a built-in sel tag that applies a selection to a given text range. We want to apply this tag to the entire text in the widget.

We can simply define a function to handle this, as follows (refer to 2.05.py in the code bundle):

def select_all(event=None):
    content_text.tag_add('sel', '1.0', 'end')
    return "break"

After doing this, add a callback to the Select All menu item:

edit_menu.add_command(label='Select All', underline=7, accelerator='Ctrl+A', command=select_all)

We also need to bind the function to the Ctrl + A keyboard shortcut. We do this by using the following key bindings (refer to 2.05.py in the code bundle):

content_text.bind('<Control-A>', select_all)
content_text.bind('<Control-a>', select_all)

The coding of the Select All feature is complete. To try it out, add some text to the text widget and then click on the menu item, Select All or use the Ctrl + A (accelerator shortcut key).

Implementing the Find Text feature


Next, let's code the Find Text feature (refer to 2.05.py in the code bundle). The following screenshot shows an example of the Find Text feature:

Here's a quick summary of the desired functionality. When a user clicks on the Find menu item, a new Toplevel window opens up. The user enters a search keyword and specifies whether the search needs to be case-sensitive. When the user clicks on the Find All button, all matches are highlighted.

To search through the document, we will rely on the text_widget.search() method. The search method takes in the following arguments:

search(pattern, startindex, stopindex=None, forwards=None, backwards=None, exact=None, regexp=None, nocase=None, count=None)

For the editor, define a function called find_text and attach it as a callback to the Find menu (refer to 2.05.py in the code bundle):

edit_menu.add_command(label='Find',underline= 0, accelerator='Ctrl+F', command=find_text)

Also, bind it to the Ctrl + F shortcut, as follows...

Types of Toplevel windows


In a code previously in this chapter, we used the following line:

search_toplevel.transient(root)

Let's understand what it means here. Tkinter supports the following four types of Toplevel windows:

  • The main Toplevel window: These are the ones that we have constructed so far.

  • The child Toplevel window: These are the ones that are independent of the root. The Toplevel child behaves independent of its root, but it gets destroyed if its parent is destroyed.

  • The transient Toplevel window: This always appears at the top of its parent, but it does not entirely grab the focus. Clicking again on the parent window allows you to interact with it. The transient window is hidden when the parent is minimized, and it is destroyed if the parent is destroyed. Compare this to what is called a modal window. A modal window grabs all the focus from the parent window and asks a user to first close the modal window before getting access back to the parent window.

  • The undecorated Toplevel window...

Working with forms and dialogs


The goal for this iteration is to implement the functionality of the File menu options of Open, Save, and Save As.

We can implement these dialogs by using the standard Tkinter widgets. However, since these are so commonly used, a specific Tkinter module called filedialog has been included in the standard Tkinter distribution.

The source code of the filedialog module can be found within the Tkinter source code in a separate file named filedialog.py.

Example of filedialog

A quick look at the source code shows the following functions for our use:

The index format

Description

x.y

This refers to the character...

Working with message boxes


Now, let's complete the code for the About and Help menus. The functionality is simple. When a user clicks on the Help or About menu, a message window pops up and waits for the user to respond by clicking on a button. Though we can easily code new Toplevel windows to show the About and Help messages, we will instead use a module called messagebox to achieve this functionality.

The messagebox module provides ready-made message boxes to display a wide variety of messages in applications. The functions available through this module include showinfo, showwarning, showerror, askquestion, askokcancel, askyesno, askyesnocancel, and askretrycancel, as shown in the following screenshot:

To use this module, we simply import it into the current namespace by using the following command:

import tkinter.messagebox

A demonstration of the commonly used functions of messagebox is illustrated in 2.08.py in the code bundle. The following are some common usage patterns:

import tkinter...

The icons toolbar and View menu functions


In this iteration, we will add the following functionalities to the text editor:

  • Showing the shortcut icons on the toolbar

  • Displaying line numbers

  • Highlighting the current line

  • Changing the color theme of the editor

Let's start with a simple task first. In this step, we will add shortcut icons to the toolbar as shown in the following screenshot:

You may recall that we have already created a frame to hold these icons. Let's add these icons now.

While adding these icons, we have followed a convention. The icons have been named exactly the same as the corresponding function that handles them. Following this convention has enabled us to loop through a list, simultaneously apply the icon image to each button, and add the command callback from within the loop. All the icons have been placed in the icons folder.

The following code adds an icon (refer to 2.10.py in the code bundle):

icons = ('new_file', 'open_file', 'save', 'cut', 'copy', 'paste', 'undo', 'redo'...

Displaying the line number


Let's work towards showing the line numbers to the left of the Text widget. This will require us to tweak the code at various places. So, before we start coding, let's look at what we are trying to achieve here.

The View menu has a menu item that allows users to choose whether to show line numbers. We only want to show the line numbers if the option is selected, as shown in the following screenshot:

If the option is selected, we need to display the line numbers in the left frame that we created earlier.

The line number should update every time a user enters a new line, deletes a line, cuts or pastes text from the line, performs an undo or a redo operation, opens an existing file, or clicks on the new menu item. In short, the line number should be updated after every activity results in change of content.

Therefore, we need to define a function called on_content_changed(). This function should be called after the definitions of every key press, cut, paste, undo, redo...

Adding the cursor information bar


The cursor information bar is simply a small label at the bottom-right corner of the Text widget, which displays the current position of the cursor, as shown in the following screenshot:

The user can choose to show/hide this info bar from the View menu (refer to the code in 2.11.py in the code bundle). Begin by creating a Label widget within the Text widget and pack it in the bottom-right corner, as follows:

cursor_info_bar = Label(content_text, text='Line: 1 | Column: 1')
cursor_info_bar.pack(expand=NO, fill=None, side=RIGHT, anchor='se')

In many ways, this is similar to displaying the line numbers. Here too, the positions must be calculated after every key press, after events such as cut, paste, undo, redo, new, and open, or activities that lead to a change in cursor positions. Because this too needs to be updated for all the changed content, for every key press, we will update on_content_changed to update this, as follows:

def on_content_changed(event=None...

Adding themes


You may recall that while defining the Themes menu, we defined a color scheme dictionary containing the name and hexadecimal color codes as a key-value pair, as follows:

color_schemes = { 
'Default': '#000000.#FFFFFF',
'Greygarious':'#83406A.#D1D4D1',
'Aquamarine': '#5B8340.#D1E7E0',
'Bold Beige': '#4B4620.#FFF0E1',
'Cobalt Blue':'#ffffBB.#3333aa',
'Olive Green': '#D1E7E0.#5B8340',
'Night Mode': '#FFFFFF.#000000',
}

The theme choice menu has already been defined. Let's add a command callback to handle the selected menu (refer to 2.12.py in the code bundle):

themes_menu.add_radiobutton(label=k, variable=theme_choice, command=change_theme)

Finally, let's define the change_theme function to handle the changing of themes, as follows:

def change_theme(event=None):
    selected_theme = theme_choice.get()
    fg_bg_colors = color_schemes.get(selected_theme)
    foreground_color, background_color = fg_bg_colors.split('.')
    content_text.config(background=background_color, fg=foreground_color...

Creating the context/pop-up menu


Let's complete the editor in this final iteration by adding a contextual menu to the editor (refer to 2.12.py in the code bundle), as shown in the following screenshot:

The menu that pops up on the right-mouse-button click at the location of the mouse cursor is called the context menu or the pop-up menu.

Let's code this feature in the text editor. First define the context menu, as follows:

popup_menu = Menu(content_text)
for i in ('cut', 'copy', 'paste', 'undo', 'redo'):
    cmd = eval(i)
    popup_menu.add_command(label=i, compound='left', command=cmd)
popup_menu.add_separator()
popup_menu.add_command(label='Select All', underline=7, command=select_all)

Then, bind the right-click of a mouse with a callback named show_popup_menu, as follows:

content_text.bind('<Button-3>', show_popup_menu)

Finally, define the show_popup_menu function in the following way:

def show_popup_menu(event):
    popup_menu.tk_popup(event.x_root, event.y_root)

You can now right-click...

Summary


In this chapter we covered the following points:

  • We completed coding the editor in twelve iterations. We started by placing all the widgets on the Toplevel window. We then leveraged some built-in features of the Text widget to code some functionality. We learned some very important concepts of indexing and tagging, which you will find yourself using frequently in Tkinter projects.

  • We also saw how to use the filedialog and messagebox modules to quickly code some common features in programs.

  • If you are feeling adventurous and want to further explore the Text Editor program, I encourage you to have a look at the source code of Python's built-in editor named IDLE, which is written in Tkinter. The source code of IDLE can be found in your local Python library directory in a folder called idlelib. On my Ubuntu, this is located at /usr/lib/python3.4/idlelib.

  • Congratulations! You completed coding your text editor.

lock icon
The rest of the chapter is locked
You have been reading a chapter from
Tkinter GUI Application Development Blueprints
Published in: Nov 2015Publisher: PacktISBN-13: 9781785889738
Register for a free Packt account to unlock a world of extra content!
A free Packt account unlocks extra newsletters, articles, discounted offers, and much more. Start advancing your knowledge today.
undefined
Unlock this book and the full library FREE for 7 days
Get unlimited access to 7000+ expert-authored eBooks and videos courses covering every tech area you can think of
Renews at ₹800/month. Cancel anytime

Author (1)

author image
Bhaskar Chaudhary

Bhaskar Chaudhary is a professional programmer and information architect. He has a decade of experience in consulting, contracting, and educating in the field of software development. He has worked with a large set of programming languages on various platforms over the years. He is an electronics hobbyist and a musician in his free time.
Read more about Bhaskar Chaudhary

Functions

Description

askopenfile

This returns the opened file object

askopenfilename

This returns the filename string, not the opened file object

askopenfilenames

This returns a list of filenames

askopenfiles

This returns a list of open file objects or an empty list if cancel is selected

asksaveasfile

This asks for a filename to save as and returns the opened file object

asksaveasfilename

This asks for a filename...